4.Click on “Next” when the FirstGear window opens.
5.Choose “User PC Installation,” and click on “Next.”
Note: NETGEAR strongly recommends that you exit all Windows programs before running the Setup program.
6.Click on “Next” when the “NETGEAR Print Server Software Installation” window opens.
7.Click on “Next” to install the NETGEAR Print Server program in the Program Files folder.
8.Click on “Next” to title the program folder “FirstGear for Print Server” (the default name). You may also type in a unique name for the print server folder.
Verify that the information on the screen is correct.
9.Click on “Finish” when the “Setup Complete” window opens. The FirstGear Print Server Program is now installed on your PC.
Setting Up Your PC to Recognize the Print Server
You must set up each PC that will print to the print server. Before proceeding, verify that:
•The print cable is connected to the printer port.
•The AC adapter is plugged into the wall socket.
•The Ethernet cable is plugged into the LAN.
To set up each PC:
1.
2.Click on “Setup.”
3.Click on “OK” after checking that the print server and printer connected to it are powered on and that the cables are properly connected.
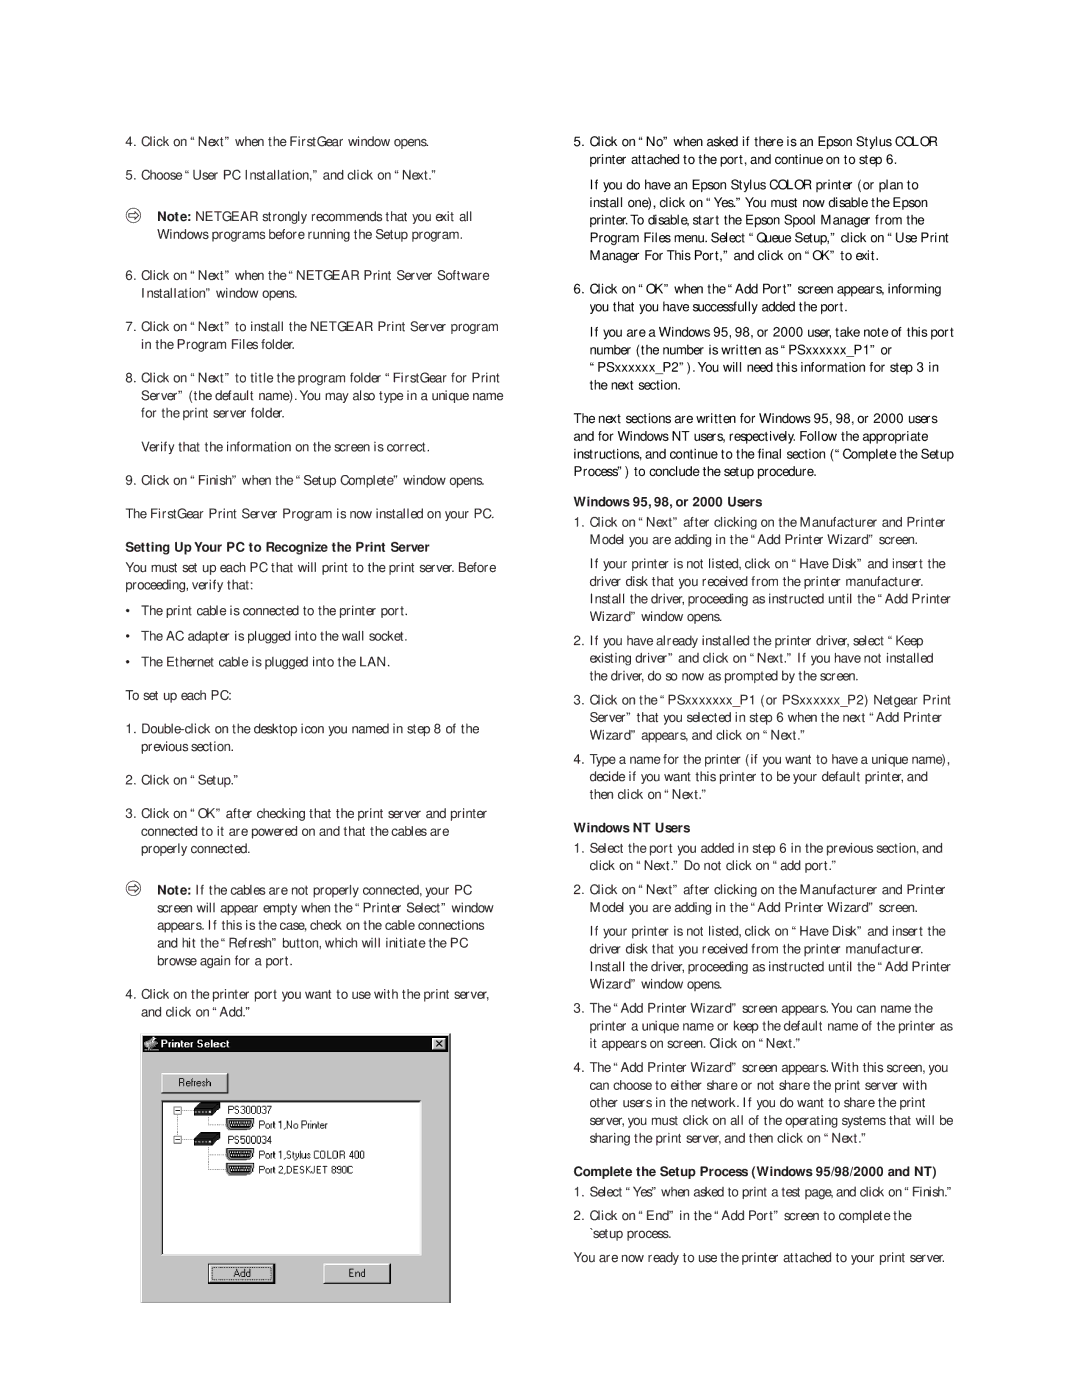
Note: If the cables are not properly connected, your PC screen will appear empty when the “Printer Select” window appears. If this is the case, check on the cable connections and hit the “Refresh” button, which will initiate the PC browse again for a port.
4.Click on the printer port you want to use with the print server, and click on “Add.”
5.Click on “No” when asked if there is an Epson Stylus COLOR printer attached to the port, and continue on to step 6.
If you do have an Epson Stylus COLOR printer (or plan to install one), click on “Yes.” You must now disable the Epson printer. To disable, start the Epson Spool Manager from the Program Files menu. Select “Queue Setup,” click on “Use Print Manager For This Port,” and click on “OK” to exit.
6.Click on “OK” when the “Add Port” screen appears, informing you that you have successfully added the port.
If you are a Windows 95, 98, or 2000 user, take note of this port number (the number is written as “PSxxxxxx_P1” or “PSxxxxxx_P2”). You will need this information for step 3 in the next section.
The next sections are written for Windows 95, 98, or 2000 users and for Windows NT users, respectively. Follow the appropriate instructions, and continue to the final section (“Complete the Setup Process”) to conclude the setup procedure.
Windows 95, 98, or 2000 Users
1.Click on “Next” after clicking on the Manufacturer and Printer Model you are adding in the “Add Printer Wizard” screen.
If your printer is not listed, click on “Have Disk” and insert the driver disk that you received from the printer manufacturer. Install the driver, proceeding as instructed until the “Add Printer Wizard” window opens.
2.If you have already installed the printer driver, select “Keep existing driver” and click on “Next.” If you have not installed the driver, do so now as prompted by the screen.
3.Click on the “PSxxxxxxx_P1 (or PSxxxxxx_P2) Netgear Print Server” that you selected in step 6 when the next “Add Printer Wizard” appears, and click on “Next.”
4.Type a name for the printer (if you want to have a unique name), decide if you want this printer to be your default printer, and then click on “Next.”
Windows NT Users
1.Select the port you added in step 6 in the previous section, and click on “Next.” Do not click on “add port.”
2.Click on “Next” after clicking on the Manufacturer and Printer Model you are adding in the “Add Printer Wizard” screen.
If your printer is not listed, click on “Have Disk” and insert the driver disk that you received from the printer manufacturer. Install the driver, proceeding as instructed until the “Add Printer Wizard” window opens.
3.The “Add Printer Wizard” screen appears. You can name the printer a unique name or keep the default name of the printer as it appears on screen. Click on “Next.”
4.The “Add Printer Wizard” screen appears. With this screen, you can choose to either share or not share the print server with other users in the network. If you do want to share the print server, you must click on all of the operating systems that will be sharing the print server, and then click on “Next.”
Complete the Setup Process (Windows 95/98/2000 and NT)
1.Select “Yes” when asked to print a test page, and click on “Finish.”
2.Click on “End” in the “Add Port” screen to complete the `setup process.
You are now ready to use the printer attached to your print server.