„ Installation: New Construction (unfinished ceilings)


fig.3

1.Once you’ve selected the desired location for the speaker, begin by installing the mounting bracket between adjacent ceiling joists. First attach the mounting wings to the bracket by inserting them into the locking plastic tabs in the side of

the bracket (fig.1). 2. The wings feature progressively elongated sections (1”, 1”, 2”, 2”, 2”, 3”, 3”) with screw holes spaced in one-inch increments. Attach the wings to the joists with the 5 x 50mm flathead screws. For maximum stability, use two screws for each wing. Break off the extra portion of the wing by snapping it at one of the pre-molded “break” lines (fig.2).

3.Complete the pre-wiring before the drywall goes up (see “Tech Tips: Pre- Wiring for New Construction”). Leave an extra few feet of speaker cable, and tie it to the the mounting bracket for later.

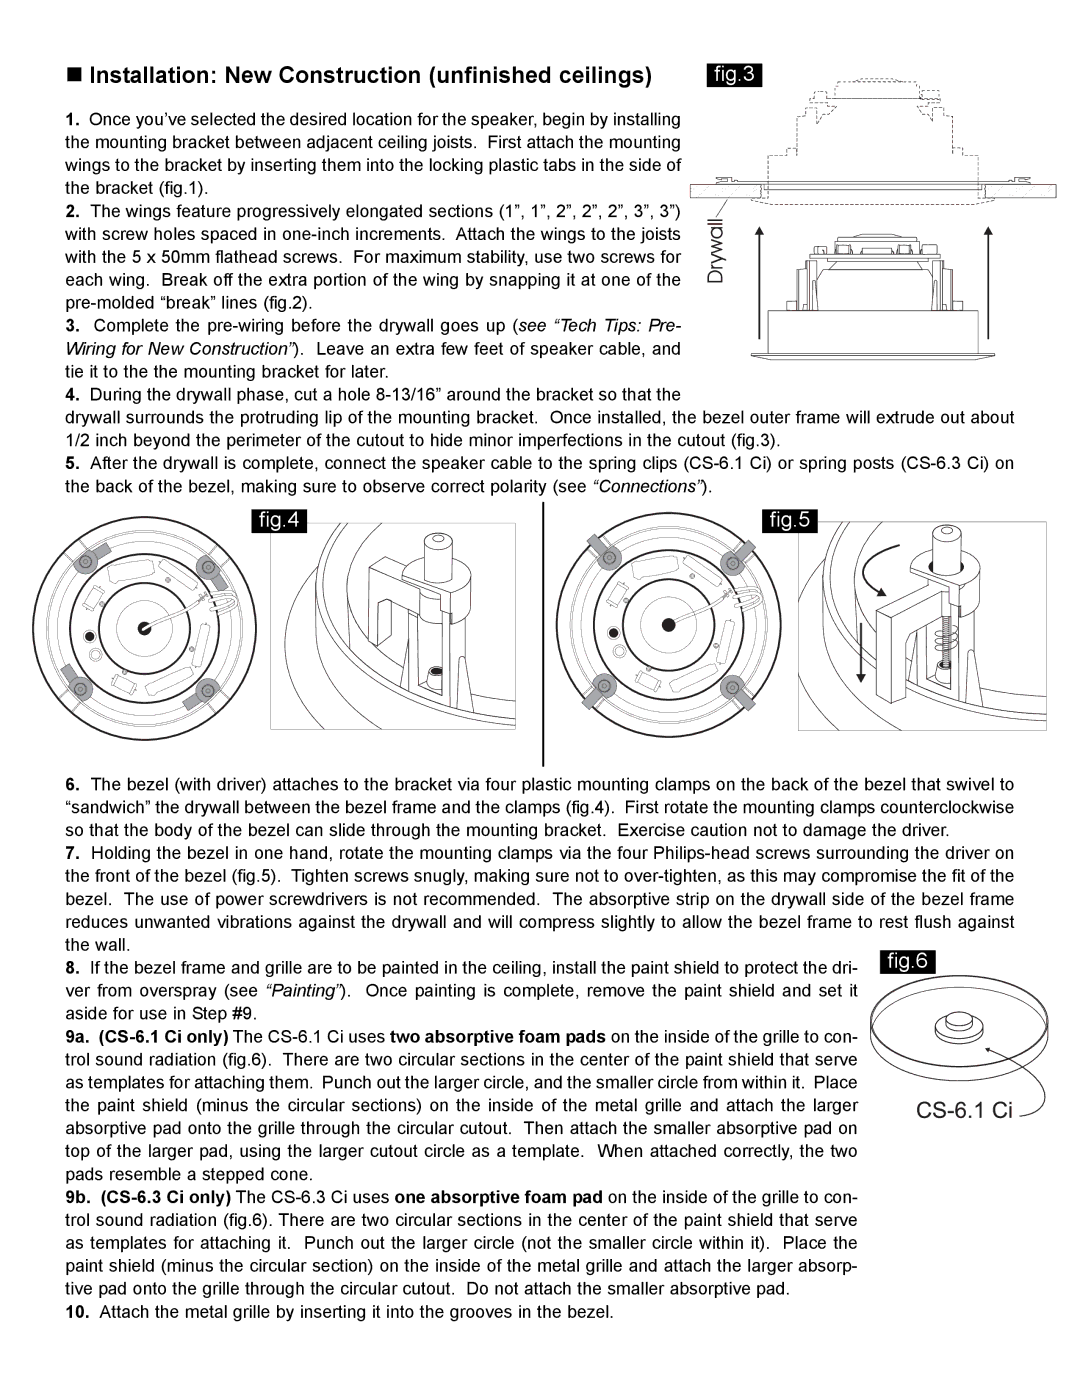
4.During the drywall phase, cut a hole 8-13/16” around the bracket so that the

drywall surrounds the protruding lip of the mounting bracket. Once installed, the bezel outer frame will extrude out about 1/2 inch beyond the perimeter of the cutout to hide minor imperfections in the cutout (fig.3).

5.After the drywall is complete, connect the speaker cable to the spring clips (CS-6.1 Ci) or spring posts (CS-6.3 Ci) on the back of the bezel, making sure to observe correct polarity (see “Connections”).

fig.4

fig.5

6.The bezel (with driver) attaches to the bracket via four plastic mounting clamps on the back of the bezel that swivel to “sandwich” the drywall between the bezel frame and the clamps (fig.4). First rotate the mounting clamps counterclockwise so that the body of the bezel can slide through the mounting bracket. Exercise caution not to damage the driver.

7.Holding the bezel in one hand, rotate the mounting clamps via the four Philips-head screws surrounding the driver on the front of the bezel (fig.5). Tighten screws snugly, making sure not to over-tighten, as this may compromise the fit of the bezel. The use of power screwdrivers is not recommended. The absorptive strip on the drywall side of the bezel frame reduces unwanted vibrations against the drywall and will compress slightly to allow the bezel frame to rest flush against

the wall.

8. If the bezel frame and grille are to be painted in the ceiling, install the paint shield to protect the dri- fig.6 ver from overspray (see “Painting”). Once painting is complete, remove the paint shield and set it

aside for use in Step #9. 9a. (CS-6.1 Ci only) The CS-6.1 Ci uses two absorptive foam pads on the inside of the grille to con-

trol sound radiation (fig.6). There are two circular sections in the center of the paint shield that serve as templates for attaching them. Punch out the larger circle, and the smaller circle from within it. Place

the paint shield (minus the circular sections) on the inside of the metal grille and attach the larger absorptive pad onto the grille through the circular cutout. Then attach the smaller absorptive pad on

top of the larger pad, using the larger cutout circle as a template. When attached correctly, the two pads resemble a stepped cone.

9b. (CS-6.3 Ci only) The CS-6.3 Ci uses one absorptive foam pad on the inside of the grille to con- trol sound radiation (fig.6). There are two circular sections in the center of the paint shield that serve as templates for attaching it. Punch out the larger circle (not the smaller circle within it). Place the paint shield (minus the circular section) on the inside of the metal grille and attach the larger absorp- tive pad onto the grille through the circular cutout. Do not attach the smaller absorptive pad.

10.Attach the metal grille by inserting it into the grooves in the bezel.

Page 3
Image 3
NHT CS-6.1 Ci, CS-6.3 Ci specifications „ Installation New Construction unfinished ceilings

CS-6.1 Ci, CS-6.3 Ci specifications

NHT, a well-known name in the audio industry, has developed the CS-6.1 Ci and CS-6.3 Ci, two exceptional loudspeakers that are designed to deliver high-quality sound performance for audiophiles and casual listeners alike. These models exhibit a blend of advanced technology, elegant design, and impressive features, making them ideal for home theater systems or stereo setups.

The CS-6.1 Ci is a compact bookshelf speaker that strikes a balance between size and audio excellence. It features a 6.5-inch woofer and a 1-inch silk dome tweeter, which work harmoniously to produce a broad frequency range with crystal-clear highs and powerful lows. The CS-6.3 Ci, on the other hand, is a floor-standing speaker that enhances the listening experience with its dual 6.5-inch woofers. This configuration allows the CS-6.3 Ci to achieve a deeper and more impactful bass response, making it a perfect choice for those who crave a more immersive audio experience.

One of the standout characteristics of both models is their use of advanced crossover technology. The speakers come equipped with precision-engineered crossovers that ensure a seamless transition between the woofer and tweeter, thus minimizing distortion and maximizing clarity. This results in a coherent soundstage, where every instrument and vocal is accurately represented, allowing listeners to fully appreciate their favorite music or movie soundtracks.

Another notable feature is the cabinet design. NHT has crafted the CS-6.1 Ci and CS-6.3 Ci with high-quality materials that not only enhance durability but also reduce resonance. The sleek finish and understated aesthetic allow these speakers to blend seamlessly into any decor while making a subtle statement about audio sophistication.

In terms of connectivity, both models are designed with standard binding posts, providing compatibility with a wide range of audio systems. Their sensitivity ratings make them versatile, allowing them to be paired with various amplifiers without compromising sound quality.

Overall, the NHT CS-6.1 Ci and CS-6.3 Ci speakers embody a commitment to high-performance audio. With their innovative technologies, quality construction, and remarkable sound reproduction capabilities, these models cater to the needs of serious listeners who appreciate the fine nuances of music and audio storytelling. Whether used in a home theater setup or as part of a dedicated stereo system, they are sure to elevate the listening experience to new heights.