Thank you for your purchase of the NHT HDP-1 Hybrid Dipole Surround Loudspeakers. Please take a few minutes to read through this Owner’s Manual prior to installing your new speakers. The information provided will help you to obtain maximum perfor- mance from your audio system. If you have questions or need assistance at any time during the installation or operation of your new speakers, please call your NHT dealer or our Toll Free Customer Hotline at:
1-800-NHT-9993
Please retain the HDP-1’s packaging to protect the speakers in
the event that you move or transport them.
!Design
NHT speakers are designed to deliver refined, musical sound from attractive and affordable packages. Our efforts are guided by the study of human hearing and are optimized for real-world use. Every NHT speaker undergoes rigorous testing and quality control at the factory to ensure you years of listening pleasure.
The NHT HDP-1 is designed to provide optimum sound dispersion for the rear (surround) channels in a Dolby Pro-Logic®home theater system. The HDP-1 is a hybrid dipole design which employs a unique combination of dipolar mid-tweeters that radiate sound in two directions, paired with a monopole woofer that fires into the wall for low frequency reinforcement.
NHT recommends the HDP-1 only for Pro-Logic®home theater systems, in which the rear channels receive a monaural signal of limited bandwidth, containing no low bass or high treble information. In these systems, it is beneficial to use specialized speakers for the rear channels that produce diffuse, ambient sound, to surround the viewer with non-localizable effects. The HDP-1 is not suitable for use in discrete Dolby Digital® surround systems.
!Placement
Prior to installing the HDP-1’s, spend some time considering placement options. For best results, mount the HDP-1’s directly to the side of the seating position, not in front of or behind it (Fig. 1). Place the HDP-1’s at a minimum height of 6 feet, to provide sufficient head clearance. Mount the HDP-1’s at least a few inches from the ceiling. The HDP-1 is designed for indoor use only.
Experimentation is the key to finding the best arrangement in your listening environment. Be patient, have fun, and remember that small changes in speaker position can sometimes have a significant effect on the sound. For example, moving the speakers nearer to a corner will tend to increase their bass output, but may result in “boomy” or “muddy” sound.
Fig. 1
Conversely, placing the speakers farther away from corners will tend to decrease their bass output, but may result in greater articulation.
In addition, room furnishings play an important role in absorbing and reflecting soundwaves. Midrange and high frequencies in particular will be absorbed by soft furnishings such as sofas, carpets and curtains. A large number of these soft furnishings will dull the sound, while a “live” room with few furnishings will brighten the sound. If you are willing to spend some time fine-tuning the performance of your system, you will enjoy the benefits for years to come.
!Installation
Note: Whenever an object is affixed to a wall, you must take special care to mount it securely, to prevent it from falling and causing pos- sible injury. Before attempting this installation, carefully evaluate the mounting surface, making sure that its composition and construction are strong enough to support the load safely. If you are unsure about the type or use of mounting hardware for your installation, consult a professional contractor or a knowledgeable hardware store. Make sure that any mounting hardware will not interfere with electrical wiring, plumbing, etc.
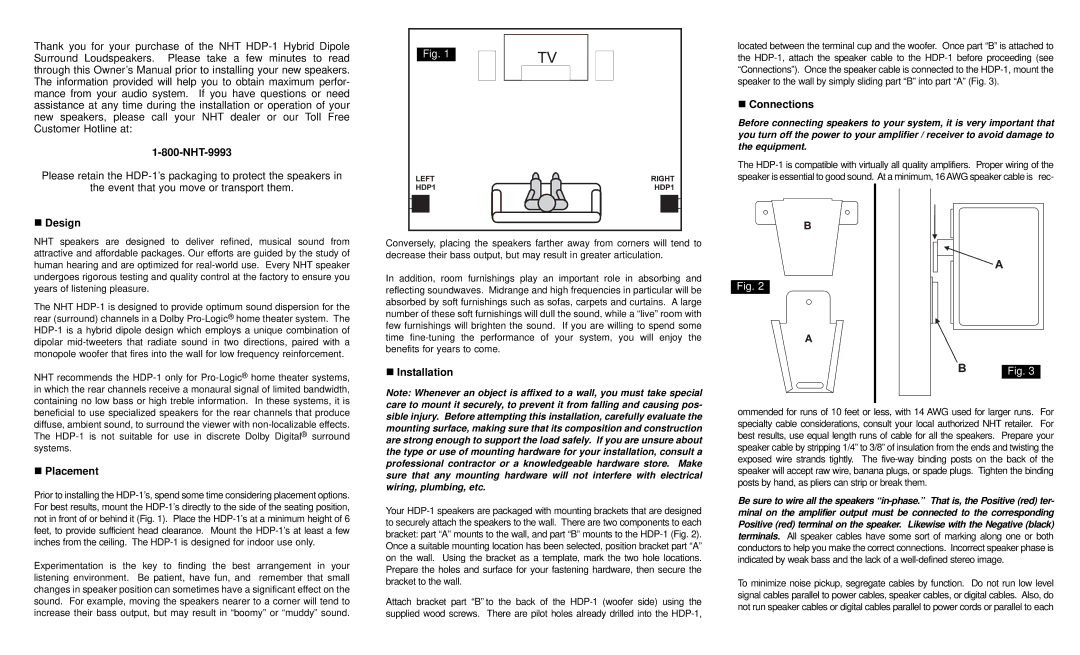
Your HDP-1 speakers are packaged with mounting brackets that are designed to securely attach the speakers to the wall. There are two components to each bracket: part “A” mounts to the wall, and part “B” mounts to the HDP-1 (Fig. 2). Once a suitable mounting location has been selected, position bracket part “A” on the wall. Using the bracket as a template, mark the two hole locations. Prepare the holes and surface for your fastening hardware, then secure the bracket to the wall.
Attach bracket part “B” to the back of the HDP-1 (woofer side) using the supplied wood screws. There are pilot holes already drilled into the HDP-1,
located between the terminal cup and the woofer. Once part “B” is attached to the HDP-1, attach the speaker cable to the HDP-1 before proceeding (see “Connections”). Once the speaker cable is connected to the HDP-1, mount the speaker to the wall by simply sliding part “B” into part “A” (Fig. 3).
!Connections
Before connecting speakers to your system, it is very important that you turn off the power to your amplifier / receiver to avoid damage to the equipment.
The HDP-1 is compatible with virtually all quality amplifiers. Proper wiring of the speaker is essential to good sound. At a minimum, 16AWG speaker cable is rec-
Fig. 2
Fig. 3
ommended for runs of 10 feet or less, with 14 AWG used for larger runs. For specialty cable considerations, consult your local authorized NHT retailer. For best results, use equal length runs of cable for all the speakers. Prepare your speaker cable by stripping 1/4” to 3/8” of insulation from the ends and twisting the exposed wire strands tightly. The five-way binding posts on the back of the speaker will accept raw wire, banana plugs, or spade plugs. Tighten the binding posts by hand, as pliers can strip or break them.
Be sure to wire all the speakers “in-phase.” That is, the Positive (red) ter- minal on the amplifier output must be connected to the corresponding Positive (red) terminal on the speaker. Likewise with the Negative (black) terminals. All speaker cables have some sort of marking along one or both conductors to help you make the correct connections. Incorrect speaker phase is indicated by weak bass and the lack of a well-defined stereo image.
To minimize noise pickup, segregate cables by function. Do not run low level signal cables parallel to power cables, speaker cables, or digital cables. Also, do not run speaker cables or digital cables parallel to power cords or parallel to each