$4!, #!-%2
See pages
Where to Find It
Error Messages See pages
Troubleshooting See pages
Technical Notes
Custom Settings
Introduction
More on Playback
For Your Safety
For Your Safety
Use appropriate cables
Iii
Symbol for Separate Collection in European Countries
Table of Contents
Technical Notes
Table of Contents
General Questions
Camera Setup
Index
Index
How can I get more photos on the memory card?
Can the flash fire automatically when needed?
Viii Q&A Index
Taking Photographs
Viewing, Printing, and Retouching Photographs
Life-Long Learning
Lens
Introduction
Age to the camera
108
Getting to Know the Camera
Introduction Getting to Know the Camera
Camera Body
Multi selector
Advanced Modes Exposure Modes
Mode Dial
Select these modes for full control over camera settings
D40 offers a choice of the following twelve shooting modes
Large-Capacity Memory Cards
Viewfinder Display
Viewfinder
Shutter-Speed and Aperture Displays
Shooting Information Display
MH-23 Quick Charger
Supplied Accessories
DK-5 Viewfinder Eyepiece Cap
Camera Strap
Detaching Lenses
First Steps
Attaching a Lens
Introduction First Steps
Introduction First Steps
Charging and Inserting the Battery
Battery and Charger
Removing the Battery
Introduction First Steps
Basic Setup
Using Camera Menus
Removing Memory Cards
Confirm that the access lamp is off
Inserting Memory Cards
Formatting Memory Cards
Write Protect Switch
Highlight Format memory card
Auto Meter Off
Adjusting Viewfinder Focus
Description
Point-and-Shoot Photography Mode
Tutorial Point-and-Shoot Photography Mode
Holding the Camera
Tutorial Point-and-Shoot Photography Mode
Using a Zoom Lens
Built-in Flash
Turn the camera off when shooting is complete
Shutter-Release Button
Portrait
Creative Photography Digital Vari-Programs
Tutorial Creative Photography Digital Vari-Programs
Auto Flash Off
Night Portrait
Child
Sports
Close Up
Deleting Unwanted Photographs
Basic Playback
Tutorial Basic Playback
Reference
More on Photography All Modes
A, and M Modes
More on Playback
Shooting Information Display
More on Photography All Modes
Focus
Focus Mode
Focus mode Description
Focus Mode
Subject
AF-Area Mode
AF-Area Mode
Reference More on Photography All Modes/Focus
Focus Area Selection
AE-L/AF-L
Focus Lock
Getting Good Results with Autofocus
Focal Plane Position
Manual Focus
Electronic Range Finder
SmallImage sizeLarge
Image Quality and Size
Image Quality and Size
HighImage qualityLow
Format
Image Quality
Image Size
Option
11- /Fn Button
File Names
Image Quality 30/Image Size
Memory Buffer
Shooting Mode
Reference More on Photography All Modes/Shooting Mode
Mode Description
Shutter released about 2s after camera has focused
Self-Timer and Remote Control Modes
Shutter released when camera focuses
Level surface Select one of the following shooting modes
Rotate the mode dial to P, S, A, or M Press
Using the Built-in Flash
Using the Built-in Flash , , , , and Modes
Using the Built-in Flash P, S, A, and M Modes
Button
Flash Mode
Custom Settings 76
Rear-Curtain Sync
ISO Auto
ISO Sensitivity
Sensitivity
ISO Sensitivity
Default Settings
Two-Button Reset
Reference More on Photography All Modes/Two-Button Reset
Option Default
Exposure
Lens Aperture Ring
Flexible Program
Mode P Programmed Auto
Reference P, S, A, and M Modes/Mode P Programmed Auto
Shutter Speed and Camera Shake
Mode S Shutter-Priority Auto
Reference P, S, A, and M Modes/Mode a Aperture-Priority Auto
Mode a Aperture-Priority Auto
Display Description
Mode M Manual
Electronic Analog Exposure Display
Thirty minutes or until the button is pressed a second time
Reference P, S, A, and M Modes/Mode M Manual
Long Time-Exposures
Metering
Exposure
Metering
Method Description
Reference P, S, A, and M Modes/Exposure
Adjusting Shutter Speed and Aperture
Mode Setting
Autoexposure Lock
Exposure Compensation
Flash Level
Flash Compensation
White Balance
White Balance
Image Review
Auto Off Timers
Viewing Photographs on the Camera
Auto Image Rotation 88/Rotate Tall
Retouch History1
Photo Information
File Information
Shooting Data,
Histogram
Viewing Multiple Images Thumbnail Playback
Highlights
Taking a Closer Look Playback Zoom
This option can be used to delete multiple photographs
Protecting Photographs from Deletion
Deleting Individual Photographs
Delete
Connecting the USB Cable
Connecting to a Computer
Before Connecting the Camera
Mac OS
Drag the camera volume Nikon D40 into the Trash
Windows XP Home Edition/Windows XP Professional
Windows 2000 Professional
Printing Via Direct USB Connection
Printing Photographs
Printing Via Direct USB Connection
Connecting the Printer
Size, Border, and Time Stamp
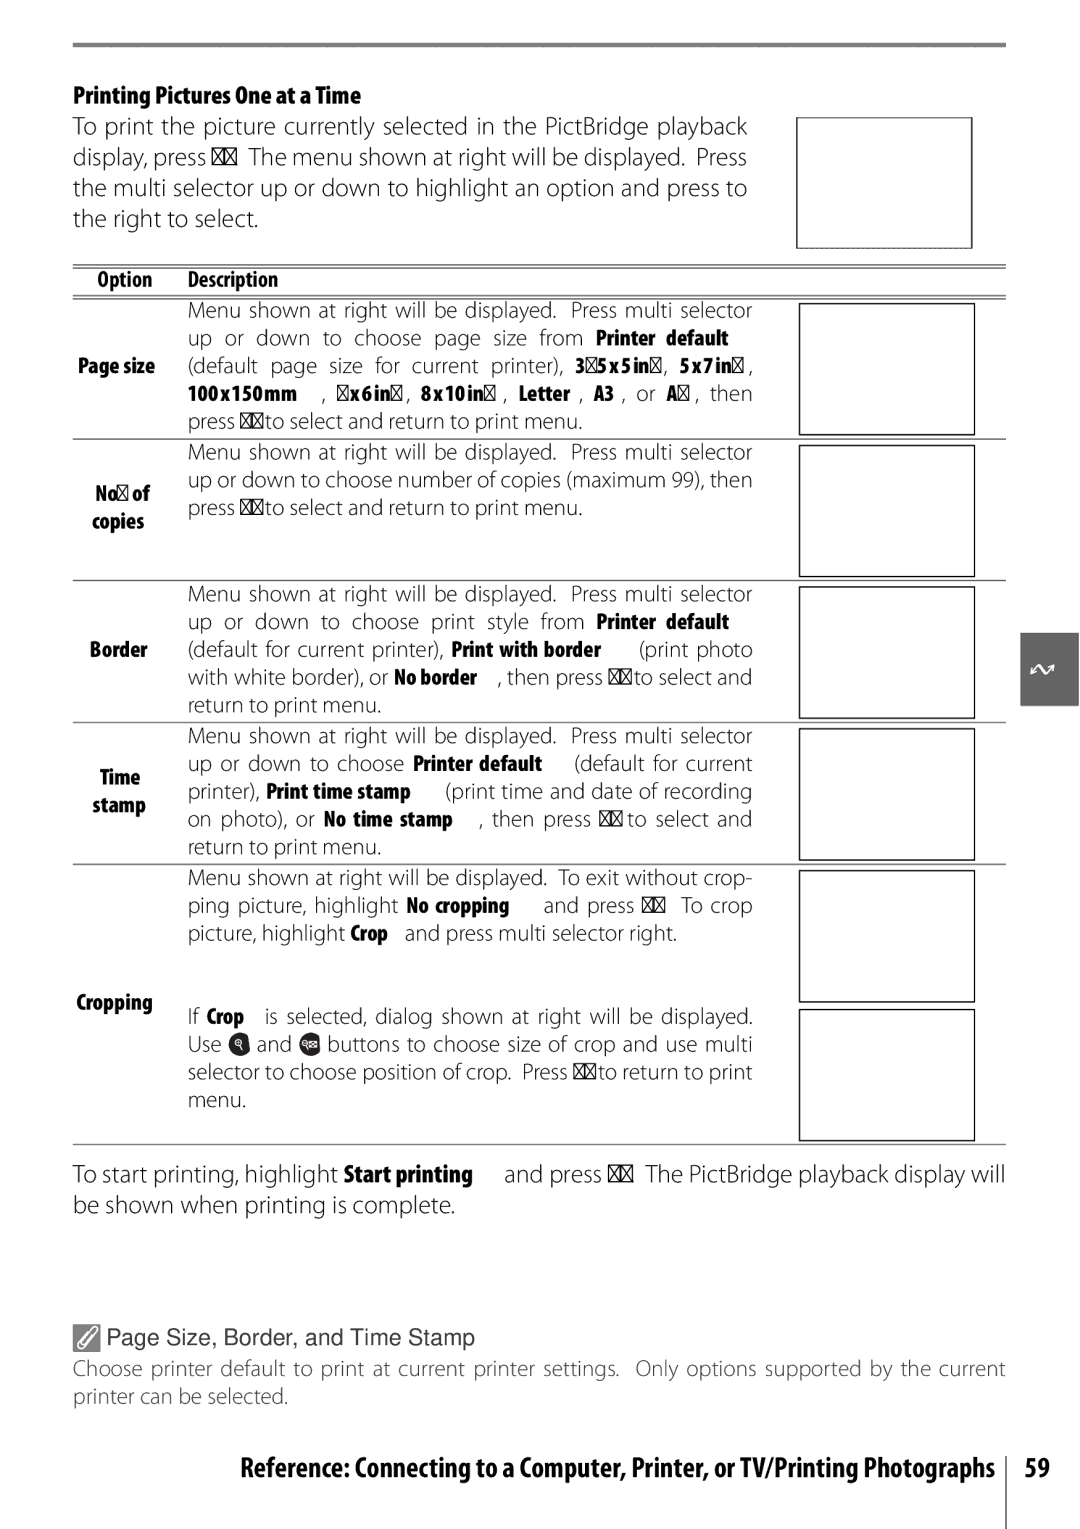
Printing Pictures One at a Time
Interrupting Printing
Printing Multiple Pictures
Printing Selected Photographs
Choosing Print select displays the menu shown in Step
Print Set
Creating a Dpof Print Order Print Set
Recorded to video tape the camera monitor will remain off
Viewing Photographs on TV
Tune the television to the video channel
Return to previous menu
Using Camera Menus
Personalize camera settings
Move cursor up Increase number
To modify menu settings
Menu Guide/Using Camera Menus
Selecting Multiple Pictures
Playback Options The Playback Menu
Delete
Delete menu contains the following options
Choose a folder for playback
Playback Folder
Rotate Tall
Menu Guide/Playback Options The Playback Menu
Following operations can be performed during a slide show
Slide Show
Print Set Dpof
Optimize Image
Shooting Options The Shooting Menu
Optimize Image P, S, A, and M Modes
Menu Guide/Shooting Options The Shooting Menu
Color Mode
Default setting Auto
Default setting IIIa sRBG
Default setting ±0
Select image quality
Fine-Tuning White Balance
Preset White Balance
White Balance P, S, A, and M Modes
Measuring a Value for Preset White Balance
Copying White Balance from a Photograph
Noise Reduction
Adjust ISO sensitivity
ISO Sensitivity
Beep
Custom Settings
Reset
Menu Guide/Custom Settings
No Memory Card?
Shooting Mode
Menu Guide/Custom Settings
Metering P, S, A, and M Modes Only
ISO Auto P, S, A, and M Modes Only
Adjust flash level
Flash Level P, S, A, and M Modes Only
AF-assist All Modes Except
Choose the function performed by the Fn button
11 /Fn Button
AE-L/AF-L
AE Lock
Optional SB-400 Speedlight
Auto off Timers
Using an AC Adapter
Built-in Flash P, S, A, and M Modes Only
Remote on Duration
Self-Timer
Menu Guide/Basic Camera Settings The Setup Menu
Basic Camera Settings The Setup Menu
CSM/Setup menu
Info Display Format
Menu Guide/Basic Camera Settings The Setup Menu
Format Memory Card
Classic format is shown below
LCD Brightness
Video Mode
Auto Shooting Info
World Time
Image Comment
Language Lang
Image Comment
Choose the language for camera menus and messages from
Folder Names
Folders
Delete Delete all empty folders on the memory card
Naming Folders
View the current camera firmware version
File No. Sequence
Mirror Lock-Up
Firmware Version
Image Dust Off
Dust off Ref Photo
Auto Image Rotation
Image Quality
Creating Retouched Copies The Retouch Menu
Description Lighting
Retouching Copies
To create retouched copies from the retouch menu
Lighting
Menu Guide/Creating Retouched Copies The Retouch Menu
Trim Image Quality and Size
Red-Eye Correction
Trim
Color
Monochrome
Filter Effects
Small Picture
Viewing Small Pictures
Highlight Select images
Image Overlay
Image Overlay
Picture Angle and Focal Length
Optional Accessories
Technical Notes/Optional Accessories
Use Only Nikon Brand Electronic Accessories
Type G and D Lenses
Focus Mode
Lens/accessory
Lenses
TC-16A AF Teleconverter Non-AI lenses
AF-Assist Illumination/Red-Eye Reduction
SB-400, SB-800, and SB-600 Speedlights
SB-R200 Wireless Remote Speedlight
SU-800 Wireless Speedlight Commander
Optional Flash Units Speedlights
AS-15 Accessory Shoe Adapter
Flash mode/feature
Flash mode SB-26, SB-25, SB-24 SB-21B2, SB-29s2
Use Only Nikon Flash Accessories
Mode
Technical Notes/Optional Accessories
Memory Cards
Other Accessories
Approved Memory Cards
Filters
Software
Accessories for the D40
Open the battery-chamber c and power-connector d Covers
Remote Controls
Storage
Cleaning
Caring for the Camera
Technical Notes/Caring for the Camera
Present, proceed to Step
Use a Reliable Power Source
Low-Pass Filter
Low-pass filter
Lens contacts Keep the lens contacts clean
Caring for the Camera and Battery Cautions
Foreign Matter on the Low-Pass Filter
Turn the product off before replacing the battery
AF-A mode
Troubleshooting
Technical Notes/Troubleshooting
Problem Solution
Technical Notes/Troubleshooting
Rotation
Message
Camera Error Messages and Displays
Set Playback folder to All
Appendix
Technical Notes/Appendix
Following defaults are restored with Custom Setting R Reset
Defaults for other settings are listed below
Choose a flash mode Modes
Command Dial
Image size File size MB1
Exposure Program Mode P
Exposure program for mode P is shown in the following graph
Memory Card Capacity and Image Quality/Size
Supported Standards
Flash Control
Shutter Speeds Available with the Built-in Flash
Aperture, Sensitivity, and Flash Range
Dir. sunlight
White Balance and Color Temperature
Fine tuning White balance None Auto
Technical Notes/Specifications
Specifications
Matrix
Technical Notes/Specifications
Specifications
EN-EL9 Rechargeable Li-ion Battery
Battery Life
Rated input
Index
Image size shooting menu, 30
Video mode setup menu, 62
126
0RINTEDNIN 4HAILAND �-!������
 Page Size, Border, and Time Stamp