3. Using TV Features

25

3D Video

This section provides Instructions for viewing 3D video using 3D glasses and the TV’s 3D feature. The 3D options are found in the Adjust > 3D Mode menu described on page 34.

Initial Setup

1.Check if your HDMI 3D video source device outputs a 1080p 60 Hz signal. This information will be needed when you assign an input name in the New Device Found screen.

2.If your 3D glasses came with an emitter box, connect the emitter box to the 3D GLASSES EMITTER jack. Place the box in front of the TV where there is an unobstructed path to the glasses.


RS-232C


DVI/PC INPUT


ANT


R

AUDIO

L


L


AVR


3D


HDMI


AUDIO


Y/ VIDEO

Pb

Pr


OUTPUT


2

GLASSES

1

2

3

R


INPUT

EMITTER


Y/ VIDEO

Pb

Pr

INPUT 1


DIGITAL

R

AUDIO

L

(480i / 480p / 720p / 1080i)


-NetCommand


3D


Output


AU IO


OUTPUT


GLASSES

EMITTER

3.Power on the TV and the source device.

4.Connect the source device to the TV’s HDMI input.

5.When the New Device Found screen displays, name the input according to the table below.

The signal type and choice of name are important because the TV will process the video signal differently depending on the name you assign.

If your source device is a Blu-ray disc or game console, the signal must be 1080p at 60 Hz.

Source


Assign

of 3D

3D Video Signal

Name

Video


Computer

Recommended: 1080p 60 Hz

PC


(1920 X 1080). The image will fill


the TV screen.


Other 60-Hz computer video


signals compatible with the TV


will display with black bars. See


“Computer Display Formats” on


page 27.


Any other

To see 3D video, the signal must

Any

3D video

be 1080p 60 Hz

other

source


name


6.Press BACK to close the New Device Found screen.

Watching 3D Video

Note: 3D glasses are required.

1.Press ACTIVITY.

2.Highlight the icon for the 3D video device and press

ENTER.

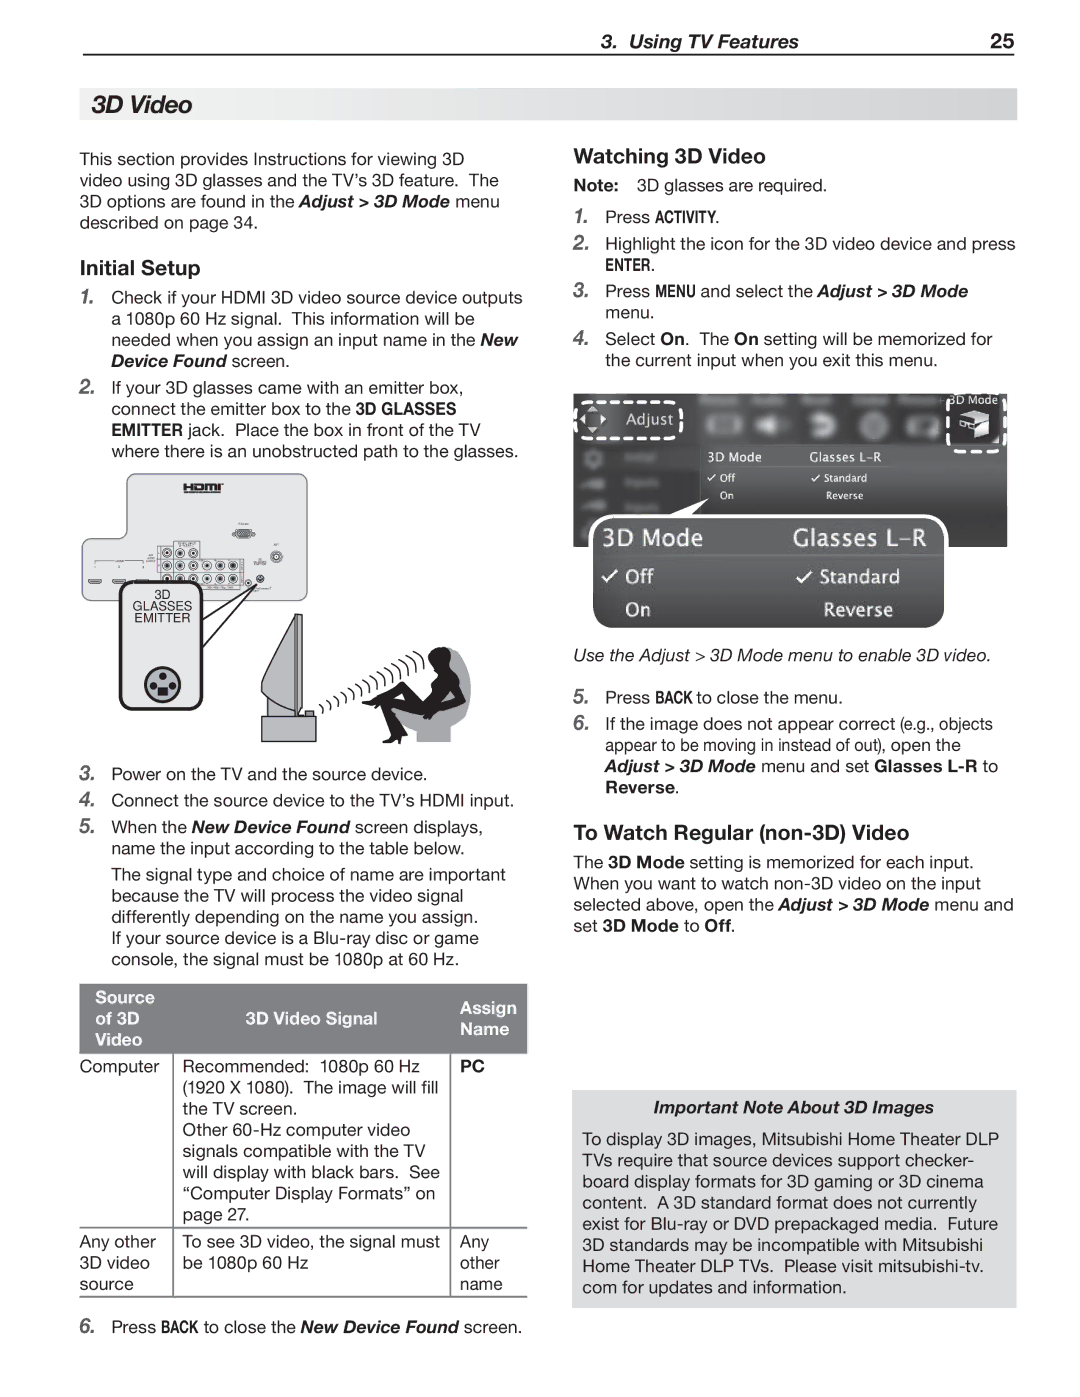
3.Press MENU and select the Adjust > 3D Mode menu.

4.Select On. The On setting will be memorized for the current input when you exit this menu.

Use the Adjust > 3D Mode menu to enable 3D video.

5.Press BACK to close the menu.

6.If the image does not appear correct (e.g., objects appear to be moving in instead of out), open the Adjust > 3D Mode menu and set Glasses L-Rto Reverse.

To Watch Regular (non-3D) Video

The 3D Mode setting is memorized for each input. When you want to watch non-3D video on the input selected above, open the Adjust > 3D Mode menu and set 3D Mode to Off.

Important Note About 3D Images

To display 3D images, Mitsubishi Home Theater DLP TVs require that source devices support checker- board display formats for 3D gaming or 3D cinema content. A 3D standard format does not currently exist for Blu-ray or DVD prepackaged media. Future 3D standards may be incompatible with Mitsubishi Home Theater DLP TVs. Please visit mitsubishi-tv. com for updates and information.

Page 25
Image 25
Nikon C9 SERIES manual Initial Setup, Watching 3D Video, To Watch Regular non-3D Video, Important Note About 3D Images

837 Series, 737 Series, C9 SERIES specifications

Nikon has long been a respected name in the optics and imaging industry, and its C9 SERIES, 737 Series, and 837 Series binoculars exemplify the company’s commitment to quality and performance. Each series offers unique features that cater to different users, from outdoor enthusiasts to avid birdwatchers.

The C9 SERIES binoculars are designed for versatility and durability. They boast a robust construction, making them ideal for rugged outdoor conditions. With an advanced multilayer coating on the lenses, the C9 SERIES provides exceptional light transmission, ensuring bright and clear images even in low-light situations. The ergonomic design enhances user comfort, allowing for extended viewing sessions without fatigue. Additionally, the C9 SERIES is nitrogen-filled and O-ring sealed, making them waterproof and fog proof, which is essential for various climates.

Moving on to the 737 Series, these binoculars cater to users seeking sophistication paired with performance. Featuring high-definition optics, the 737 Series ensures superior resolution and color fidelity, elevating the viewing experience. The inclusion of phase-corrected prisms enhances image sharpness and contrast. With a sleek design and lightweight build, the 737 Series is perfect for travelers or those who need to carry their binoculars over long distances. The twist-up eyecups accommodate eyeglass wearers, providing an adaptable viewing experience.

Lastly, the 837 Series stands out with its advanced technology and premium features, aimed at serious nature observers or sports enthusiasts. The 837 Series binoculars come with a high magnification range, which allows for detailed views of distant subjects. Featuring ED (Extra-low Dispersion) glass, these binoculars minimize color fringing and provide exceptional clarity. The wide field of view and close-focus capabilities make them versatile for both distant wildlife watching and close-up observation. Additionally, the 837 Series incorporates a comfortable grip and durable materials, ensuring longevity in various environments.

In summary, Nikon's C9 SERIES, 737 Series, and 837 Series binoculars offer a range of options tailored to different needs. From rugged outdoor performance to high-definition clarity and advanced features, these binoculars embody Nikon’s dedication to excellence in optical technology. Users can find a reliable, high-quality pair of binoculars that suit their specific viewing requirements, whether for casual use or serious observation.