Appendices

73


Appendix E: Troubleshooting, continued


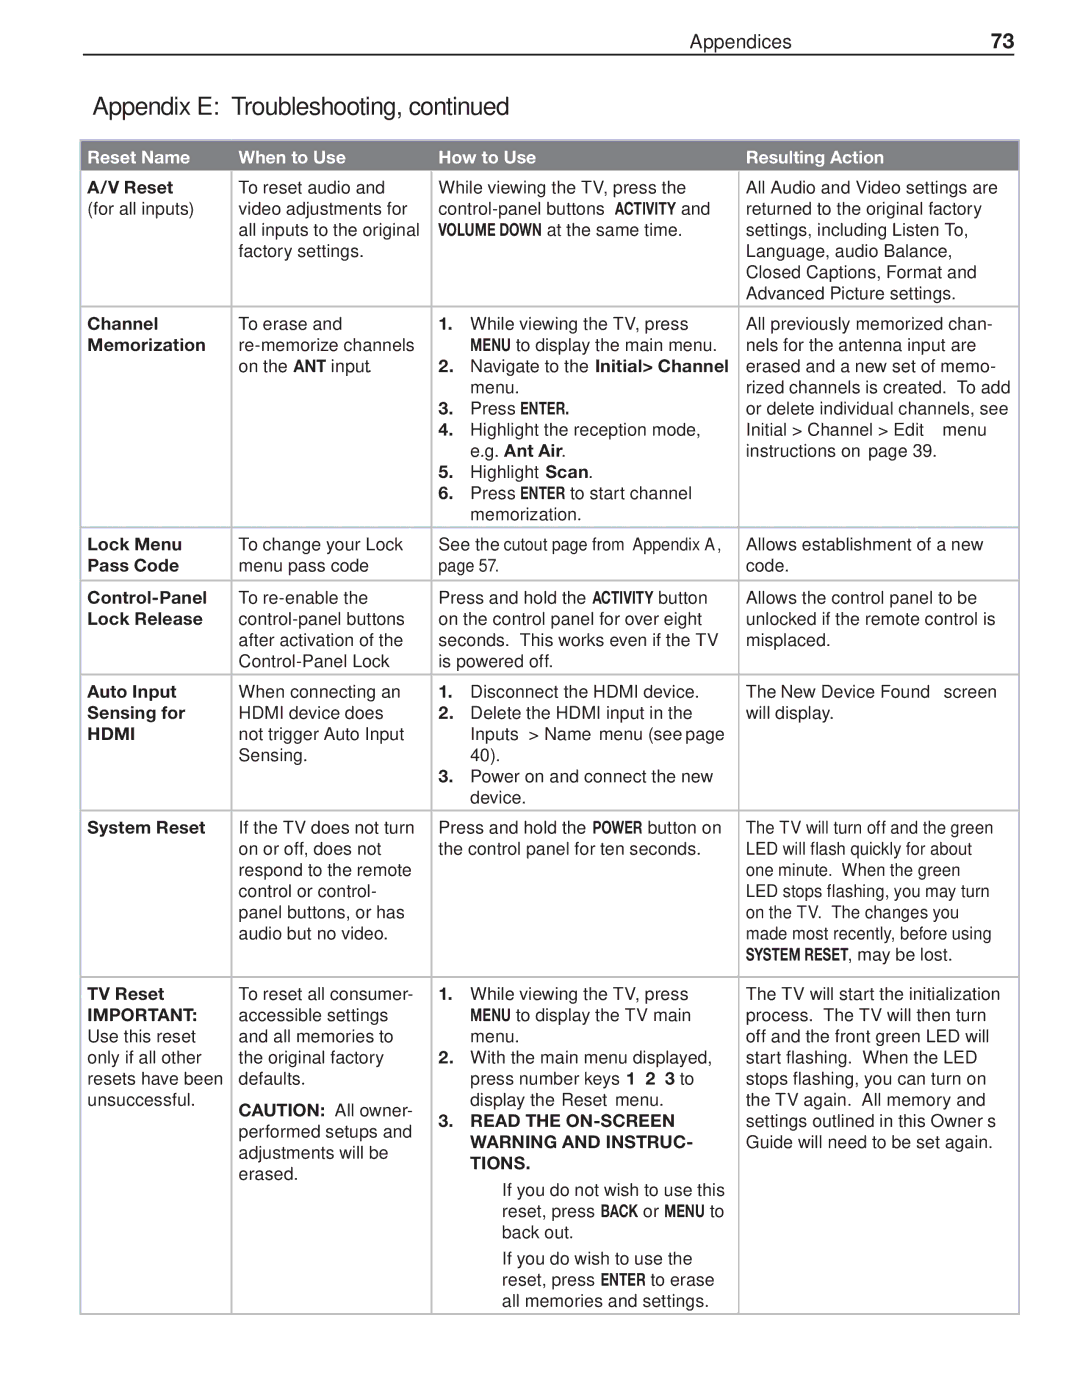
Reset Name


When to Use


How to Use


Resulting Action


A/V Reset


To reset audio and


While viewing the TV, press the


All Audio and Video settings are


(for all inputs)


video adjustments for


control-panel buttons ACTIVITY and


returned to the original factory


all inputs to the original


VOLUME DOWN at the same time.


settings, including Listen To,


factory settings.


Language, audio Balance,


Closed Captions, Format and


Advanced Picture settings.


Channel


To erase and


1.

While viewing the TV, press


All previously memorized chan-


Memorization


re-memorize channels


MENU to display the main menu.


nels for the antenna input are


on the ANT input.


2.

Navigate to the Initial> Channel


erased and a new set of memo-


menu.


rized channels is created. To add


3.

Press ENTER.


or delete individual channels, see


4. Highlight the reception mode,


Initial > Channel > Edit menu


e.g. Ant Air.


instructions on page 39.


5.

Highlight Scan.


6. Press ENTER to start channel


memorization.


Lock Menu


To change your Lock


See the cutout page from Appendix A,


Allows establishment of a new


Pass Code


menu pass code


page 57.


code.


Control-Panel


To re-enable the


Press and hold the ACTIVITY button


Allows the control panel to be


Lock Release


control-panel buttons


on the control panel for over eight


unlocked if the remote control is


after activation of the


seconds. This works even if the TV


misplaced.


Control-Panel Lock


is powered off.


Auto Input


When connecting an


1.

Disconnect the HDMI device.


The New Device Found screen


Sensing for


HDMI device does


2.

Delete the HDMI input in the


will display.


HDMI


not trigger Auto Input


Inputs > Name menu (see page


Sensing.


40).


3. Power on and connect the new


device.


System Reset


If the TV does not turn


Press and hold the POWER button on


The TV will turn off and the green


on or off, does not


the control panel for ten seconds.


LED will flash quickly for about


respond to the remote


one minute. When the green


control or control-


LED stops flashing, you may turn


panel buttons, or has


on the TV. The changes you


audio but no video.


made most recently, before using


SYSTEM RESET, may be lost.


TV Reset


To reset all consumer-


1.

While viewing the TV, press


The TV will start the initialization


IMPORTANT:


accessible settings


MENU to display the TV main


process. The TV will then turn


Use this reset


and all memories to


menu.


off and the front green LED will


only if all other


the original factory


2.

With the main menu displayed,


start flashing. When the LED


resets have been


defaults.


press number keys 1 2 3 to


stops flashing, you can turn on


unsuccessful.


CAUTION: All owner-


display the Reset menu.


the TV again. All memory and


3.

READ THE ON-SCREEN


settings outlined in this Owner’s


performed setups and


WARNING AND INSTRUC-


Guide will need to be set again.


adjustments will be


TIONS.


erased.


• If you do not wish to use this


reset, press BACK or MENU to


back out.


• If you do wish to use the


reset, press ENTER to erase


all memories and settings.


Page 73
Image 73
Nikon C9 SERIES, 837 Series, 737 Series manual Initial Channel Edit menu, New Device Found screen, Read the ON-SCREEN, Tions

837 Series, 737 Series, C9 SERIES specifications

Nikon has long been a respected name in the optics and imaging industry, and its C9 SERIES, 737 Series, and 837 Series binoculars exemplify the company’s commitment to quality and performance. Each series offers unique features that cater to different users, from outdoor enthusiasts to avid birdwatchers.

The C9 SERIES binoculars are designed for versatility and durability. They boast a robust construction, making them ideal for rugged outdoor conditions. With an advanced multilayer coating on the lenses, the C9 SERIES provides exceptional light transmission, ensuring bright and clear images even in low-light situations. The ergonomic design enhances user comfort, allowing for extended viewing sessions without fatigue. Additionally, the C9 SERIES is nitrogen-filled and O-ring sealed, making them waterproof and fog proof, which is essential for various climates.

Moving on to the 737 Series, these binoculars cater to users seeking sophistication paired with performance. Featuring high-definition optics, the 737 Series ensures superior resolution and color fidelity, elevating the viewing experience. The inclusion of phase-corrected prisms enhances image sharpness and contrast. With a sleek design and lightweight build, the 737 Series is perfect for travelers or those who need to carry their binoculars over long distances. The twist-up eyecups accommodate eyeglass wearers, providing an adaptable viewing experience.

Lastly, the 837 Series stands out with its advanced technology and premium features, aimed at serious nature observers or sports enthusiasts. The 837 Series binoculars come with a high magnification range, which allows for detailed views of distant subjects. Featuring ED (Extra-low Dispersion) glass, these binoculars minimize color fringing and provide exceptional clarity. The wide field of view and close-focus capabilities make them versatile for both distant wildlife watching and close-up observation. Additionally, the 837 Series incorporates a comfortable grip and durable materials, ensuring longevity in various environments.

In summary, Nikon's C9 SERIES, 737 Series, and 837 Series binoculars offer a range of options tailored to different needs. From rugged outdoor performance to high-definition clarity and advanced features, these binoculars embody Nikon’s dedication to excellence in optical technology. Users can find a reliable, high-quality pair of binoculars that suit their specific viewing requirements, whether for casual use or serious observation.