Digital Camera
Nikon Guide to Digital Photography With
Attaching the Camera Strap
Attach the camera strap as shown below
Symbols and Conventions
Memory Cards
For Your Safety
Do not disassemble
Observe proper precautions when han- dling batteries
Iii
Fornia
Comply with copyright notices
Table of Contents
Menu Guide
Technical Notes
Use Only Nikon Brand Electronic Accessories
Viii
Introduction
Before Taking Important Pictures
Life-Long Learning
Mode selector
Parts of the Camera
Lens cover Closed
Scene
Multi selector
Menu navigation Move
9999 /9999
Monitor
Shooting mode
MV-11 COOL-STATION
EH-63 AC Adapter
Removing the Camera from the Cool
Remove the camera as shown below
Inserting the Battery
Inserting the Battery
First Steps
Charging the Battery
Charging the Battery
Removing the Battery from the Camera
Description
EN-EL8 Batteries
EH-63 AC Adapter
Inserting Memory Cards
Inserting Memory Cards
Close the memory card slot cover
Formatting Memory Cards
Removing Memory Cards
Basic Setup
Battery exhausted
Auto Power off Stand-by Mode
Turning the Camera On
Camera Clock
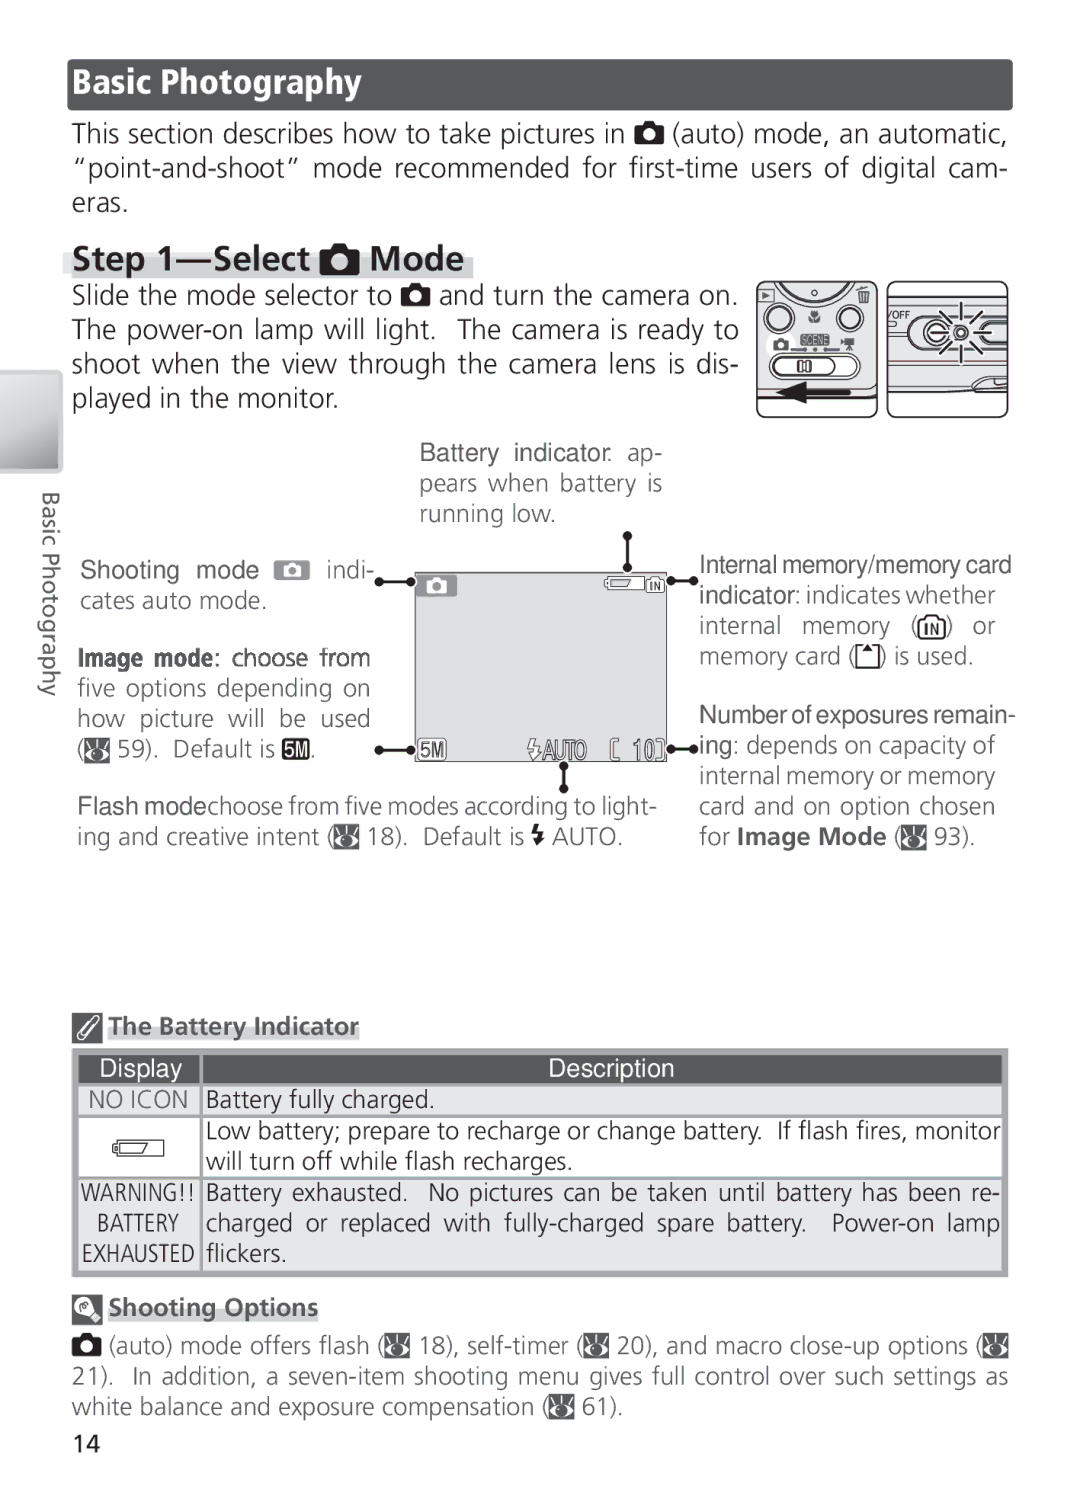
Select Mode
Basic Photography
Display Description
Frame the Picture
Don’t Block the Shot
Digital Zoom
Focus and Shoot
Focus
Take the picture
During Recording
View the Results
Press the button Picture will be displayed in the monitor
View additional pictures
To return to shooting mode, press the button again
Using the Flash
How it works When to use it
More on Photography
Following flash modes are available
When Lighting Is Poor
Default Flash Mode
Camera Shake Icon
Dust or Mist
Taking Pictures with the Self-Timer
Easy Close-ups Macro Close-up Mode
Macro Close-up Mode
Scene Mode
Scene Mode
Help
Other Options
Using the Guides
Framing Assist , , ,
Portrait Assist
Landscape Assist
Auto
Off †
Sports Assist
Focus, Exposure, and White Balance
Night Portrait Assist
Other Scenes
To select a scene from the scene menu
20, or macro close-up
Tions are noted on the pages that follow
Preserves the deep hues seen in sunsets and sunrises
Slow shutter speeds are used to produce stunning night
Noise Reduction
Close up
Off Use tripod
Underwater Mode Panorama Assist
Create a digital audio recording
Taking Pictures for a Panorama
Voice Recordings
Making a Voice Recording
Making a Voice Recording
Voice Recordings
Playing Voice Recordings
Deleting Voice Recordings
Copying Voice Recordings
Highlight Selected files
Movie Mode
Movies
To choose the type of movie that will be recorded
Max. length
Following options are available for Auto-focus mode
Default
Camera adjusts focus continuously
Single AF
Recording Movies
Recording Time-Lapse Movies
Highlight Set interval time
Recording Movies
Use a Reliable Power Source
AE Lock
Viewing Movies
17, 41, movies are indicated By a
Multi selector. Playback controls appear at
Top of the display press the multi selector left or right
More on Playback
Viewing Pictures on the Camera
Viewing Multiple Pictures Thumbnail Playback
Viewing Pictures
Taking a Closer Look Playback Zoom
Cropped Copies
Enhancing Contrast D-Lighting
Lighting
Voice Memos Recording and Playback
Voice memo can be recorded and appended to any
Voice Memos
Choosing a Video Mode
Viewing Pictures on TV
Viewing Pictures on TV
Before Connecting the Camera Choosing a USB Option
Camera setup menu. After consulting the follow
Viewing Pictures on a Computer
Connecting the USB Cable
Highlight PTP or Mass storage
Transferring Pictures
During Transfer
Transferring Pictures from Internal Memory
Sound Files
Disconnecting the Camera
Drag the untitled camera volume no Name into the Trash
Windows Millennium Edition Me
Windows 98 Second Edition SE
Printing Pictures
Print Set
Pictures can be printed by any of the following methods
Highlight Print selected
Print Set and Digital Print Order Format Dpof
Print Set
Print-Order Icon
Printing Via Direct USB Connection
Thumbnail Display
Printing Pictures One at a Time
Printing Multiple Pictures
Printing Pictures
PictBridge
Highlighted in the thumbnail list, press the center
Multi selector. The menu shown at right will be
Light an option
Option Description
Printing Multiple Pictures
Dpof printing
5x7, Postcard, 100mmx150mm
Prints
Dpof Printing
Menu Guide
Shooting Menu
Shooting menu contains the following options
Exp. +
Image Mode
Image Mode
Size
Option
Preset White Balance
White Balance
White Balance
Restrictions on Camera Settings
Exposure Compensation
Continuous
Memory Buffer
Interval Timer Photography
Interval Timer Photography
Best Shot Selector BSS
Off
Highlight BSS picture
Restrictions on BSS
Sensitivity
Color Options
Sensitivity
Color Options
Playback Menu
Playback menu contains the following options
To display the playback menu
Selecting Multiple Pictures
Slide Show
Slide Shows
Loop
Delete
Protect
Delete menu contains the following options
Transfer Marking
Select images Mark selected pictures for transfer
Restrictions on Auto Transfer
Small Picture
To copy a picture at a smaller size
Small Picture
Copy Copy
Shown at right
All
Copy
Setup Menu
Setup menu contains the following options
To display the setup menu
Welcome Screen
Welcome Screen
Small Pictures and Cropped Copies
To switch between home and travel destination time zones
Date
Time Zone
Date
Time Zones
GMT + Location
Monitor Settings
Photo Info
Following display options are available
Brightness
Date Imprint
Date Counter
Date Imprint
Sound Settings
Blur Warning
Auto Off
Format Memory Format Card
Format Card
Format
Reset all
Language
Interface
AF Assist
Resetting File Numbering to
Menus Menus
Firmware Version
Normal
Optional Accessories
Technical Notes
Approved Memory Cards
Caring for the Camera
Handle the lens and all moving parts with care
Cleaning
Avoid contact with liquid crystal
Do not use alcohol, thinner, or other volatile chemicals
Storage
Batteries
Error Messages
Problem
Flashes
Display Problem
Problem Solution
Troubleshooting
Electronically-Controlled Cameras
Info
Night landscape, or Dusk/Dawn as appropriate to
Choose correct video mode
Picture has been cropped to below 320 × Picture is a movie
Ies created with these options
Lighting, or small picture options
Appendix Focus Lock, File Storage, and Date Imprint
Focus Lock
Getting Good Results with Autofocus
Image mode
MB memory card
Original Copy Audio file Type
Identifier Extension
File Storage Image File and Folder Names
Printing the Date and Time of Recording on Pictures
Date Imprint Versus the Print Set Date Option
Date imprint Print set Date
Specifications
Self-timer
Power sources
Battery life
Dimensions
EN-EL8 Rechargeable Li-ion Battery
EH-63 AC Adapter
Symbols
Index
Small picture
6MA08311