$4!, #!-%2
Trademark Information
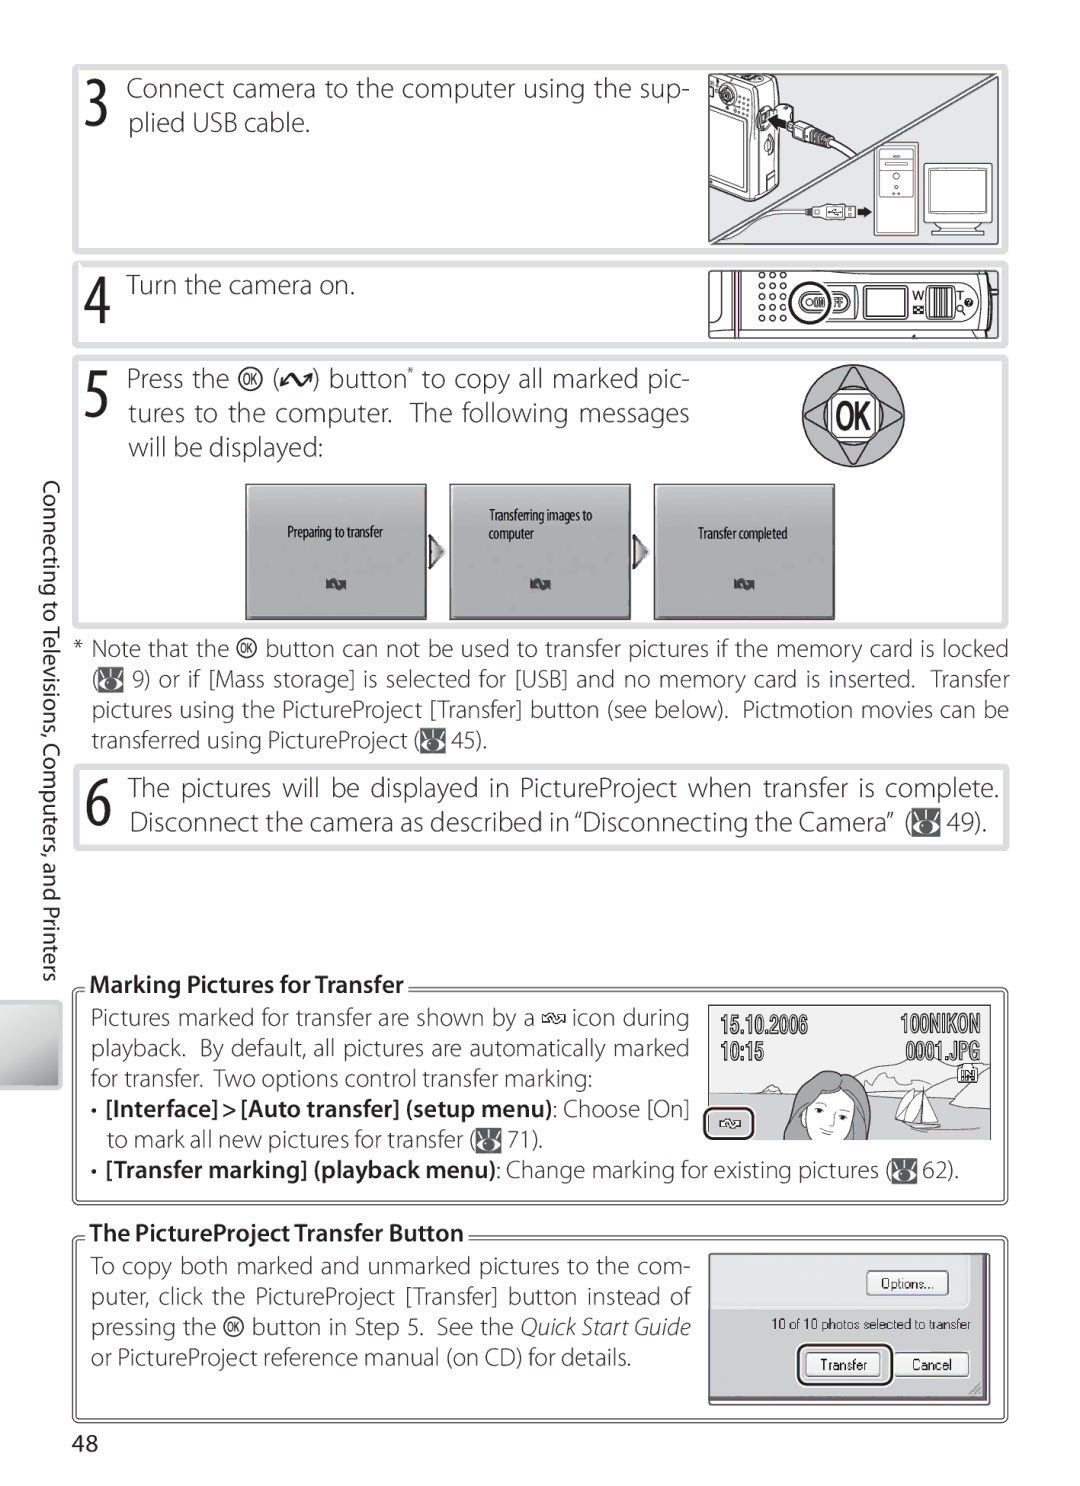
Basic Photography and Playback
Introduction First Steps Camera Operations
Menu Guide Technical Notes
Memory Cards
Do not disassemble
For Your Safety
Turn off in the event of malfunction
Handle the camera strap with care
Iii
This equipment has been tested and found to
Comply with copyright notices
Symbol for Separate Collection in European Countries
Disposing of Data Storage Devices
Table of Contents
Menu Guide
Vii
Technical Notes
Before Taking Important Pictures
Use Only Nikon Brand Electronic Accessories
EN-EL5 rechargeable battery
Life-Long Learning
Parts of the Camera
Introduction
Lens in storage Position Attaching the Camera Strap
Tripod Monitor Socket
Battery latch
Delete button
Multi selector
Lens Cap
Mode Button
Default Modes
Menu Help
Monitor
Playback
Current frame number Total number of frames
Internal memory/memory card
Number of exposures
Battery Charger
Charging the Battery
Charge the battery
First Steps
After charging the battery, insert it as described below
Inserting the Battery
Close the battery-chamber/memory card slot Cover
Inserting Memory Cards
Inserting Memory Cards
Removing Memory Cards
Write Protect Switch
Write protect switch
Before removing memory cards, turn the camera off and con
Turning the Camera on and Off
Camera Operations
…and the monitor will turn on
Zoom
Adjusting the Lens
Using a Tripod
Digital Zoom
During Recording
Focus and Shutter Release
Putting the Camera Away
Using Menus
Lost?
Mode
Highlight Select and exit to mode
Basic Photography and Playback
Frame subject in center focus area
Deleting Unwanted Pictures
Press the button again to return to shooting mode
Viewing Pictures
Deleting the Last Shot
Mode Description
Using the Flash
Flash Lamp
Red-eye Reduction
When Lighting Is Poor AF-assist illuminator may light
Pictures may be blurred
Display self-timer menu
Taking Pictures with the Self-Timer
Display
By icon in display
Macro Close-up Mode
Button is pressed halfway to lock focus
Off no display Vibration reduction off
Turn VR off when using a tripod
Vibration Reduction VR
Vibration Reduction
Take picture
One-Touch Portrait Mode
Press Button Icon is displayed
Face-Priority AF
Exp. +
One-Touch Portrait Menu
Option Description
Pictures, positive values brighter pictures
Night backdrop
Scene Mode
Highlight
Menus
Scene modes The following scenes are available
Settings Icons
Scene Assist Modes
Portrait Assist Use for smooth, natural-looking portraits
Feature a landmark in the background
Landscape Assist Use for vivid landscapes or portraits that
Party/Indoor
Setting Icons
Scene Modes
Beach/Snow
Close Up
Dusk/Dawn
Night Landscape
Museum
Menu Right Bottom To top To left
Taking Pictures for a Panorama
Panorama Assist
Left to
Compose next shot to overlap with previ
Using Exposure Compensation in Scene Mode
Movie Menu
Movies
Recording Movies
Auto-focus
Following options are available
Movie Options
Option
Control
Movie Playback
Full-frame playback 37, movies are indicated by a icon
More on Movies
File number
Voice Recordings
Making a Voice Recording
Date of recording
To play voice recordings back
Voice Recording Menu
Playing Voice Recordings
Voice Recordings
Display list of voice recording files Highlight file
Copying Voice Recordings
Copying Voice Recordings to a Computer
Deleting Pictures
Viewing Pictures on the Camera
Viewing Multiple Pictures Thumbnail Playback
Pressing Button in full-frame or thumbnail play
Press
Taking a Closer Look Playback Zoom
Creating a Cropped Copy
Cropped Copies
Lighting
Enhancing Contrast D-Lighting
See the Appendix for more information on D-Lighting copies
Playing Voice Memos
Voice Memos Recording and Playback
Recording Voice Memos
Deleting Voice Memos
Highlight date View pictures taken on date
Display playback mode menu
Viewing Pictures by Date
Print Set/Transfer Marking
Rotate image Small pic
Viewing Pictures
View playback menu On same date
List by Date
Highlight Pictmotion
Pictmotion by muvee
Creating a Pictmotion Movie
Display options Highlight View Pictmotion
To create a custom Pictmotion movie
Other Options Steps 1 and 7 on
PictureProject
Viewing Pictmotion Movies
Highlight movie
Viewing Pictures on TV
Connecting to Televisions, Computers, and Printers
Start a computer to which PictureProject has been installed
Viewing Pictures on a Computer
Marking Pictures for Transfer
PictureProject Transfer Button
Choosing a USB Option for Connection to a Computer
Disconnecting the Camera
PictureProject Button
Printing the Date of Recording on Pictures
Printing Pictures
Other Ways to Print Pictures
Date imprint Print set Date
Connecting the Printer
USB
Printing Pictures One at a Time
Paper Size
Printing Selected Pictures
Printing Multiple Pictures
Choosing Print selection displays the menu shown in Step
Creating a Dpof Print Order Print Set
Print Set
Menu Guide
Image Mode
Current setting is shown by an icon in the display
Shooting Options The Shooting Menu
Preset White Balance
White Balance
Single
Exp. +
Continuous
Multi-shot
Interval Timer Photography
Interval Timer Photography
Best Shot Selector BSS
Sensitivity
Color Options
AF Area Mode
Choose where the camera focuses
Make colors more vivid or record pictures in monochrome
Print Set
Press the button. See page 13 for more on using the menus
Playback Options The Playback Menu
Rotate image
Protect
Slide Show
Delete
Transfer Marking
Rotate selected pictures
Rotate Image
Small Pic
Copy
Menus
Basic Camera Setup The Setup Menu
Choose how menus are displayed
Date
Clock Battery
Welcome Screen
Set camera clock to current date and time see below
To change the home time zone, select in and follow Steps
Display map of world time zones
Photo Info
Monitor Settings
Description Shooting mode
Following display options are available
Time and date do not appear on pictures
Date Counter
Sample date counter time stamps are shown below
Taken while this option is in effect
AF Assist
Sound Settings
Adjust the following sound settings
Record Orientation
Language
Reset All
Format Memory/ Format Card
Interface
Inserting the Connector
Optional Accessories
Connecting the Optional EH-62A AC Adapter Kit
Technical Notes
64 MB, 128 MB, 256 MB, 256 MB*, 512 MB, 512 MB*, 1 GB, 1 GB
Approved Memory Cards
Nikon High speed 10 MB/s
Caring for the Camera
Cleaning
Do not use alcohol, thinner, or other volatile chemicals
Display Problem Solution
Error Messages
Storage
Format
Insert index before using
Memory card has not
Camera Era off and replace card
Electronically Controlled Cameras
Troubleshooting
Problem Solution
Voice memos cannot be appended to movies Memo
Choose correct video mode
Er make of camera
Picture that supports crop, D-lighting, or small picture
Shooting Menus
Operation Flowchart
Appendix
Playback
Option Default
Setting
Image Mode 55, Movie Options 31, and Sound Quality
Restrictions on Camera Settings
Copies Identifier
Image File and Folder Names
Originals Identifier
Copies 42, 43
Time Zones
Location
Specifications
Battery life
Self-timer
Power sources
Dimensions
Rated output
Rated input
Rated capacity
Charging time
Symbols
Index
Button, 1 menu
Page
0RINTEDNIN *APAN 3������������ �-!�����