Digital Camera
Digitutor
Symbols and Conventions
Product Documentation
XIntroduction
AKeep the sun out of the frame
For Your Safety
Iii
AVC Patent Portfolio License
Use Only Nikon Brand Electronic Accessories
Before Taking Important Pictures
Use Only Nikon Brand Accessories
Servicing the Camera and Accessories
Camera Settings
XIntroduction
Package Contents
Camera Body
Getting to Know the Camera
Camera Body
Power Switch
Camera offers a choice of the following shooting modes
Mode Dial
Monitor can be angled and rotated as shown below
Monitor
Pbutton
Information Display
Viewfinder
Viewfinder
Playback 0
Using Camera Menus
Custom Settings 0 Recent settings or My Menu 0
Camera Menus
Position the cursor in the selected menu
Display the menus
Highlight the icon for the current menu
Select a menu
Highlight an option
DPlayback Menu Options
CShooting Menu Options
Display options
NRetouch Menu Options
ACustom Settings
MRecent Settings/OMy Menu Defaults to mRecent Settings
BSetup Menu Options
Charging the Battery
Charge the battery
Insert the battery
Check to be sure the battery is in the correct orientation
Formatting Memory Cards
Insert a memory card available separately
Attach a lens
Check to be sure the card is in the correct orientation
Camera Clock
Open the monitor
Choose a language and set the camera clock
Open the monitor as shown. Do not use force
Removing Memory Cards
Adjusting Viewfinder Focus
Removing the Battery
Focus the viewfinder
Vibration Reduction
Write Protect Switch
Detaching the Lens
Description
Battery Level and Card Capacity
Battery Level
Number of Exposures Remaining
Taking Photographs
Shutter-Release Button
Check the indicators in the viewfinder
In-focus indicator Description
Shoot
Built-in Flash
Using a Zoom Lens
Image Sensor Cleaning
Auto Meter-Off
LLandscape
KPortrait
NClose up
PChild
MSports
SParty/Indoor
Other Scenes
ONight Portrait
RNight Landscape
WPet Portrait
TBeach/Snow
USunset
VDusk/Dawn
0Food
XCandlelight
YBlossom
ZAutumn Colors
Photograph will be displayed in the monitor
Basic Playback
Press the K button
View additional pictures
To display images in contact sheets of four
Images displayed
Choose from the following release modes
Release Mode
Place the cursor in the information display
Display release-mode options
Buffer Size
Choose a release mode
Memory Buffer
Mount the camera on a tripod
Self-Timer and Remote Control Modes
Select a release mode
Cover the Viewfinder
Before Using the Remote Control
Using the Built-in Flash
Self-timer mode can also be selected by pressing Ebutton
Display focus-mode options
Focus Mode
Focus
Getting Good Results with Autofocus
Choose a focus mode
Predictive Focus Tracking
Continuous-servo Autofocus
Option Description Single-point AF
AF-Area Mode
Display AF-area mode options
Choose an AF-area mode
Choose a file type
Image Quality and Size
Image Quality
Display image quality options
Choose an image size
Image Size
Display image size options
Choose a flash mode 0 Take pictures
Using the Built-in Flash
Using the Built-in Flash i, k, p, n, o, s, w, and gModes
Using the Built-in Flash P, S, A, M, and 0Modes
Flash modes available vary with shooting mode
Flash Mode
Display flash mode options
Choose a flash mode
Shutter Speeds Available with the Built-in Flash
Choosing a Flash Mode
Mode Shutter speed
Flash Modes
Choose an ISO sensitivity
Mode ISO sensitivity
ISO Sensitivity
Display ISO sensitivity options
Choose the interval
Interval Timer Photography
Select Interval timer shooting
Choose a starting time
Start shooting
Other Settings
Interrupting Interval Timer Photography
Choose the number of intervals
Shutter Speed and Aperture
Mode Description
A, and M Modes
Take the picture
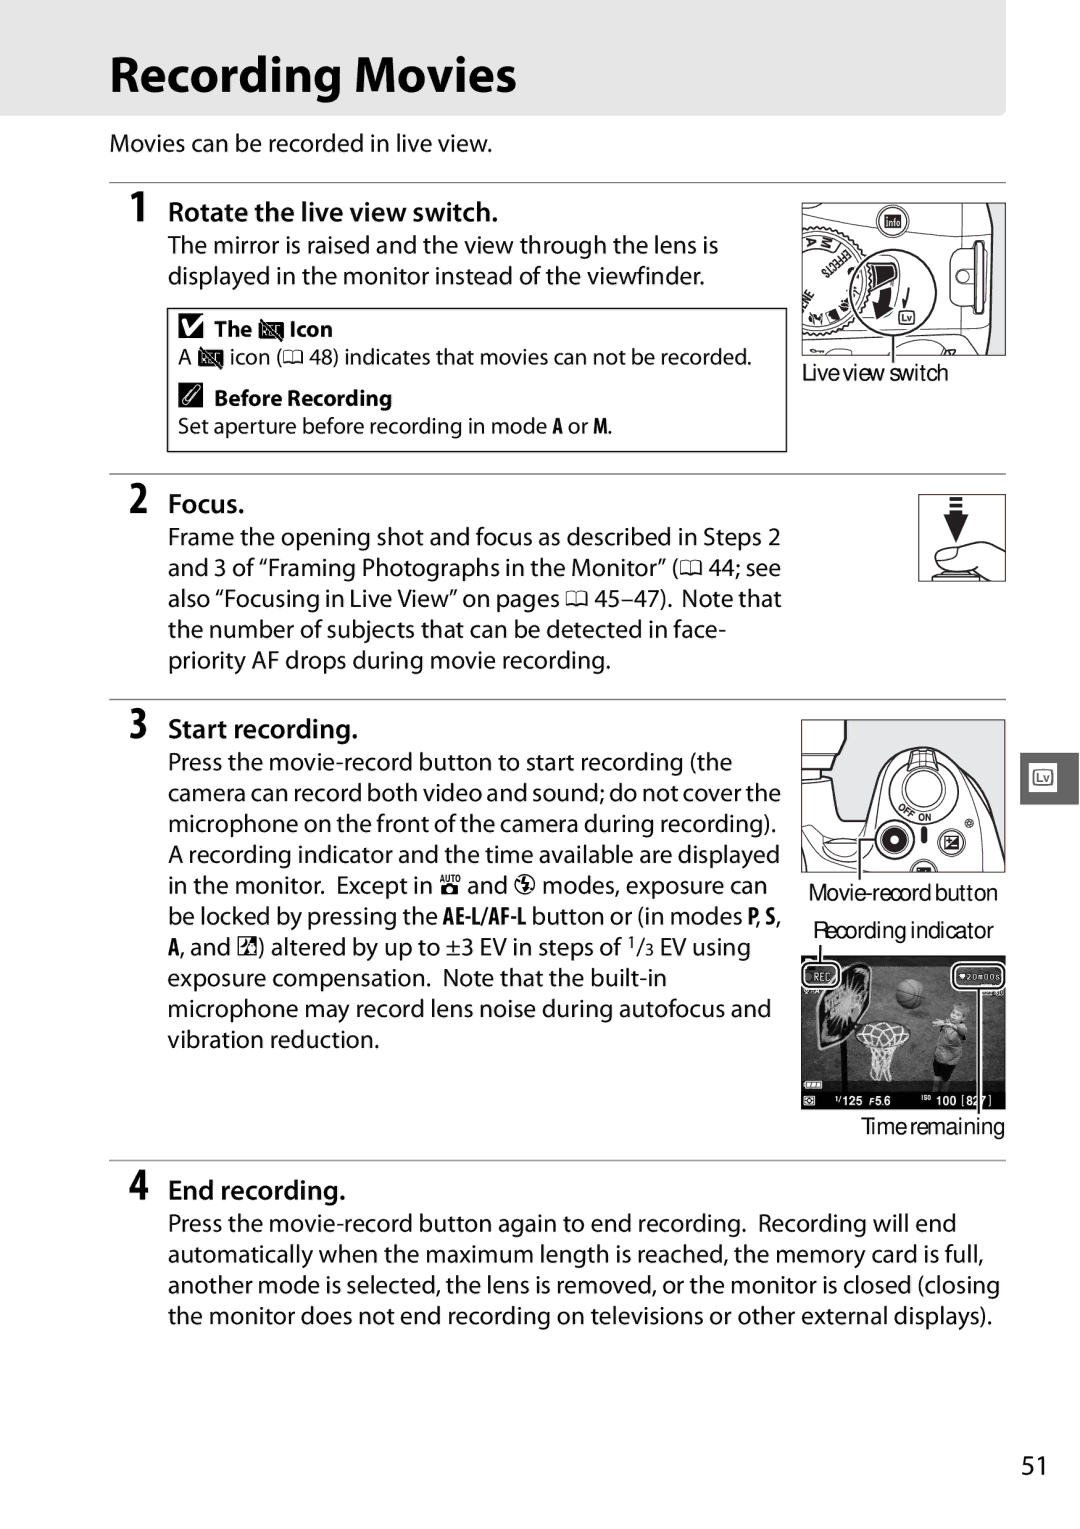
Rotate the live view switch
Framing Photographs in the Monitor
Focus
Choose a focus option
Focusing in Live View
Choosing a Focus Mode
Display focus options
Display AF-area modes
Choosing an AF-Area Mode
Subject Tracking
Choosing the Focus Point
Movie mode
Live View Display Description Shooting mode
Focus mode
AF-area mode
Landscape
Using Autofocus in Live View
Automatic Scene Selection Scene Auto Selector
Portrait
Count Down Display
Shooting in Live View Mode
Movies can be recorded in live view
Recording Movies
Start recording
End recording
Count-Down Display
Taking Photographs During Movie Recording
Maximum Length
Recording Movies
Choose movie options
Movie Settings
Select Movie settings
2Icon
Viewing Movies
Following operations can be performed
Use Description
1 Icon
Special effects can be used when recording images
Shooting with Special Effects
Miniature Effect
Night Vision
GColor Sketch
3Low Key
3Selective Color
1Silhouette
2High Key
Miniature Effect
Options Available in Live View
GColor Sketch
Press J to display selective color options
3Selective Color
Return to the live view display
Press J to display miniature effect options
Select additional colors
Choose the color range
Windows Mac OS
Installing ViewNX
Start the computer and insert the installer CD
Select a language
Click Install and follow the on-screen instructions
Start the installer
Exit the installer
Remove the installer CD from the CD-ROM drive
Confirm that the correct source is Selected
Using ViewNX
Copy Pictures to the Computer
Choose how pictures will be copied to the computer
Printing Pictures
View Pictures
Retouching Photographs
Editing Movies
IX Nikkor lenses can not be used
Compatible CPU Lenses
Identifying CPU and Type G and D Lenses
IX Nikkor Lenses
Filters
Other Accessories
Power
Sources
Sdhc memory cards
Approved Memory Cards
MC-DC2 remote cords and GP-1 GPS units , which connect with
Terminal
Lens
Cleaning
Caring for the Camera
Storage
Caring for the Camera and Battery Cautions
Page
Page
Error Messages
Format the card
No Bulb in S mode
No Bulb in HDR mode
Locked
Cool
Flash error
Representative Autoexposure error
Button again
Nikon D5100 Digital Camera
Specifications
Shutter Type
Release Release mode
Self-timer
Matrix or center-weighted metering 0-20 EV
Exposure Index
Flash mode
Accessory shoe
Exposure ISO sensitivity
Selection Movie Metering
Live view Lens servo
Manual focus MF
Automatic scene
Temperature
Power source Battery
Dimensions/weight
Weight
Dimensions
MH-24 battery charger Rated input
EN-EL14 rechargeable Li-ion battery Type
Focusing
Trademark Information
Battery Life
Page
Page
6MB11511-03