Digital Camera
Where to Find It
Troubleshooting
Q&A Index
Find what you’re looking for from
Package Contents
Symbols and Conventions
Trademark Information
Iii
Index
Question Key phrase
Menus and Displays
Auto meter off
Taking Photographs
Vii
Viewing Photographs
Viii
Viewing or Printing Photographs on Other Devices
Table of Contents
ISO Sensitivity 105
Exposure 111
139
159
183
195
Connections 237
Menu Guide 259
217
Xiii
Xiv
296
Xvi
Technical Notes 369
Xvii
For Your Safety
Xviii
Do not use in the presence of flammable gas
Xix
Keep out of reach of children
Use appropriate cables
Observe caution when using the flash
CD-ROMs
Xxi
All batteries, whether
Battery Charger
Xxii
Xxiii
Disposing of Data Storage Devices
Items prohibited by law from being copied or reproduced
Comply with copyright notices
Use Only Nikon Brand Electronic Accessories
Xxiv
Before Taking Important Pictures
Life-Long Learning
Overview Getting to Know the Camera
Quick Start Guide
Servicing the Camera and Accessories
Use Only Nikon Brand Accessories
Overview
Getting to Know the Camera
Release mode dial
Camera Body
Yflash compensation
Flash sync terminal
Ten-pin remote terminal
384
Battery-chamber cover
Contact cover for optional
Depth-of-field preview CPU contacts
Tripod socket
Lprotect button
Wthumbnail/playback
Xplayback zoom
Eyepiece shutter lever
Memory card access
Diopter adjustment control
113
AAE/AF lock
Exposure mode
Control Panel
Aperture
Viewfinder Display
No Battery
Control Panel and Viewfinder Displays
Shooting Information Display
See Also
Color temperature
MB-D10 battery type
White balance fine-tuning
Release mode single frame
AE-L/AF-L button
Quick Settings Display
Button Active D-Lighting
Picture Control
Long exposure noise Depth-of-field preview button
Sub-command dial
Command Dials
Main command dial
Press the Qual button and rotate the command dials
Press the ISO button and rotate the main command dial
Image Quality and Size
ISO Sensitivity
Use the command dials to adjust exposure
Choose Exposure mode
Choose an Aperture Exposure Mode a or M
Exposure
Set exposure Compensation
Depth-of-Field Preview and AE-L/AF-L Buttons
Flash Settings
Press the WB button and rotate the command dials
Press the Mbutton and rotate the command dials
White Balance
Attaching the AN-D700 Camera Strap
BM-9 Monitor Cover
Charge the battery pg Insert the battery pg
Quick Start Guide
Insert a memory card pg
Turn the camera on pg
Check camera settings pp
Select single-servo autofocus pp
Rotate the focus-mode selector to S single-servo autofocus
Press Otwice to delete the current photograph
Page
Camera Menus
First Steps
Camera Menus
Tabs
Menu options
Options in current menu
Menus
Following menus are available
Using Camera Menus
Menu Controls
Navigating the Menus
Display the menus
Select a menu
Position the cursor in the selected menu
Highlight a menu item
Display options
Select the highlighted item
Button
Help
Lbutton
Charge the Battery
Remove the terminal cover from the battery
First Steps
Plug the charger
Insert the battery
Remove the battery when charging is complete
Insert the Battery
Removing the Battery
Open the battery-chamber cover
Close the battery-chamber cover
Battery and Charger
Battery is not in use
Incompatible Batteries
EN-EL3e Rechargeable Li-ion Batteries
Attach a Lens
Remove the rear lens cap and the camera body cap
Attach the lens
Cap from the lens and remove the camera body cap
Detaching the Lens
Remove the lens cap
CPU Lenses with Aperture Rings
Lens
Basic Setup
Turn the camera on
Select Language
Select a language
Select World time
Set time zone
Turn daylight saving time on or off
Set the date and time
Exit to shooting mode
Clock Battery
Set date format
Camera Clock
Insert a Memory Card
Open the card slot cover
Insert the memory card
Slide the card slot cover out q Open the card slot w
Confirm that the access lamp is off and turn the camera off
Removing Memory Cards
Close the card slot cover
Remove the memory card
Formatting Memory Cards
Press the Qbuttons
Press the Qbuttons again
Formatting Memory Cards
Memory Cards
No Memory Card
Adjust Viewfinder Focus
Lift the diopter adjustment control
Replace the diopter adjustment control
Focus the viewfinder
Check the battery level
Check the battery level in the control panel or viewfinder
Or ready spare battery
Turn the Camera On
Check the number of exposures remaining
Large-Capacity Memory Cards
LCD Illuminators
Auto Meter Off
Camera Off Display
Control panel
Check camera settings
Adjust Camera Settings
Default settings are listed below
Choose exposure mode e
Main command dial
Release mode dial lock release
Choose single-point AF
Autofocus
Choose single-servo
Choose matrix metering
Ready the Camera
Halfway to focus
Focus and Shoot
Focus point. Frame a
Memory Card Access Lamp
Smoothly press the shutter Release-button the rest
Way down to take the picture
Shutter-Release Button
Viewing Photographs
Press the Kbutton
View additional pictures
Photograph will be displayed in the monitor
Deleting Unwanted Photographs
Display the photograph
Delete the photograph
Deleted
DImage Recording Options
Image Area Image Quality Image Size
Image Area
Auto DX Crop
Mm picture angle
Attached
Choose Image Area
DX Lenses
Adjust settings
Image Area Menu
Select Image area
Choose an option
Fn button Main command dial
Fn Button
Assign image area to the Fn button
Choose the image area
Fn, Depth-of-Field Preview, and AE-L/AF-L Buttons
Auto DX Crop
Image size varies with the option selected for image area
Image Quality
Following image quality options are available
Option File type Description
File Size
Dial
Control panel Image Quality Menu
NEF RAW Recording
Jpeg Compression
NEF RAW+JPEG
+NEF RAW
Jpeg Compression Menu
NEF RAW Recording Menu Type
Option Description 12-bit
14-bit
Color data recorded
NEF RAW Images
Image Size
Option Size pixels Print size cm/in
Qual button Sub-command dial
Control panel Image Size Menu
NFocus
Controlling How the Camera Focuses
Focus Mode
OptionDescription
Autofocus can also be activated by pressing Button
BButton
Button Predictive Focus Tracking
AF-Area Mode
AF-area mode selector
Mode Description
Following options are available
Area AF
Auto-area AF
Information
Display
Focus Point Selection
Rotate the focus selector lock to
Select the focus point
Positioned almost anywhere
See Also
Focus Lock
Focus
Point and press the shutter-release
Button halfway to initiate focus
Recompose Photograph and shoot
Shutter-release Button AE-L/AF-L button
Getting Good Results with Autofocus
Manual Focus
M Selection/Autofocus with Manual Priority
Focal Plane Position
Electronic Rangefinder
Focal plane mark
KRelease Mode
Camera supports the following release modes
Choosing a Release Mode
ModeDescription
Release mode dial lock release
Continuous Mode
Select CH or CL mode
Continuous low speed mode
Frame a photograph, focus, and shoot
Power Source and Frame Rate
Buffer Size
Memory Buffer
Taken in a single burst, see
Select live view a mode to frame pictures in the monitor
Framing Pictures in the Monitor Live View
Phase-Detection Versus Contrast-Detect AF
Focuses normally using phase-detection autofocus
Live View Options
Select Live view mode
Select a live view mode
Release mode can be chosen from the following options
Select Live view
Select Release mode
Select a release mode
Hand-Held Mode
Release mode
Assigning Live View Mode to a Button
Press the shutter-release Button all the way down
Frame a picture in the monitor
Take the picture
No Picture
Tripod Mode
Ready the camera
Frame a picture
Viewfinder
Selector. To focus using
Check the view in the monitor
Corner of the display. Use the multi selector to scroll
Contrast-detect AF point
Focusing with Contrast-Detect Autofocus
Contrast-Detect Autofocus
Shooting Information Display
AF area brackets are displayed only in hand held mode
Shooting information on
Shooting in Live View Mode
100
For extended periods, the camera may become
Unusual colors. To prevent damage to
101
Monitor Brightness
View, release the Kbutton
Remote Cords
Self-Timer Mode
Select self-timer mode
Frame the photograph and focus
102
During the timer count-down, see Custom Setting d1 Beep, pg
Start the timer
103
Mirror up Mode
Select mirror up mode
Raise the mirror
Take a picture
Reacting Faster to Light
105
ISO button Main command Dial Control panel
Choosing ISO Sensitivity Manually
106
ISO Sensitivity Menu
ISO Sensitivity Settings
ISO sensitivity settings available
107
Hi 0.3-Hi
Auto ISO Sensitivity Control
108
109
110
Metering Exposure Mode
Controlling How the Camera Sets Exposure
111
Autoexposure AE Lock Exposure Compensation Bracketing
112
Metering
MethodDescription
To choose a metering method
113
3D Color Matrix II Metering
114
Exposure Mode
Lens Types
Preview button Custom Setting e4-Modeling Flash
Button Main command dial Depth-of-Field Preview
115
Programmed Auto
Select exposure mode e
116
Exposure mode e, different combinations
117
Flexible Program
Field or slow shutter speeds that blur motion
Button Main command dial
Shutter-Priority Auto
Choose a shutter speed
118
Mode g
Aperture-Priority Auto
Select exposure
Choose an aperture
Non-CPU Lenses pg
120
F-number must be read from the lens aperture ring
Manual
Mode h
121
122
Choose aperture and shutter speed
AF Micro Nikkor Lenses
123
Custom Setting b2 set to 1/3 step
Electronic Analog Exposure Displays
Long Time-Exposures
Select exposure mode h
124
Release the shutter-release button
125
Long Time-Exposures
Menu pg
Lock exposure
Autoexposure AE Lock
126
127
Adjusting Shutter Speed and Aperture
Metered Area
Exposure Compensation
128
129
130
Bracketing
Type of bracketing performed
Exposure and Flash Bracketing
Select flash or exposure bracketing
Choose the number of shots
131
Fn buttonSub-command Control panel Dial
Select an exposure increment
132
From 1/3, 2/3, and 1 EV. The bracketing programs with an
133
Canceling Bracketing
134
Exposure and Flash Bracketing
Exposure Bracketing
Fn button Main command Control panel
Indicator
White Balance Bracketing
Select white balance bracketing
Fn button Sub-command
Select a white balance increment
136
See page 145 for a definition of mired
137
138
White Balance Bracketing
Keeping Colors True
139
White Balance Options
140
141
Color Temperature
142
Studio Flash Lighting
Information
Button and rotating the sub-command dial
Temperature and press 2. If Preset manual is selected
White Balance Menu
Select a white balance option
Fine tune white balance
Press J
144
Amber A-blue B axis and the green G-magenta M
145
White Balance Fine Tuning
Mired
WB Button
WB button Sub-command
146
Dial Choose Color Temperature
147
Preset Manual
148
Method Description
Neutral gray or white object is placed under
White Balance Presets
149
D-4
Store values copied from d-0 pg
Set white balance to LPreset manual
Measuring a Value for White Balance
Light a reference object
150
Select direct measurement mode
Measure white balance
Check the results
151
Select preset d-0
Direct Measurement Mode
Preset d-0
152
Copying White Balance from d-0 to Presets d-1-d-4
Select LPreset manual
Preset
Select a destination
154
Choose Select image
Highlight the destination
Choosing a White Balance Preset
Highlight a source image
Copy white balance
155
Selecting a White Balance Preset
Select a preset
To set white balance to a preset value
Select Set
Selecting a White Balance Preset the WB Button
157
Entering a Comment
Select Edit comment
Edit the comment
158
159
Picture Controls
Active D-Lighting Color Space
Creating Custom Picture Controls
Picture Controls
160
Using Picture Controls
161
Picture Controls can be used as described below
Nikon Picture Controls Versus Custom Picture Controls
Selecting Nikon Picture Controls
Choosing a Picture Control
Select Set Picture Control
Select a Picture Control
163
Picture Control Indicator
Picture Control Grid
Modifying Existing Picture Controls
164
Picture Control Settings
165
166
Previous Settings
Button to return to the Picture Control menu
167
Filter Effects Monochrome Only
Toning Monochrome Only
Custom Picture Controls
Creating Custom Picture Controls
Select Manage Picture Control
Select Save/edit
168
Edit the selected Picture Control
169
Name the Picture Control
170
Original Picture Control Icon
171
Original Picture Control icon
Sharing Custom Picture Controls
Copying Custom Picture Controls to the Camera
Select Load/save
Select Copy to camera
173
Name the Picture Control as described
Saving Custom Picture Controls to the Memory Card
Select Copy to card
Choose a destination
174
Managing Custom Picture Controls
Renaming Custom Picture Controls
Select Rename
Rename the Picture Control
Deleting Custom Picture Controls from the Camera
Select Delete
Select Yes
176
Select Delete from card
177
178
Press Jto display confirmation dialog shown at right
Highlight Yes and press Jto
Delete the selected Picture
179
Active D-Lighting
Active D-Lighting off
Select Active D-Lighting
180
To use active D-Lighting
Shooting menu pg , highlight Active D-lighting
Color Space
Select Color space
Select a color space
181
182
Nikon Software
Using the Built-in Flash
183
184
Built-in Flash
ISO Sensitivity
Using the Built-in Flash
Choose a flash mode
Choose a metering method
Press the flash pop-up button
Check exposure shutter speed and aperture
186
By camera
By user
187
Lowering the Built-in Flash
Built-in Flash
188
Flash Modes
Camera supports the following flash modes
Shutter-priority auto or manual exposure mode
Flash Control Mode
189
Background. Use of tripod is recommended to
Mbutton Sub-command dial
Flash Compensation
190
±0 EV Ybutton Pressed +1.0 EV
191
Optional Flash Units
Assign FV lock to the Fn button
FV Lock
192
Lock flash level
Recompose the photograph Take the photograph
Release FV lock
193
Using FV Lock with the Built-in Flash
Using FV Lock with Optional Flash Units
194
Metering
TOther Shooting Options
195
Option Default
Ebutton Qual button Option Default
196
Off
See page 418 for a list of default settings
197
Multiple Exposure
Creating a Multiple Exposure
Select Multiple exposure
Select Number of shots
Select the number of shots
Select Auto gain
Set gain
199
Select Done
200
Other Settings
Ref photo options in the setup menu can not used
201
Multiple Exposure
Interrupting Multiple Exposures
202
Interval Timer Photography
Select Interval timer shooting
Select a starting trigger
203
Choose a start time
Choose an interval
204
Not displayed if Now is selected for Choose start time
Shots per interval
Start shooting
205
Close the Viewfinder Eyepiece Shutter
During interval timer photography, the Qicon
206
Out of Memory
During Shooting
Pausing Interval Timer Photography
Choose a new starting trigger
Resume shooting
207
Interrupting Interval Timer Photography
Using the Monitor
No Photograph
208
209
Shooting Menu Banks
Non-CPU Lenses
210
Focal Length Not Listed
Zoom Lenses
Non-CPU Lens Data Menu
Select Non-CPU lens data
Select a lens number
Select a focal length
Choosing a Lens Number Using Camera Controls
Assign non-CPU lens number selection to a camera control
Use the selected control to choose a lens number
212
GP-1 GPS Unit
Using a GPS Unit
213
214
Other GPS Units
MC-35
KIcon
215
Heading
Coordinated Universal Time UTC
Setup Menu Options
Battery
216
Exposure meters will not turn off while a GPS unit is
Playback Options
217
218
Full-Frame Playback
To display tall portrait-orientation
219
Photo Information
220
File Information
221
Highlights
222
235 Folder number
272
RGB Histogram
223
Image highlights Folder number
235
224
Histograms
Shooting Data Page 1
225
226
Shooting Data Page 2
Sharpening
Shooting Data Page 3
227
Long exposure noise
Camera name Folder number
Shooting Data Page 4
228
GPS Data
229
Overview Data
230
231
162 Time of recording
180
342
232
Viewing Multiple Images Thumbnail Playback
Full-frame playback
233
Taking a Closer Look Playback Zoom
234
Protecting Photographs from Deletion
Select an image
Press the Lbutton
235
Press the Obutton
236
Display the image or highlight it in the thumbnail list
Full-Frame Playback Thumbnail Playback
Connecting to External Devices
Connecting to a Computer
237
Printing Photographs
Supported Operating Systems
Connecting to a Computer
238
239
Connecting Cables
Camera Control Pro
Direct USB Connection
Turn the computer on
Connect the USB cable
240
241
Transfer photographs
During Transfer
Wireless and Ethernet Networks
Mode Function
Transfer Mode
242
243
Printing Photographs
Tiff Photographs
244
Take photographs
Connect camera to printer pg
Disconnect USB cable USB Hubs
Turn the camera off Connect the USB cable
Connecting the Printer
245
Printing Pictures One at a Time
Select a picture
Display printing options
246
247
Adjust printing options
Press 1 or 3 to highlight an option and press 2 to select
Start printing
248
Picture, highlight Crop and press Cropping
Selecting Photographs for Printing
Printing Multiple Pictures
Display the PictBridge menu
Choose Print select or Print Dpof
249
Select pictures
250
251
Size, Border, Time Stamp, and Cropping
Select Index print
Creating Index Prints
252
Choose Select/set
Creating a Dpof Print Order Print Set
253
Select imprint options
Complete the print order
254
Highlight Done and press J to complete the print order
Viewing Photographs on TV
Standard Definition Devices
Connect the supplied video cable as shown
255
Video Mode pg
256
Television Playback
Slide Shows
High-Definition Devices
Connect the Hdmi cable as shown
257
Connect to high- definition device
258
NThe Retouch Menu Creating
ACustom Settings Fine-Tuning
259
DThe Playback Menu Managing Images
Selecting Multiple Pictures
Display the menu
260
Display thumbnails
Highlight a picture
Repeat steps 1 and 2 to select additional pictures
261
Delete
Press Jto complete the operation
262
Option Description Selected Delete selected pictures All
Playback Folder
Hide Image
263
Choose a folder for playback
Display Mode
264
OptionDescription Basic photo info
Info
Image Review
After Delete
Rotate Tall
265
266
Slide Show
Dialog shown at right is displayed when
267
Print Set Dpof
Pictures from the current print order
268
Shooting Menu Bank
Renaming Shooting Menu Banks
Select a bank
269
Enter a name
Save changes and exit
270
After editing the name, press Jto save changes and exit
Reset Shooting Menu
Restore defaults for the current shooting menu bank
Exit without changing shooting menu settings
No default
Active Folder
New Folder Number
Select New folder number
Choose a folder number
Select Folder
Choose Select folder
Highlight a folder
Select the highlighted folder
File Naming
Image Quality
Image Size
Image Area
Jpeg Compression
NEF RAW Recording
Set Picture Control
Manage Picture Control
Off the default setting
Active D-Lighting
Vignette Control
276
Long Exp. NR Long Exposure Noise Reduction
277
ISO Sensitivity Settings
High ISO NR
Live View
Multiple Exposure
Interval Timer Shooting
279
Custom Setting groups Main menu
Setting bank
280
Custom
Following Custom Settings are available
281
Custom Setting Bank
Reset Custom Settings
Custom Settings Bank
282
Autofocus
A1 AF-C Priority Selection
283
This option controls whether
Select single-servo AF, rotate the focus mode selector to S
A2 AF-S Priority Selection
284
Option Description Release
Default Surrounding eight focus points. Choose when
A3 Dynamic AF Area
285
OptionDescription Points
286
3D-tracking
A5 AF Activation
A4 Focus Tracking with Lock-On
287
A6 AF Point Illumination
A7 Focus Point Wrap-Around
288
Option Description Auto
A8 AF Point Selection
289
Choose from the 51 focus points shown at right
Points focus-point selection
290
A9 Built-in AF-Assist Illuminator
AF-Assist Illuminator
A10 AF-On for MB-D10
291
Metering/Exposure
B1 ISO Sensitivity Step Value
B2 EV Steps for Exposure Cntrl
B3 Exp Comp/Fine Tune
293
B4 Easy Exposure Compensation
Change Main/Sub
B5 Center-Weighted Area
Select Custom Setting b6
B6 Fine Tune Optimal Exposure
294
Fine-Tuning Exposure
Select a metering method
Choose an exposure value
295
Timers/AE Lock
C2 Auto Meter-off Delay
Choose a shorter meter-off delay for longer battery life
C1 Shutter-Release Button AE-L
C3 Self-Timer Delay
C4 Monitor off Delay
297
20 s
Shooting/Display
D1 Beep
D2 Viewfinder Grid Display
D3 Screen Tips
D5 Max. Continuous Release
D4 CL Mode Shooting Speed
299
Reset
D6 File Number Sequence
300
File Number Sequence
301
D7 Shooting Info Display
Dark on light
D9 Exposure Delay Mode
D10 MB-D10 Battery Type
D8 LCD Illumination
302
303
Using AA Batteries
Blinks
D11 Battery Order
304
Bracketing/Flash
E1 Flash Sync Speed
305
This option controls flash sync speed
Flash Control at 1/320 s Auto FP
306
250 s
Shutter speed
Flash-Ready Indicator
307
E2 Flash Shutter Speed
308
E3 Flash Cntrl for Built-in Flash
Choose the flash mode for the built-in flash
309
Manual
Repeating Flash
310
Option Description Output
Commander Mode
311
Option Description Built-in
Group B
Adjust settings for the built-in flash
Adjust settings for group a
Adjust settings for group B
Select the channel Press J
Compose the shot
Raise the built-in flash
Frame the photograph, focus, and shoot
313
Flash Sync Mode Display
Yicon flashes when the built-in flash is in mode M
Commander Mode
314
E5 Auto Bracketing Set
E4 Modeling Flash
315
Exposure mode
E6 Auto Bracketing Mode M
316
E7 Bracketing Order
317
F1 DSwitch
Shooting Mode
Controls
F2 Multi Selector Center Button
Playback Mode
Selecting Playback mode displays the following options
F3 Multi Selector
319
F4 Photo Info/Playback
F5 Assign FUNC. Button
FUNC. Button Press
320
321
322
Virtual
Horizon
None
FUNC. Button+Dials
323
F6 Assign Preview Button
324
325
F7 Assign AE-L/AF-L Button
Option
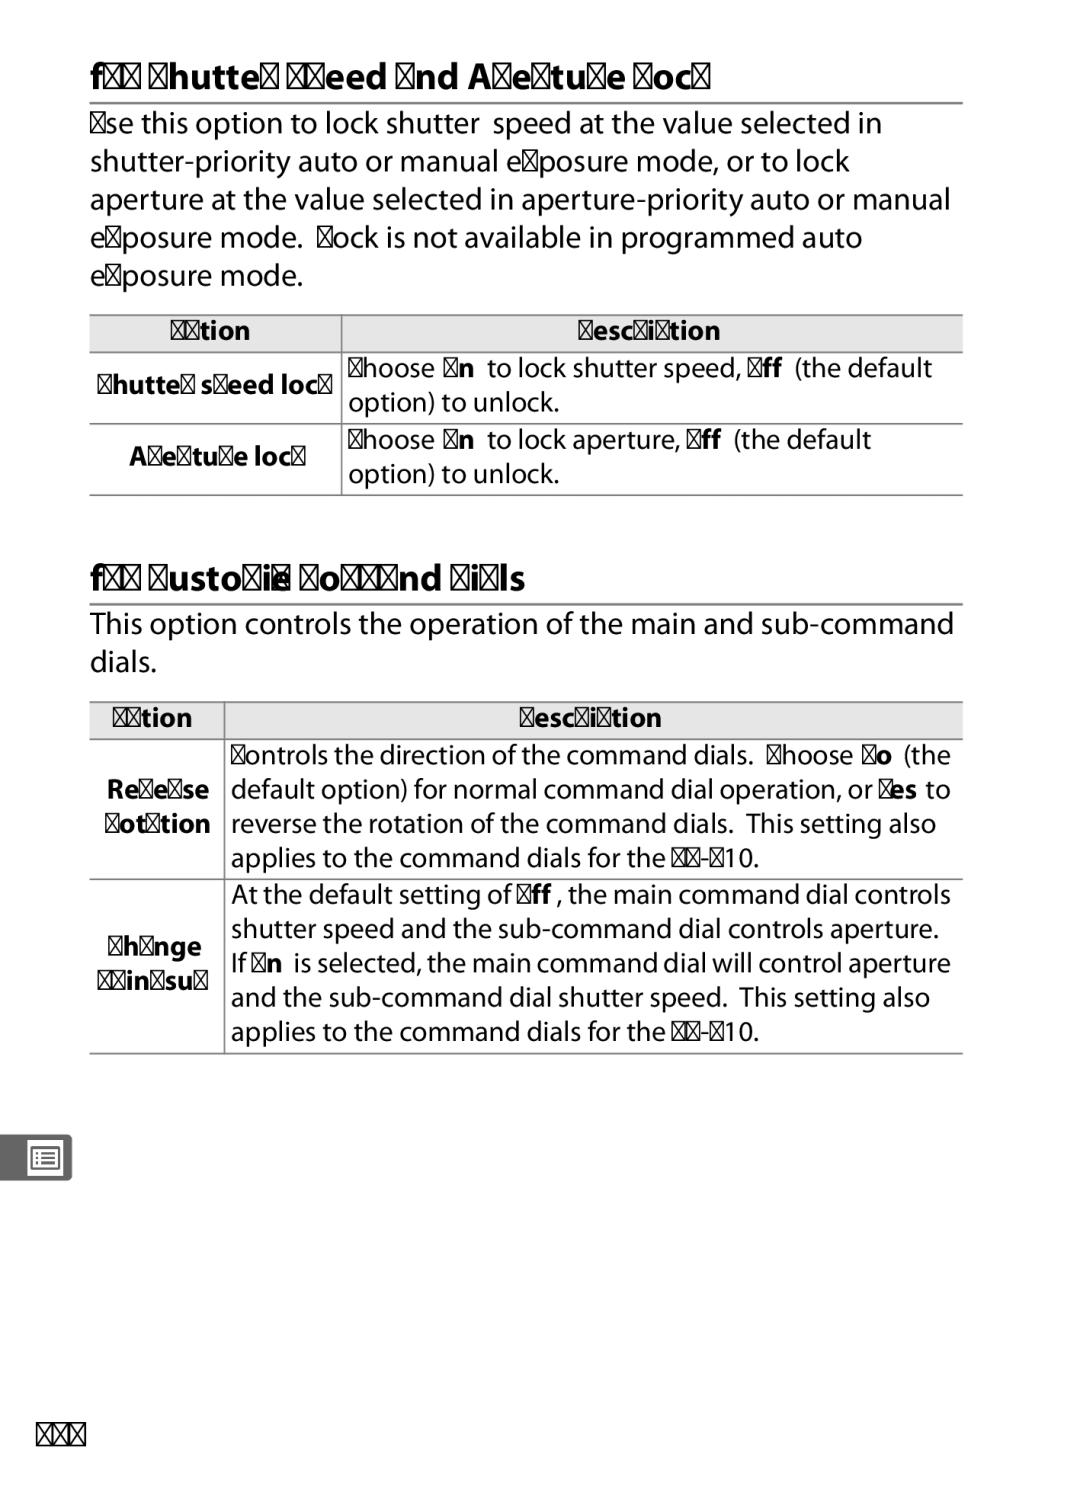
F9 Customize Command Dials
F8 Shutter Speed and Aperture Lock
326
Rotation
327
F10 Release Button to Use Dial
328
F11 No Memory Card?
329
F12 Reverse Indicators
330
BThe Setup Menu Camera Setup
331
Clean Image Sensor
Lock Mirror up for Cleaning
Format Memory Card
LCD Brightness
Video Mode
333
World Time
Language
334
Daylight
Image Comment
335
Auto Image Rotation
336
Image Sensor Cleaning
Dust off Ref Photo
Choose a start option
337
Acquire dust off reference data
Frame a featureless white object in the viewfinder
338
339
Image Dust Off Reference Data
Battery Info
340
Wireless Transmitter
341
342
Image Authentication
Copies
343
Copyright Information
Option
Save/Load Settings
344
345
Saved Settings
Menu Option
Adjust settings for connection to a GPS unit pg
Virtual Horizon
Non-CPU Lens Data
346
AF Fine Tune
347
Tune
Value
348
Firmware Version
View the current camera firmware version
349
Creating Retouched Copies
Creating Retouched Copies in Full-Frame Playback
Choose a picture
Display the retouch menu
Creating Retouched Copies from the Retouch Menu
Create a retouched copy
Select an item in the retouch menu
351
Display retouch options
352
353
Retouching Copies
Lighting
354
Red-Eye Correction
355
Press Xbutton to
Navigation window is displayed when
Trim
356
Monochrome
357
Monochrome
Trim Image Quality and Size
Filter Effects
Color Balance
358
Monitor
Image Overlay
Select Image overlay
Display NEF RAW images
Highlight a photograph
Select the second photo and adjust gain
Highlight the Preview column
360
Press 4 or 2 to highlight
Save the overlay
Preview the overlay
361
Side-by-Side Comparison
Making a Side-by-Side Comparison
362
Compare retouched copies to the original photographs
363
Compare the copy with the original
Direction indicated by
OMy Menu Creating a Custom Menu
Adding Options to My Menu
Select Add items
Select an item
View My Menu
Position the new item
365
Deleting Options from My Menu
Select Remove items
Select items
Delete the selected items
Reordering Options in My Menu
Select Rank items
Position the item
367
Displaying Recent Settings
Select Recent Settings
Select Choose tab
368
Cleaning Low-Pass Filter
Camera Care, Options, and Resources
Pg n
369
Lens/accessory
Compatible Lenses
Compatible CPU Lenses
370
AF-S/AF-I Teleconverter
371
Lens f-number
Non-CPU Lenses
372
373
Incompatible Accessories and Non-CPU Lenses
Compatible Non-CPU Lenses
Lens
374
Min. range
Red-Eye Reduction
375
AF-Assist Illumination
Calculating Picture Angle
376
Is selected
Nikon Creative Lighting System CLS
377
Principal features of these flash units are listed below
Feature
CLS-Compatible Flash Units
378
379
Guide Number
380
Flash mode/feature
SB-900
Other Flash Units
381
17-19 mm 20-105 mm
382
24-34 mm 35-49 mm
Use Only Nikon Flash Accessories
383
Accessory Shoe
Flash Contacts
Sync Terminal
384
Other Accessories
385
386
387
Filters
Type I CompactFlash memory cards to be inserted
Adapters
388
Software
Modified after shooting
Body cap
Accessory
389
390
Approved Memory Cards
SanDisk
Cleaning
Cleaner to a soft cloth and clean with care
Caring for the Camera
Storage
Clean Now
Display the Clean image sensor menu
Low-Pass Filter
Place the camera base down
Clean at Startup/Shutdown
Select Clean now
Select Clean at startup/ shutdown
393
Select an option
394
Manual Cleaning
Charge the battery or connect an AC adapter
Select Lock mirror up for cleaning
395
Clean the filter
Examine the low-pass filter
396
Press the shutter-release button all the way down
397
Use a Reliable Power Source
Foreign Matter on the Low-Pass Filter
Caring for the Camera and Battery Cautions
398
399
Release the shutter a few times n before putting it away
400
401
Troubleshooting
Problem Solution
Or c4 Monitor off delay
Display
Shooting
Aperture setting to use lens
403
Auto FP or 1/250 s Auto
404
Image quality set to NEF RAW
405
Adjust Set Picture Control
A9 Built-in AF-assist Illuminator
406
Playback
407
Select All for Playback folder
Select On for Rotate tall
Miscellaneous
408
Error Messages
Indicator
Camera or Optional MB-D10 Battery pack
409
410
411
412
413
Card
Be used
Damaged
414
415
This file
Continue if
Continue Paper jam
Problem Solution Check ink Ink error
416
Supply Select Continue Out of ink
Replace ink
Appendix
417
Appendix covers the following topics
Aperture, Sensitivity, and Flash Range
Defaults
418
419
420
421
422
FX Format 36 × 24 Image Area
Memory Card Capacity
423
DX Format 24 × 16 Image Area
424
425
D5-Max. Continuous Release pg
426
Exposure Program
Shutter speed
Aperture, Sensitivity, and Flash Range
427
Maximum aperture at ISO equivalent
Range
Nikon D700 Digital Camera
Specifications
428
429
430
431
432
433
434
435
Supported Standards
Battery Life
436
437
Symbols
Index
438
Numerics
439
Burst, 200, 299 72, 79, 283
Flash cntrl for built-in flash, 309 Commander mode
440
441
LCD brightness LCD illumination
Recent settings Red-eye correction
442
443
444
Page
6MB02411-04