Installation Fundamentals

Speaker

Location

Volume

Control

Location

Stereo

Location

Figure 8

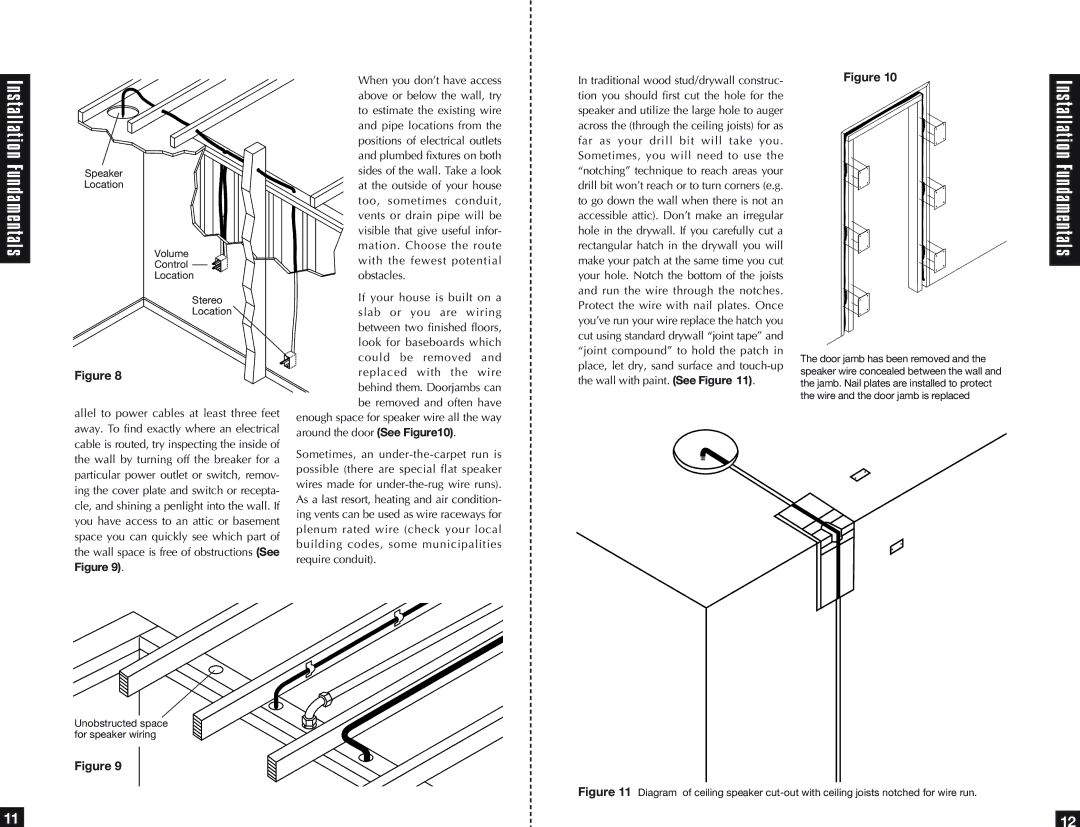
allel to power cables at least three feet away. To find exactly where an electrical cable is routed, try inspecting the inside of the wall by turning off the breaker for a particular power outlet or switch, remov- ing the cover plate and switch or recepta- cle, and shining a penlight into the wall. If you have access to an attic or basement space you can quickly see which part of the wall space is free of obstructions (See Figure 9).

When you don’t have access above or below the wall, try to estimate the existing wire and pipe locations from the positions of electrical outlets and plumbed fixtures on both sides of the wall. Take a look at the outside of your house too, sometimes conduit, vents or drain pipe will be visible that give useful infor- mation. Choose the route with the fewest potential obstacles.

If your house is built on a slab or you are wiring between two finished floors, look for baseboards which could be removed and replaced with the wire behind them. Doorjambs can be removed and often have

enough space for speaker wire all the way around the door (See Figure10).

Sometimes, an under-the-carpet run is possible (there are special flat speaker wires made for under-the-rug wire runs). As a last resort, heating and air condition- ing vents can be used as wire raceways for plenum rated wire (check your local building codes, some municipalities require conduit).

In traditional wood stud/drywall construc- tion you should first cut the hole for the speaker and utilize the large hole to auger across the (through the ceiling joists) for as far as your drill bit will take you. Sometimes, you will need to use the “notching” technique to reach areas your drill bit won’t reach or to turn corners (e.g. to go down the wall when there is not an accessible attic). Don’t make an irregular hole in the drywall. If you carefully cut a rectangular hatch in the drywall you will make your patch at the same time you cut your hole. Notch the bottom of the joists and run the wire through the notches. Protect the wire with nail plates. Once you’ve run your wire replace the hatch you cut using standard drywall “joint tape” and “joint compound” to hold the patch in place, let dry, sand surface and touch-up the wall with paint. (See Figure 11).

Figure 10

The door jamb has been removed and the speaker wire concealed between the wall and the jamb. Nail plates are installed to protect the wire and the door jamb is replaced

Installation Fundamentals

Unobstructed space for speaker wiring

Figure 9

Figure 11 Diagram of ceiling speaker cut-out with ceiling joists notched for wire run.

11

12

Page 12
Image 12
Niles Audio CM5PR, CM6PR specifications Unobstructed space for speaker wiring

CM6PR, CM5PR specifications

Niles Audio, a renowned name in the audio industry, introduces the CM5PR and CM6PR, both part of their premium in-ceiling speaker range designed to deliver exceptional sound quality in any environment. These models are engineered for customers who prioritize both aesthetic appeal and superior acoustics in their home audio systems.

The CM5PR features a 5.25-inch polypropylene woofer, delivering a well-balanced sound profile that is rich in detail across the entire audio spectrum. Coupled with a 1-inch aluminum dome tweeter, it provides crisp highs and smooth midrange tones, making it an ideal choice for music enthusiasts and movie lovers alike. The CM6PR, on the other hand, ups the ante with a larger 6.5-inch polypropylene woofer, enabling it to deliver even deeper bass response. The tweeter remains consistent, ensuring both speakers provide uniform sound quality throughout different rooms.

One of the standout technologies behind the CM5PR and CM6PR is the patented IN-CEILING speaker design, which minimizes sound distortion while providing a broad dispersion pattern. This enables a more immersive listening experience, as the speakers can fill the room with clear sound regardless of the listener's position. The speakers are also equipped with a unique speaker grille that can be painted to match the room decor, making them blend seamlessly into any environment.

Furthermore, both models come with adjustable tweeter and woofer controls that allow users to customize the sound to their liking. This is particularly beneficial for rooms with challenging acoustics, where fine-tuning can lead to significantly improved audio performance.

Installation is simplified by their direct-connect system that allows for quick integration into existing audio systems. The CM5PR and CM6PR speakers are compatible with a wide range of amplifiers and receivers, making them versatile choices for various setups.

In terms of durability, Niles Audio has designed these speakers with a moisture-resistant construction, making them suitable for installation in humid areas such as kitchens and bathrooms without compromising sound quality.

In summary, the Niles Audio CM5PR and CM6PR speakers are exceptional choices for anyone looking to enhance their home audio experience while ensuring aesthetic harmony with their living spaces. With their advanced technologies and thoughtful design features, they set a standard in in-ceiling audio solutions.