System Setup
The first time the Nintendo DS is turned on, you will be asked to select the screen language. Use the +Control Pad or stylus to select a language, then touch "Yes" or press the A Button.
Follow the
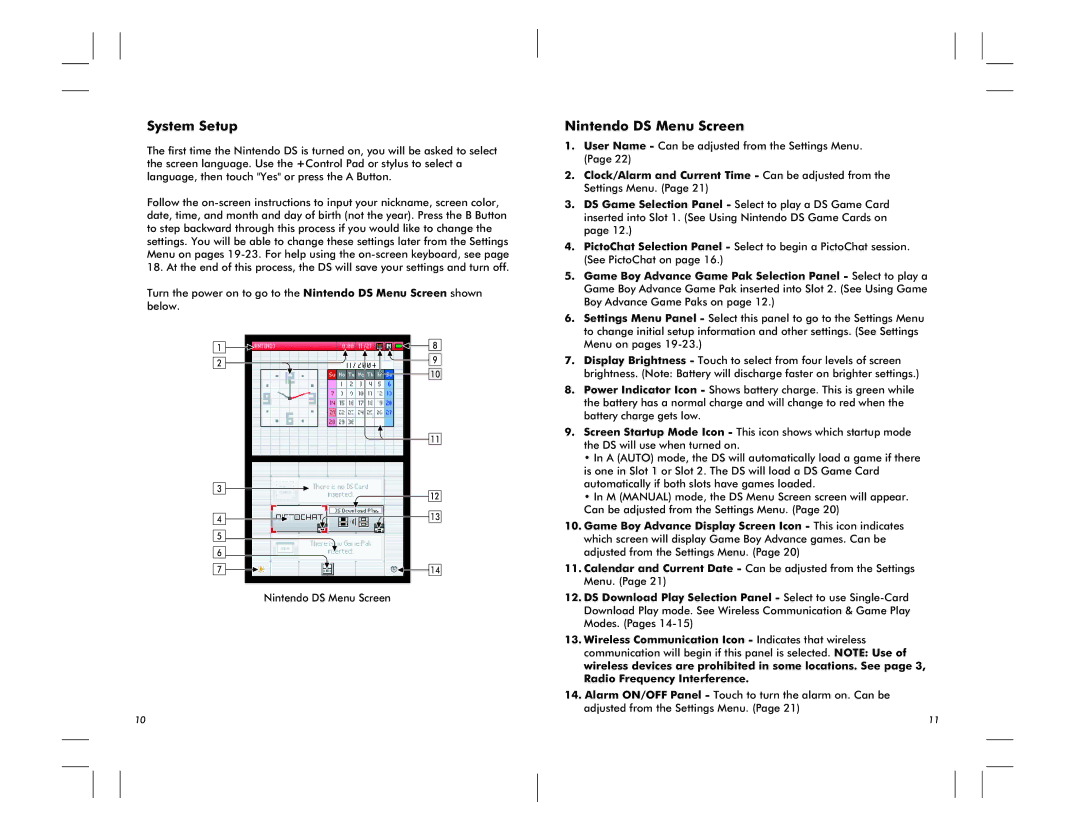
Turn the power on to go to the Nintendo DS Menu Screen shown below.
1 | 8 | |
2 | 9 | |
10 | ||
| ||
| 11 | |
3 | 12 | |
| ||
4 | 13 | |
5 |
| |
6 |
| |
7 | 14 |
Nintendo DS Menu Screen
Nintendo DS Menu Screen
1.User Name - Can be adjusted from the Settings Menu. (Page 22)
2.Clock/Alarm and Current Time - Can be adjusted from the Settings Menu. (Page 21)
3.DS Game Selection Panel - Select to play a DS Game Card inserted into Slot 1. (See Using Nintendo DS Game Cards on page 12.)
4.PictoChat Selection Panel - Select to begin a PictoChat session. (See PictoChat on page 16.)
5.Game Boy Advance Game Pak Selection Panel - Select to play a Game Boy Advance Game Pak inserted into Slot 2. (See Using Game Boy Advance Game Paks on page 12.)
6.Settings Menu Panel - Select this panel to go to the Settings Menu to change initial setup information and other settings. (See Settings Menu on pages
7.Display Brightness - Touch to select from four levels of screen brightness. (Note: Battery will discharge faster on brighter settings.)
8.Power Indicator Icon - Shows battery charge. This is green while the battery has a normal charge and will change to red when the battery charge gets low.
9.Screen Startup Mode Icon - This icon shows which startup mode the DS will use when turned on.
•In A (AUTO) mode, the DS will automatically load a game if there is one in Slot 1 or Slot 2. The DS will load a DS Game Card automatically if both slots have games loaded.
•In M (MANUAL) mode, the DS Menu Screen screen will appear. Can be adjusted from the Settings Menu. (Page 20)
10.Game Boy Advance Display Screen Icon - This icon indicates which screen will display Game Boy Advance games. Can be adjusted from the Settings Menu. (Page 20)
11.Calendar and Current Date - Can be adjusted from the Settings Menu. (Page 21)
12.DS Download Play Selection Panel - Select to use
13.Wireless Communication Icon - Indicates that wireless communication will begin if this panel is selected. NOTE: Use of wireless devices are prohibited in some locations. See page 3, Radio Frequency Interference.
14.Alarm ON/OFF Panel - Touch to turn the alarm on. Can be adjusted from the Settings Menu. (Page 21)
10 | 11 |
