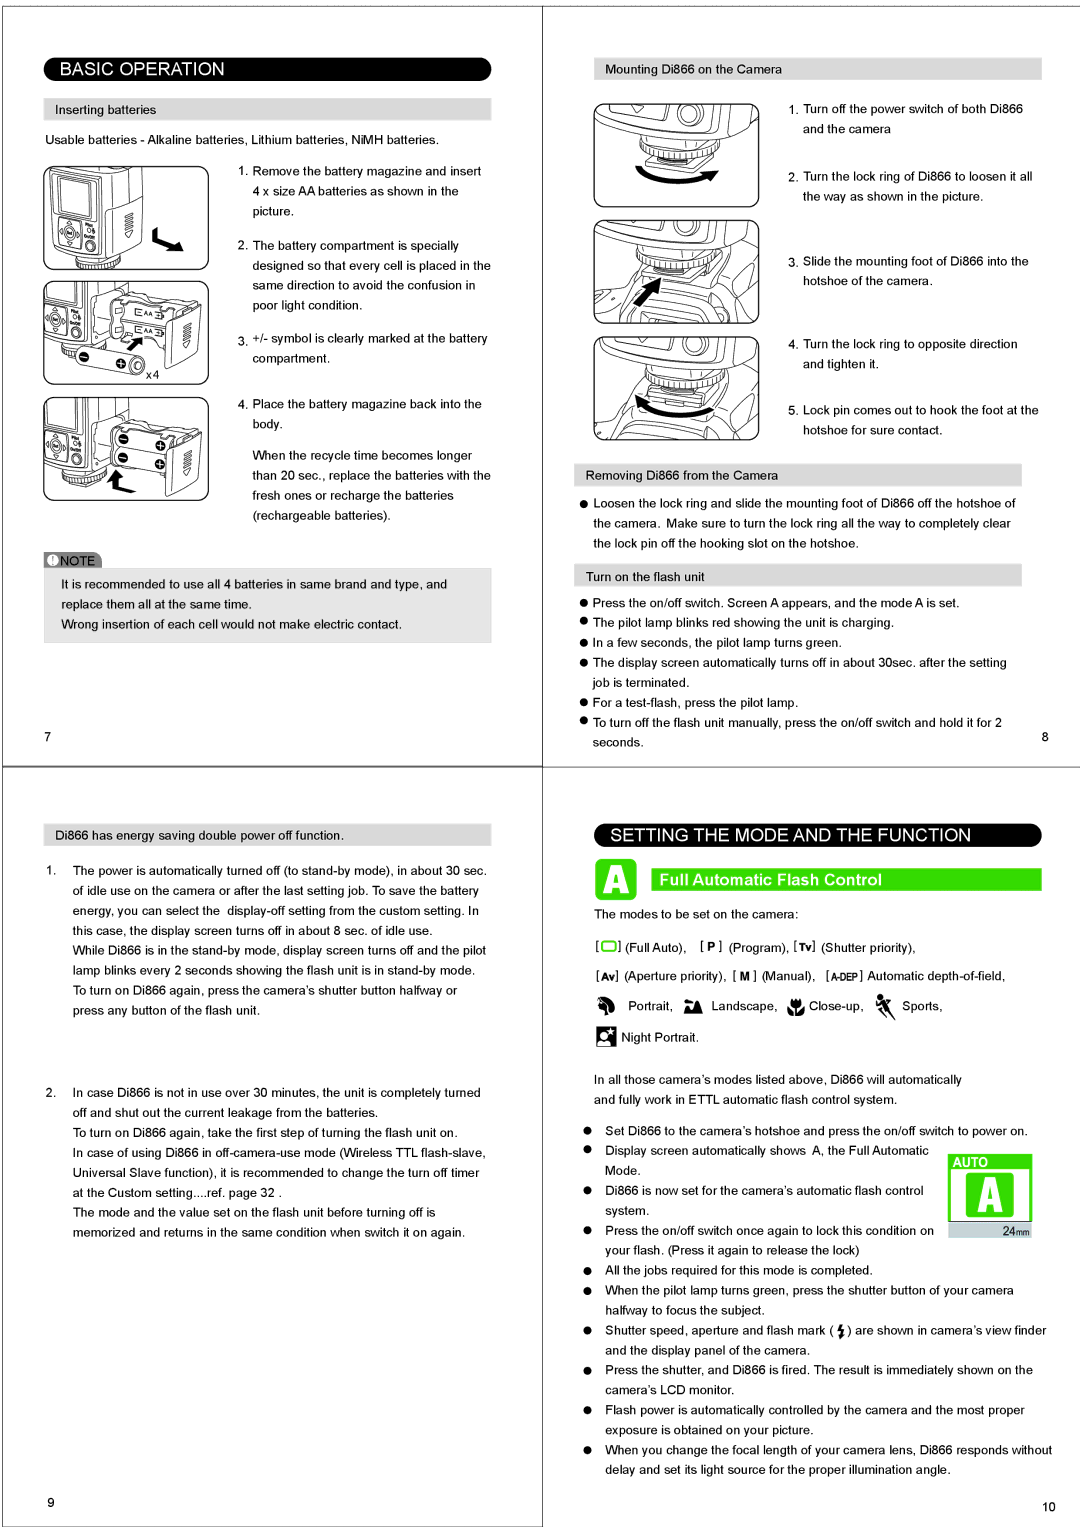
BASIC OPERATION | Mounting Di866 on the Camera |
| |
Inserting batteries | 1. Turn off the power switch of both Di866 |
| |
Usable batteries - Alkaline batteries, Lithium batteries, NiMH batteries. | and the camera |
| |
|
| ||
1. Remove the battery magazine and insert | 2. Turn the lock ring of Di866 to loosen it all |
| |
4 x size AA batteries as shown in the |
| ||
the way as shown in the picture. |
| ||
picture. |
| ||
|
| ||
2. The battery compartment is specially | 3. Slide the mounting foot of Di866 into the |
| |
designed so that every cell is placed in the |
| ||
same direction to avoid the confusion in | hotshoe of the camera. |
| |
|
| ||
poor light condition. |
|
| |
3. +/- symbol is clearly marked at the battery | 4. Turn the lock ring to opposite direction |
| |
compartment. | and tighten it. |
| |
x4 |
| ||
|
| ||
4. Place the battery magazine back into the | 5. Lock pin comes out to hook the foot at the |
| |
body. |
| ||
hotshoe for sure contact. |
| ||
|
| ||
When the recycle time becomes longer |
|
| |
than 20 sec., replace the batteries with the | Removing Di866 from the Camera |
| |
fresh ones or recharge the batteries | Loosen the lock ring and slide the mounting foot of Di866 off the hotshoe of |
| |
(rechargeable batteries). |
| ||
the camera. Make sure to turn the lock ring all the way to completely clear |
| ||
|
| ||
| the lock pin off the hooking slot on the hotshoe. |
| |
! NOTE | Turn on the flash unit |
| |
It is recommended to use all 4 batteries in same brand and type, and |
| ||
|
| ||
replace them all at the same time. | Press the on/off switch. Screen A appears, and the mode A is set. |
| |
Wrong insertion of each cell would not make electric contact. | The pilot lamp blinks red showing the unit is charging. |
| |
| In a few seconds, the pilot lamp turns green. |
| |
| The display screen automatically turns off in about 30sec. after the setting |
| |
| job is terminated. |
| |
| For a |
| |
7 | To turn off the flash unit manually, press the on/off switch and hold it for 2 | 8 | |
seconds. | |||
|
|
Di866 has energy saving double power off function. |
| SETTING THE MODE AND THE FUNCTION | |||||||||||||
1. | The power is automatically turned off (to |
|
|
|
|
|
|
|
|
|
|
|
|
| |
|
|
| Full Automatic Flash Control |
| |||||||||||
| of idle use on the camera or after the last setting job. To save the battery |
|
|
|
| ||||||||||
|
|
|
|
|
|
|
|
|
|
|
|
|
| ||
| energy, you can select the | The modes to be set on the camera: |
|
|
|
|
|
|
| ||||||
| this case, the display screen turns off in about 8 sec. of idle use. |
|
|
|
|
|
|
|
|
|
|
|
|
| |
| While Di866 is in the |
|
| (Full Auto), |
| (Program), | Tv | (Shutter priority), | |||||||
|
|
| |||||||||||||
| lamp blinks every 2 seconds showing the flash unit is in |
| Av (Aperture priority), | (Manual), | Automatic | ||||||||||
| To turn on Di866 again, press the camera’s shutter button halfway or |
|
| Portrait, | Landscape, |
| Sports, | ||||||||
| press any button of the flash unit. |
|
|
| |||||||||||
|
|
|
| Night Portrait. |
|
|
|
|
|
|
|
|
| ||
|
|
|
|
|
|
|
|
|
|
|
|
| |||
2. | In case Di866 is not in use over 30 minutes, the unit is completely turned | In all those camera’s modes listed above, Di866 will automatically | |||||||||||||
and fully work in ETTL automatic flash control system. | |||||||||||||||
| off and shut out the current leakage from the batteries. | ||||||||||||||
|
|
|
|
|
|
|
|
|
|
|
|
|
| ||
| To turn on Di866 again, take the first step of turning the flash unit on. |
| Set Di866 to the camera’s hotshoe and press the on/off switch to power on. | ||||||||||||
| In case of using Di866 in |
| Display screen automatically shows A, the Full Automatic |
|
| ||||||||||
|
|
| |||||||||||||
| Universal Slave function), it is recommended to change the turn off timer |
| Mode. |
|
|
|
|
|
|
|
|
| |||
|
|
|
|
|
|
|
|
|
|
| |||||
| at the Custom setting....ref. page 32 . |
| Di866 is now set for the camera’s automatic flash control |
|
| ||||||||||
| The mode and the value set on the flash unit before turning off is |
| system. |
|
|
|
|
|
|
|
|
| |||
| memorized and returns in the same condition when switch it on again. |
| Press the on/off switch once again to lock this condition on |
|
| ||||||||||
|
|
| your flash. (Press it again to release the lock) |
|
|
|
| ||||||||
|
|
| All the jobs required for this mode is completed. | ||||||||||||
|
|
| When the pilot lamp turns green, press the shutter button of your camera | ||||||||||||
|
|
| halfway to focus the subject. |
|
|
|
|
|
|
| |||||
|
|
| Shutter speed, aperture and flash mark ( ) are shown in camera’s view finder | ||||||||||||
|
|
| and the display panel of the camera. |
|
|
|
|
| |||||||
|
|
| Press the shutter, and Di866 is fired. The result is immediately shown on the | ||||||||||||
|
|
| camera’s LCD monitor. |
|
|
|
|
|
|
| |||||
|
|
| Flash power is automatically controlled by the camera and the most proper | ||||||||||||
|
|
| exposure is obtained on your picture. |
|
|
|
|
| |||||||
|
|
| When you change the focal length of your camera lens, Di866 responds without | ||||||||||||
|
|
| delay and set its light source for the proper illumination angle. | ||||||||||||
9 |
|
|
|
|
|
|
|
|
|
| 10 | ||||
|
|
|
|
|
|
|
|
|
|
| |||||