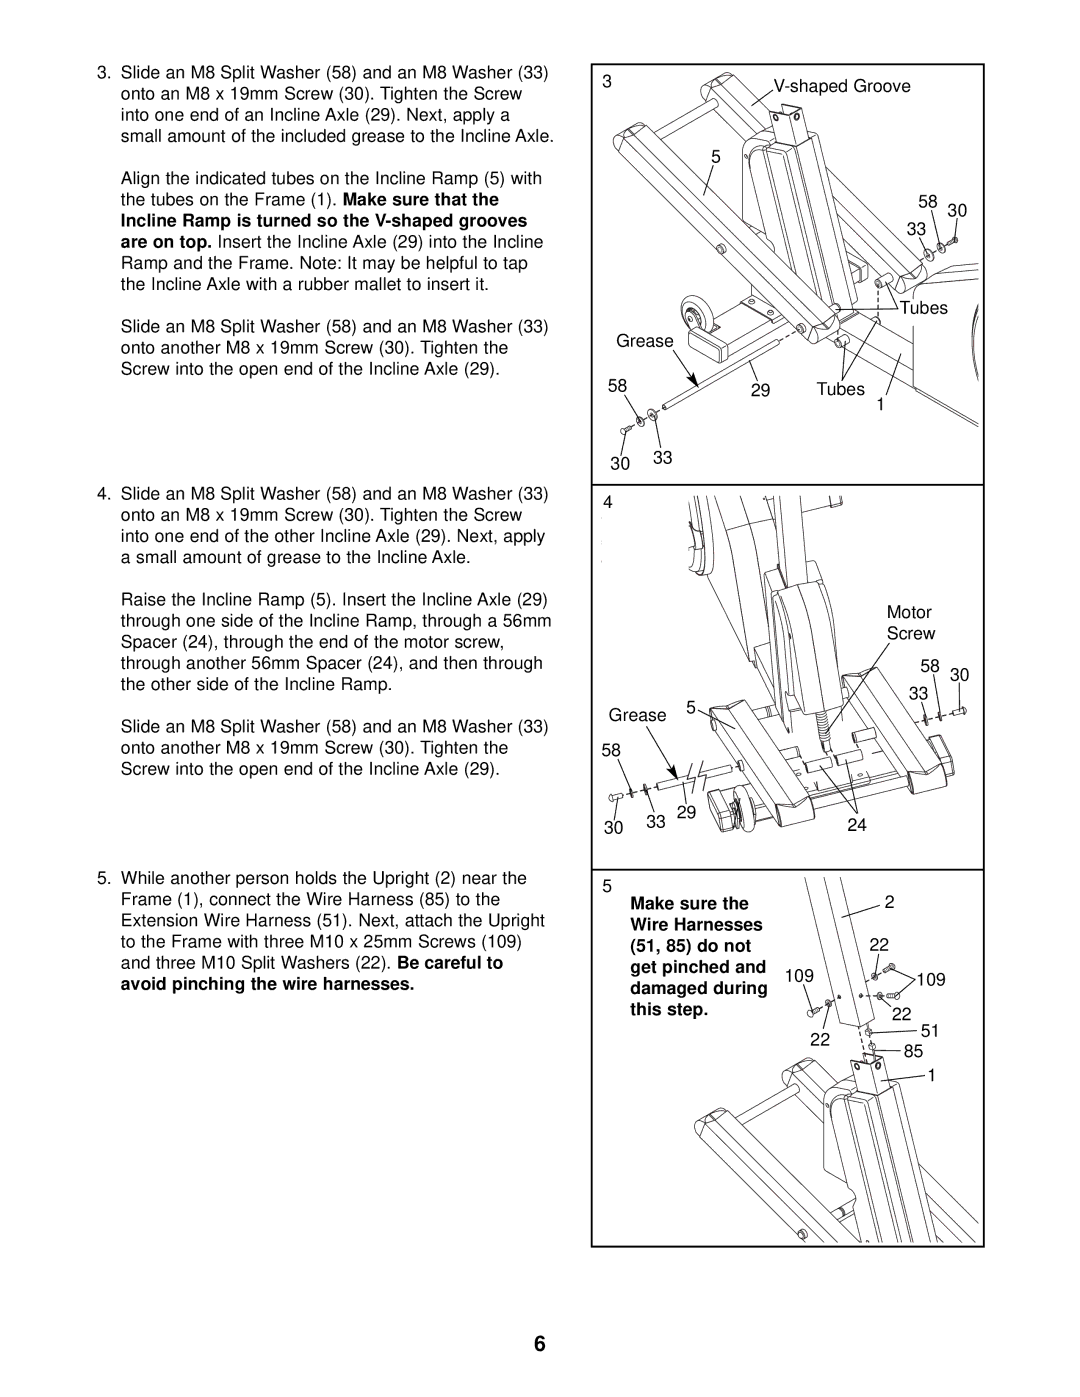
3.Slide an M8 Split Washer (58) and an M8 Washer (33) onto an M8 x 19mm Screw (30). Tighten the Screw into one end of an Incline Axle (29). Next, apply a small amount of the included grease to the Incline Axle.
Align the indicated tubes on the Incline Ramp (5) with the tubes on the Frame (1). Make sure that the
Incline Ramp is turned so the
Slide an M8 Split Washer (58) and an M8 Washer (33) onto another M8 x 19mm Screw (30). Tighten the Screw into the open end of the Incline Axle (29).
4.Slide an M8 Split Washer (58) and an M8 Washer (33) onto an M8 x 19mm Screw (30). Tighten the Screw into one end of the other Incline Axle (29). Next, apply a small amount of grease to the Incline Axle.
Raise the Incline Ramp (5). Insert the Incline Axle (29) through one side of the Incline Ramp, through a 56mm Spacer (24), through the end of the motor screw, through another 56mm Spacer (24), and then through the other side of the Incline Ramp.
Slide an M8 Split Washer (58) and an M8 Washer (33) onto another M8 x 19mm Screw (30). Tighten the Screw into the open end of the Incline Axle (29).
5.While another person holds the Upright (2) near the Frame (1), connect the Wire Harness (85) to the Extension Wire Harness (51). Next, attach the Upright to the Frame with three M10 x 25mm Screws (109) and three M10 Split Washers (22). Be careful to avoid pinching the wire harnesses.
3 |
|
|
| ||
|
| 5 |
|
|
|
|
|
|
| 58 | 30 |
|
|
|
| 33 |
|
|
|
|
| Tubes | |
Grease |
|
|
|
| |
58 |
| 29 | Tubes | 1 |
|
|
|
|
|
| |
30 | 33 |
|
|
|
|
|
|
|
|
| |
4 |
|
|
|
|
|
|
|
|
| Motor |
|
|
|
|
| Screw |
|
|
|
|
| 58 | 30 |
|
| 5 |
| 33 |
|
Grease |
|
|
| ||
|
|
|
| ||
58 |
|
|
|
|
|
30 | 33 | 29 | 24 |
|
|
5 | Make sure the |
| 2 |
| |
|
|
| |||
| Wire Harnesses |
| 22 |
| |
| (51, 85) do not |
|
| ||
| get pinched and | 109 | 109 |
| |
| damaged during |
| |||
|
|
|
| ||
| this step. |
| 22 |
| |
|
|
| 22 | 51 |
|
|
|
| 85 |
| |
|
|
|
|
| |
|
|
|
| 1 |
|
6
