5.Replacement installation:
Position housing so that it is centered in existing opening.
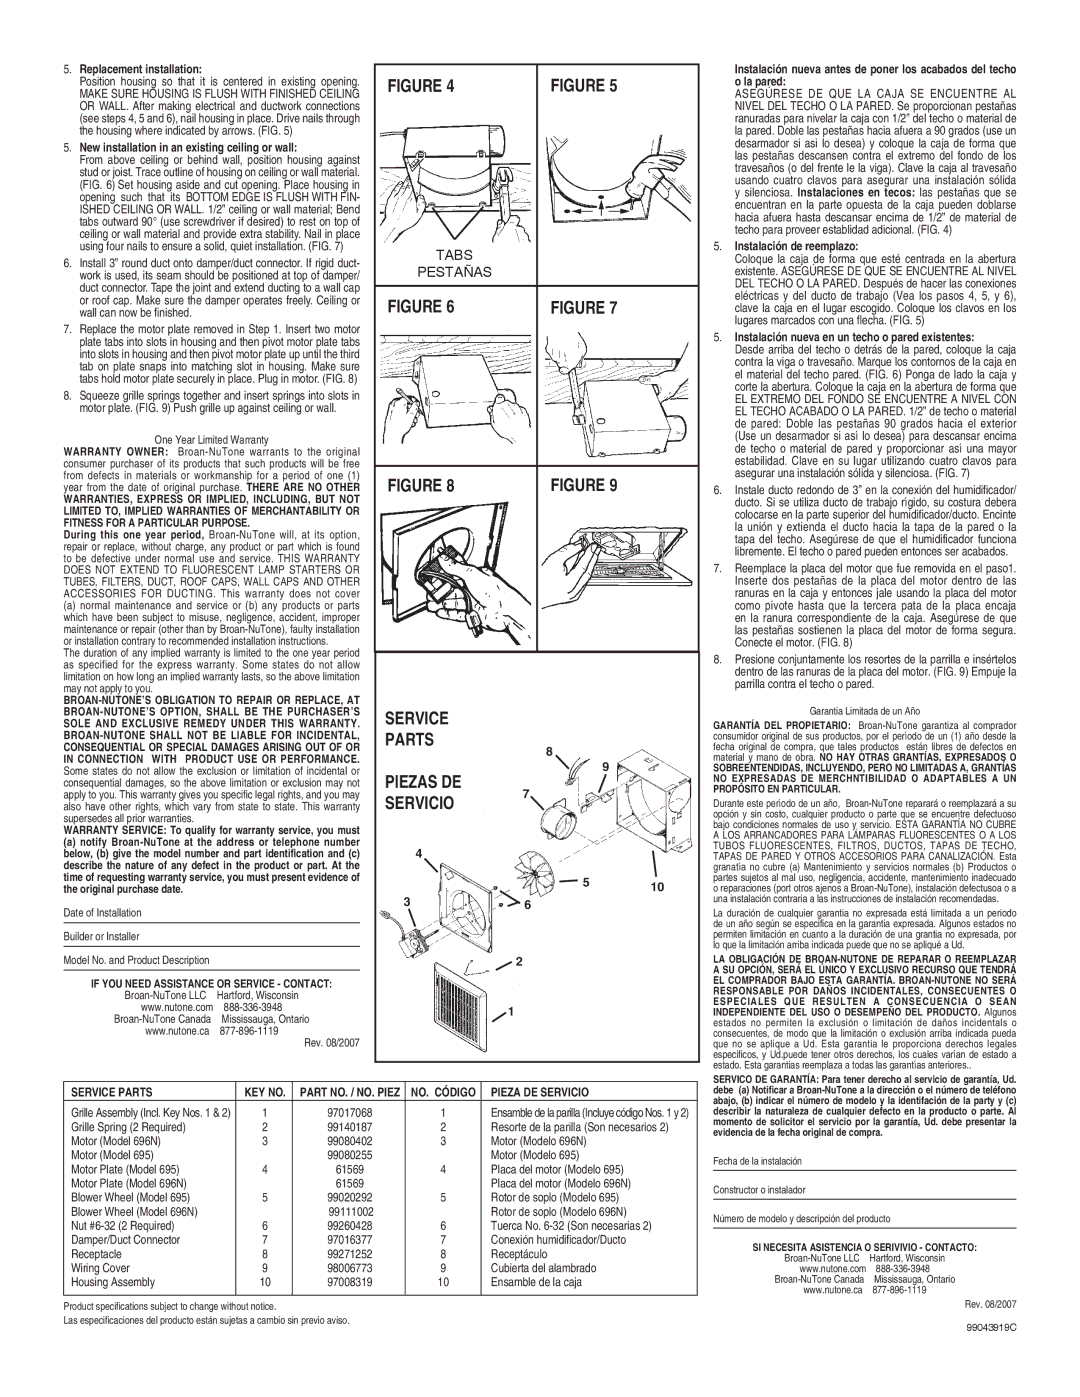
MAKE SURE HOUSING IS FLUSH WITH FINISHED CEILING OR WALL. After making electrical and ductwork connections (see steps 4, 5 and 6), nail housing in place. Drive nails through the housing where indicated by arrows. (FIG. 5)
5.New installation in an existing ceiling or wall:
From above ceiling or behind wall, position housing against stud or joist. Trace outline of housing on ceiling or wall material. (FIG. 6) Set housing aside and cut opening. Place housing in opening such that its BOTTOM EDGE IS FLUSH WITH FIN- ISHED CEILING OR WALL. 1/2” ceiling or wall material; Bend tabs outward 90° (use screwdriver if desired) to rest on top of ceiling or wall material and provide extra stability. Nail in place using four nails to ensure a solid, quiet installation. (FIG. 7)
6.Install 3” round duct onto damper/duct connector. If rigid duct- work is used, its seam should be positioned at top of damper/ duct connector. Tape the joint and extend ducting to a wall cap or roof cap. Make sure the damper operates freely. Ceiling or wall can now be finished.
7.Replace the motor plate removed in Step 1. Insert two motor plate tabs into slots in housing and then pivot motor plate tabs into slots in housing and then pivot motor plate up until the third tab on plate snaps into matching slot in housing. Make sure tabs hold motor plate securely in place. Plug in motor. (FIG. 8)
8.Squeeze grille springs together and insert springs into slots in motor plate. (FIG. 9) Push grille up against ceiling or wall.
One Year Limited Warranty
WARRANTY OWNER: Broan-NuTone warrants to the original consumer purchaser of its products that such products will be free from defects in materials or workmanship for a period of one (1) year from the date of original purchase. THERE ARE NO OTHER
WARRANTIES, EXPRESS OR IMPLIED, INCLUDING, BUT NOT LIMITED TO, IMPLIED WARRANTIES OF MERCHANTABILITY OR FITNESS FOR A PARTICULAR PURPOSE.
During this one year period, Broan-NuTone will, at its option, repair or replace, without charge, any product or part which is found to be defective under normal use and service. THIS WARRANTY DOES NOT EXTEND TO FLUORESCENT LAMP STARTERS OR TUBES, FILTERS, DUCT, ROOF CAPS, WALL CAPS AND OTHER ACCESSORIES FOR DUCTING. This warranty does not cover
(a) normal maintenance and service or (b) any products or parts |
which have been subject to misuse, negligence, accident, improper |
maintenance or repair (other than by Broan-NuTone), faulty installation |
or installation contrary to recommended installation instructions. |
The duration of any implied warranty is limited to the one year period |
as specified for the express warranty. Some states do not allow |
limitation on how long an implied warranty lasts, so the above limitation |
may not apply to you. |
Broan-NuTone’S OBLIGATION TO REPAIR OR REPLACE, AT |
Broan-NuTone’S OPTION, SHALL BE THE PURCHASER’S |
SOLE AND EXCLUSIVE REMEDY UNDER THIS WARRANTY. |
Broan-NuTone SHALL NOT BE LIABLE FOR INCIDENTAL, |
CONSEQUENTIAL OR SPECIAL DAMAGES ARISING OUT OF OR |
IN CONNECTION WITH PRODUCT USE OR PERFORMANCE. |
Instalación nueva antes de poner los acabados del techo o la pared:
ASEGÚRESE DE QUE LA CAJA SE ENCUENTRE AL NIVEL DEL TECHO O LA PARED. Se proporcionan pestañas ranuradas para nivelar la caja con 1/2” del techo o material de la pared. Doble las pestañas hacia afuera a 90 grados (use un desarmador si asi lo desea) y coloque la caja de forma que las pestañas descansen contra el extremo del fondo de los travesaños (o del frente le la viga). Clave la caja al travesaño usando cuatro clavos para asegurar una instalación sólida y silenciosa. Instalaciones en tecos: las pestañas que se encuentran en la parte opuesta de la caja pueden doblarse hacia afuera hasta descansar encima de 1/2” de material de techo para proveer establidad adicional. (FIG. 4)
5.Instalación de reemplazo:
Coloque la caja de forma que esté centrada en la abertura existente. ASEGÚRESE DE QUE SE ENCUENTRE AL NIVEL DEL TECHO O LA PARED. Después de hacer las conexiones eléctricas y del ducto de trabajo (Vea los pasos 4, 5, y 6), clave la caja en el lugar escogido. Coloque los clavos en los lugares marcados con una flecha. (FIG. 5)
5.Instalación nueva en un techo o pared existentes:
Desde arriba del techo o detrás de la pared, coloque la caja contra la viga o travesaño. Marque los contornos de la caja en el material del techo pared. (FIG. 6) Ponga de lado la caja y corte la abertura. Coloque la caja en la abertura de forma que
EL EXTREMO DEL FONDO SE ENCUENTRE A NIVEL CON EL TECHO ACABADO O LA PARED. 1/2” de techo o material de pared: Doble las pestañas 90 grados hacia el exterior (Use un desarmador si así lo desea) para descansar encima de techo o material de pared y proporcionar así una mayor estabilidad. Clave en su lugar utilizando cuatro clavos para asegurar una instalación sólida y silenciosa. (FIG. 7)
6.Instale ducto redondo de 3” en la conexión del humidificador/ ducto. Si se utiliza ducto de trabajo rígido, su costura debera colocarse en la parte superior del humidificador/ducto. Encinte la unión y extienda el ducto hacia la tapa de la pared o la tapa del techo. Asegúrese de que el humidificador funciona libremente. El techo o pared pueden entonces ser acabados.
7.Reemplace la placa del motor que fue removida en el paso1. Inserte dos pestañas de la placa del motor dentro de las ranuras en la caja y entonces jale usando la placa del motor como pivote hasta que la tercera pata de la placa encaja en la ranura correspondiente de la caja. Asegúrese de que las pestañas sostienen la placa del motor de forma segura. Conecte el motor. (FIG. 8)
8.Presione conjuntamente los resortes de la parrilla e insértelos dentro de las ranuras de la placa del motor. (FIG. 9) Empuje la parrilla contra el techo o pared.
Garantia Limitada de un Año
GARANTÍA DEL PROPIETARIO: Broan-NuTone garantiza al comprador consumidor original de sus productos, por el período de un (1) año desde la fecha original de compra, que tales productos están libres de defectos en material y mano de obra. NO HAY OTRAS GRANTÍAS, EXPRESADOS O