Troubleshooting
PROBLEM: LED does not blink when you press a key.
SOLUTION: Replace battery with one new 3.3 V 2032 Lithium battery.
PROBLEM: LED blinks when you press a key, but device does not respond.
SOLUTION: Make sure the remote is aimed at your device and is not more
than 15 feet away.
PROBLEM: LED blinks one long blink.
SOLUTION: An entry error has occurred (for example, wrong key). Try
entry sequence again.
PROBLEM: Remote does not control sources or commands are not working
properly.
SOLUTION: Try all listed codes for the device. Make sure the device
operates with an infrared remote control.
PROBLEM: CH+,CH-, and LAST do not work for your RCA TV.
SOLUTION: Due to RCA design from 1983 to 1987, only the original remote
control will operate these functions.
PROBLEM: No volume on a source.
SOLUTION: See “Changing Volume Lock”.
PROBLEM: Channels do not change properly.
SOLUTION: If the original remote control required you to press Enter to
change channels, press Enter on this remote after entering the channel
number.
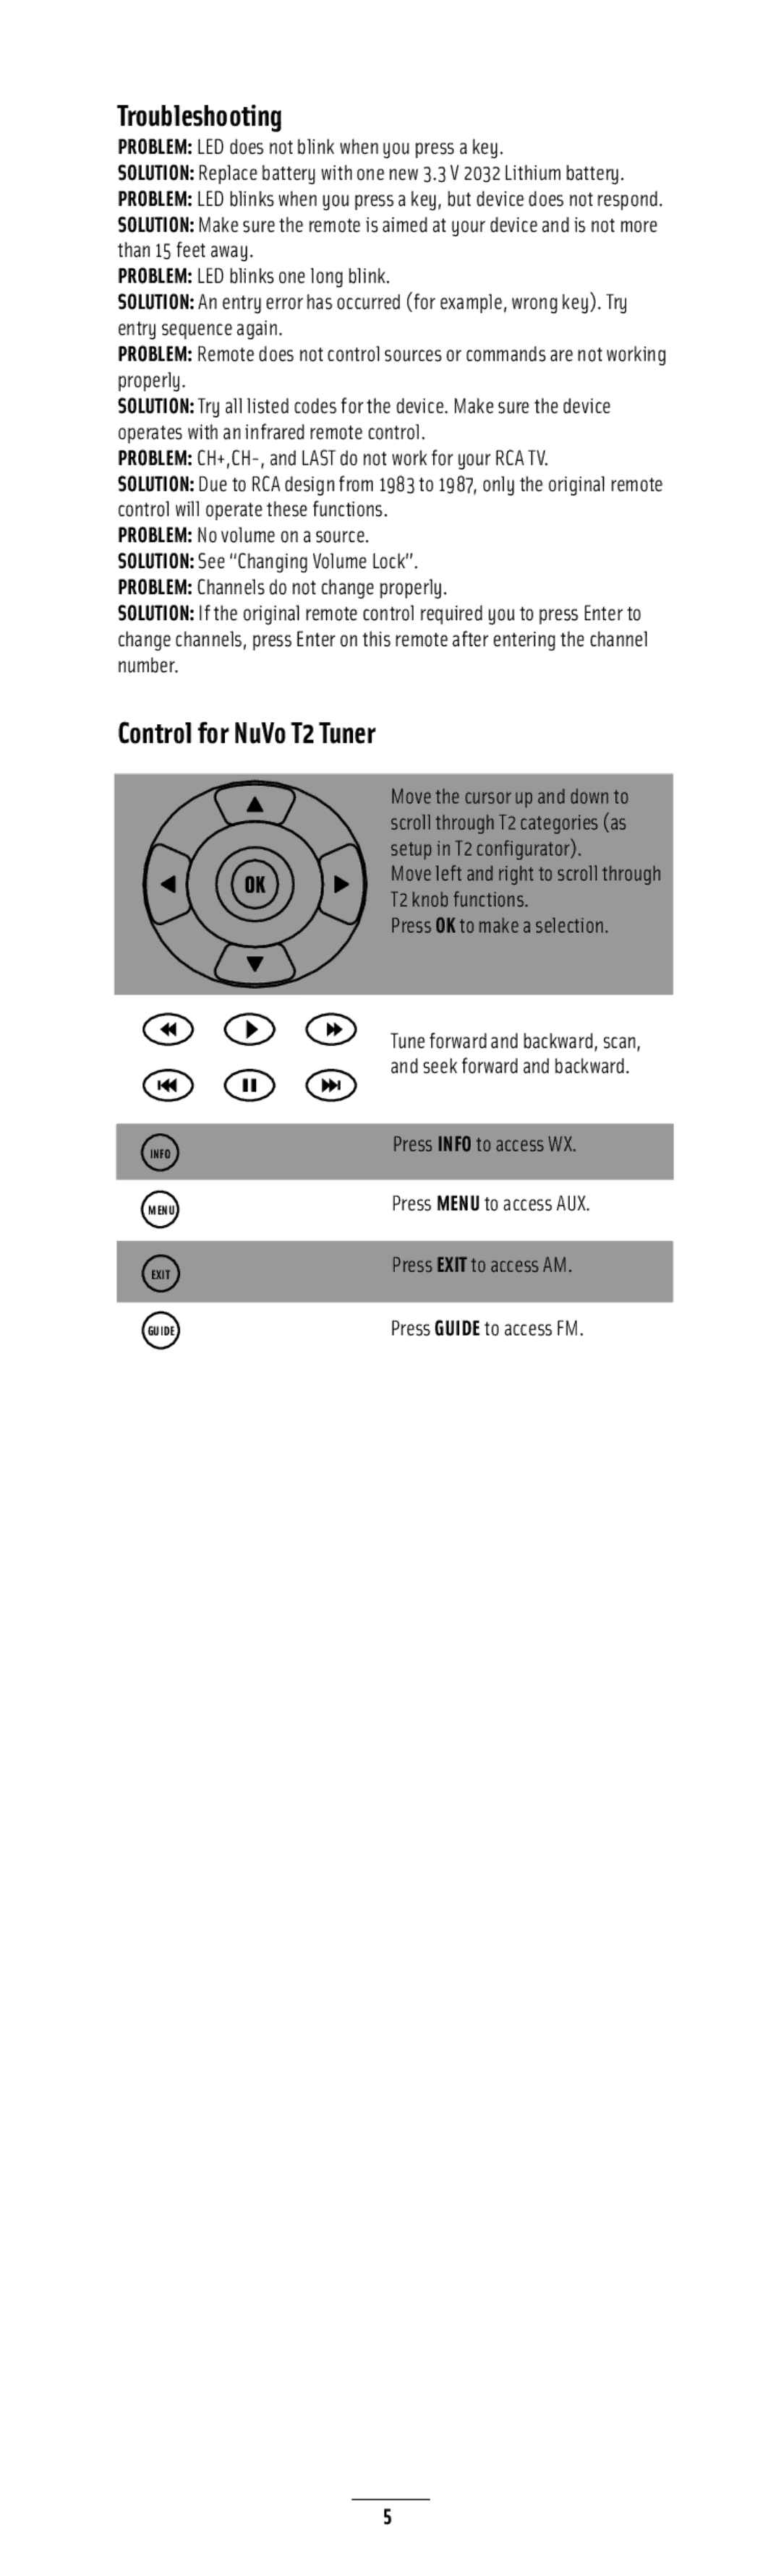
Control for NuVo T2 Tuner
5
Move the cursor up and down to
scroll through T2 categories (as
setup in T2 configurator).
Move left and right to scroll through
T2 knob functions.
Press OK to make a selection.
Tune forward and backward, scan,
and seek forward and backward.
Press INFO to access WX.
Press EXIT to access AM.
Press GUIDE to access FM.
Press MENU to access AUX.
GUIDE
INFO
MENU
EXIT
Now, when you press the Macro key, the remote will send the series of
commands you have entered, but only if you are in the mode you
selected in step 1. For example, you could program the Macro key to turn
on your T2 tuner and select a particular channel, but only if you are in
tuner mode. If you are in DVD mode, this key will do nothing.
Clearing a Mode-Dependent Macro
1. Press and hold SETUP until the red LED blinks twice, then release.
2. Press 978.
3. Press the source key where you programmed the macro (Source 1-6).
4. Press the macro’s activation key (POWER, any unused key, etc.).
5. Press and hold SETUP until the red LED blinks twice, then release.
Using Learning
The NV-LRC1 includes a Learning feature so you can add functions that
are unique to your home entertainment devices (e.g., CD skip forward or
backward). However, there are some considerations:
Learning Precautions
- Your original remote controls must be in working order for learning to
work properly.
- Learning keys are mode specific, so each one can store a unique
function for each mode.
- Learned keys can be used in macros (See Using Macros).
- Do not use the following keys for learning: Source Keys, SETUP, BACK,
REPEAT, FAV SCAN, SLEEP, or Record ( ) Key.
- Learning capacity is approximately 16 to 25 keys, depending on the
code being learned.
- Certain device codes are not learnable including multi-frequency
types, some high frequency ones, and other unusual formats.
- For optimum learning: avoid high levels of ambient light such as
natural sunlight or energy-efficient fluorescent lights.
NOTE: Please have your original remote controls handy before
programming learning.
Programming a Learned Key
NOTE: If more than 10 seconds pass between key presses, the remote
exits programming.
1. Press and hold SETUP until LED flashes twice.
2. Press 975.
3. Press a source key once (1-6) to assign a mode for learning.
4. Place the NV-LRC1 head-to-head (about 2” apart) from your original
remote control. Also locate the key (on your original remote control)
that will serve as the teaching function.
5. On the NV-LRC1, press a key where the learned function will be stored.
6. On the original remote, press and hold the key to be learned. The
LRC1’s LED will turn off. Continue holding the key on the original
remote until the LRC1’s LED blinks twice.
NOTE: If the LED displays one long blink, a learning error has occurred.
Try repeating this step again until a successful capture occurs. If the
function is still not captured, press and hold SETUP to exit programming
and review the “Learning Precautions” above. If needed, also see
“Troubleshooting”. After review, start programming again at step1.
7. Repeat steps 2 to 6 for another key or press and
hold SETUP to exit programming.
Deleting a Single Learning Key
1. Press and hold SETUP until the LED flashes twice.
NOTE: If more than 10 seconds pass between key presses, the remote
exits programming.
2. Press SETUP, then 976 to delete a learned function.
3. Press a source key once (1-6).
4. Press the key containing the learned function to be deleted. The
remote blinks twice.
5. Repeat steps 2 to 4 for another key or press and hold SETUP to
exit programming.
Deleting All Learned Keys in a Specific Mode
1. Press and hold SETUP until the LED blinks twice.
NOTE: If more than 10 seconds pass between key presses, the remote
exits programming.
2. Press 976.
3. Press a source key twice (1-6) to clear all the learned keys for that
Mode. The LED blinks twice.
4. Repeat step 3 for another key or press and hold SETUP to exit
Programming.
4

2"

123
456
OL-V
ON/OFF
VOL+