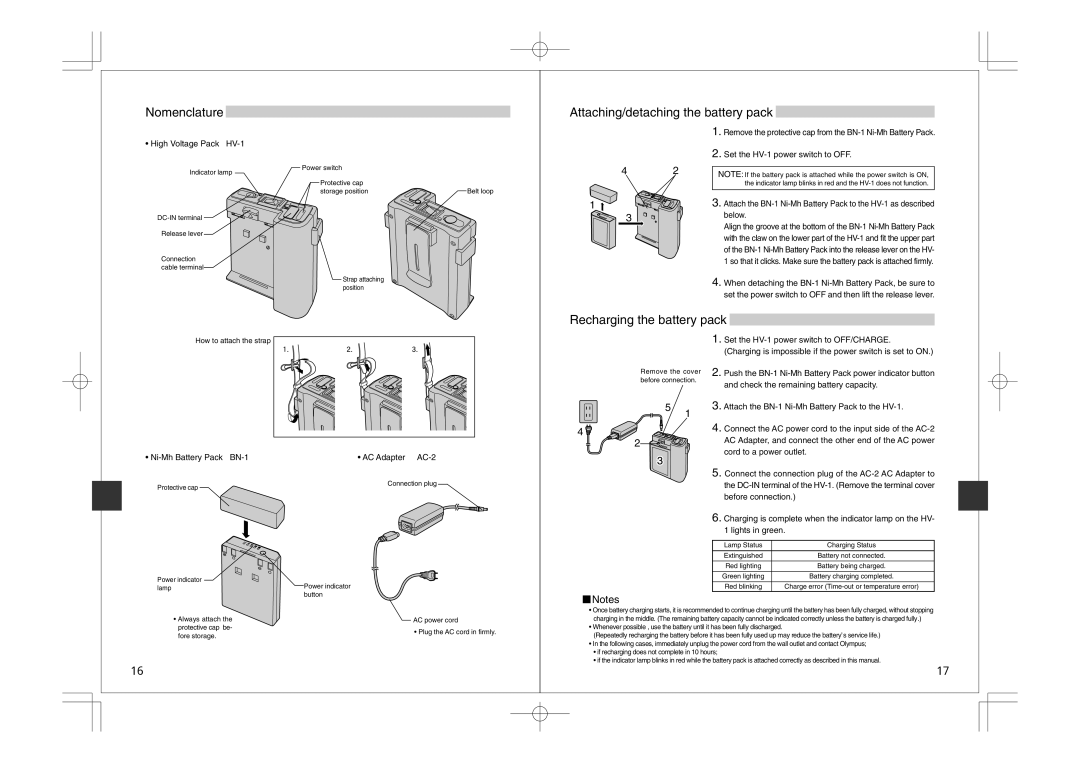
Nomenclature

• High Voltage Pack HV-1

Power switch


Indicator lamp


Protective cap


storage position

Belt loop

DC-IN terminal

Release lever

Connection cable terminal

Strap attaching position

Attaching/detaching the battery pack

1. Remove the protective cap from the BN-1 Ni-Mh Battery Pack.

2.Set the HV-1 power switch to OFF.

4

2

NOTE: If the battery pack is attached while the power switch is ON,


the indicator lamp blinks in red and the HV-1 does not function.

1


3. Attach the BN-1 Ni-Mh Battery Pack to the HV-1 as described

3


below.

Align the groove at the bottom of the BN-1 Ni-Mh Battery Pack with the claw on the lower part of the HV-1 and fit the upper part of the BN-1 Ni-Mh Battery Pack into the release lever on the HV- 1 so that it clicks. Make sure the battery pack is attached firmly.

4.When detaching the BN-1 Ni-Mh Battery Pack, be sure to set the power switch to OFF and then lift the release lever.

Recharging the battery pack

How to attach the strap

NK

OK

PK

Remove the cover before connection.

1. Set the HV-1 power switch to OFF/CHARGE.

(Charging is impossible if the power switch is set to ON.)

2. Push the BN-1 Ni-Mh Battery Pack power indicator button

and check the remaining battery capacity.

5

4

2

1

3. Attach the BN-1 Ni-Mh Battery Pack to the HV-1.

4. Connect the AC power cord to the input side of the AC-2

AC Adapter, and connect the other end of the AC power

cord to a power outlet.

Ni-Mh Battery Pack BN-1

Protective cap

Power indicator lamp

Always attach the protective cap be- fore storage.

16

• AC Adapter AC-2

Connection plug

Power indicator button

AC power cord

• Plug the AC cord in firmly.

5. Connect the connection plug of the AC-2 AC Adapter to

the DC-IN terminal of the HV-1. (Remove the terminal cover

before connection.)

6. Charging is complete when the indicator lamp on the HV-

1 lights in green.

Lamp Status

Charging Status


Extinguished

Battery not connected.


Red lighting

Battery being charged.


Green lighting

Battery charging completed.


Red blinking

Charge error (Time-out or temperature error)

￿Notes

Once battery charging starts, it is recommended to continue charging until the battery has been fully charged, without stopping charging in the middle. (The remaining battery capacity cannot be indicated correctly unless the battery is charged fully.)

Whenever possible , use the battery until it has been fully discharged.

(Repeatedly recharging the battery before it has been fully used up may reduce the battery’s service life.)

In the following cases, immediately unplug the power cord from the wall outlet and contact Olympus;

if recharging does not complete in 10 hours;

if the indicator lamp blinks in red while the battery pack is attached correctly as described in this manual.

17

Page 9
Image 9
Olympus FS-HV1 manual Nomenclature, Attaching/detaching the battery pack, Recharging the battery pack

FS-HV1 specifications

The Olympus FS-HV1 is a sophisticated optical device tailored for the demanding needs of both amateur and professional filmmakers and photographers. Designed with an emphasis on flexibility and quality, this hybrid camera embodies advanced technologies that enhance the user experience.

At the core of the FS-HV1 is a high-resolution sensor that captures stunning images with sharp details and vibrant colors. This sensor is complemented by the device's exceptional image processing capabilities, allowing for rapid shooting speeds and remarkable low-light performance. Whether shooting in bright daylight or dimly lit environments, users can expect pristine image clarity and reduced noise.

One of the hallmark features of the FS-HV1 is its versatile optical zoom lens. This lens offers a wide focal range, giving users the ability to capture everything from expansive landscapes to close-up portraits with ease. The zoom mechanism is designed for smooth operation, ensuring seamless transitions between various focal lengths while maintaining image integrity.

The FS-HV1 also includes advanced stabilization technology, which significantly reduces the impact of camera shake. This feature is invaluable for handheld shooting, enabling videographers to produce fluid and steady footage without the need for additional equipment such as steady-cams or rigs. Coupled with this stabilization is the camera's fast autofocus system, which ensures that subjects remain sharp and in focus, even during dynamic shooting situations.

In terms of connectivity, the Olympus FS-HV1 offers built-in Wi-Fi and Bluetooth capabilities. This allows users to easily transfer files to their smartphones or tablets for instant sharing on social media platforms. Additionally, remote shooting features enable users to control the camera from a distance, providing flexibility for group shots or unique perspectives.

The durability of the FS-HV1 is another feature that stands out. Engineered to withstand the rigors of outdoor shooting, it is weather-sealed to protect against rain and dust. Its ergonomic design features intuitive controls that enhance usability, making it accessible for users at all skill levels.

In summary, the Olympus FS-HV1 is a powerful tool that marries advanced technology with user-friendly design. With its high-resolution sensor, versatile zoom lens, advanced stabilization and connectivity options, it stands out as a reliable choice for anyone looking to elevate their photographic and videographic endeavors. Whether capturing fleeting moments or crafting cinematic storytelling, the FS-HV1 is equipped to deliver exceptional results.