QUICK START GUIDE
OREGON SCIENTIFIC WEATHER COLLECTION
You will have one of the following Oregon Scientific products:
100 : EMR201A 400 : BAR206A
200 : RMR202A 500 : BAR208HGA
300 : RMR203HGA RAIN AND TEMPERATURE STATION:
RGR202A
A | UNPACK | |
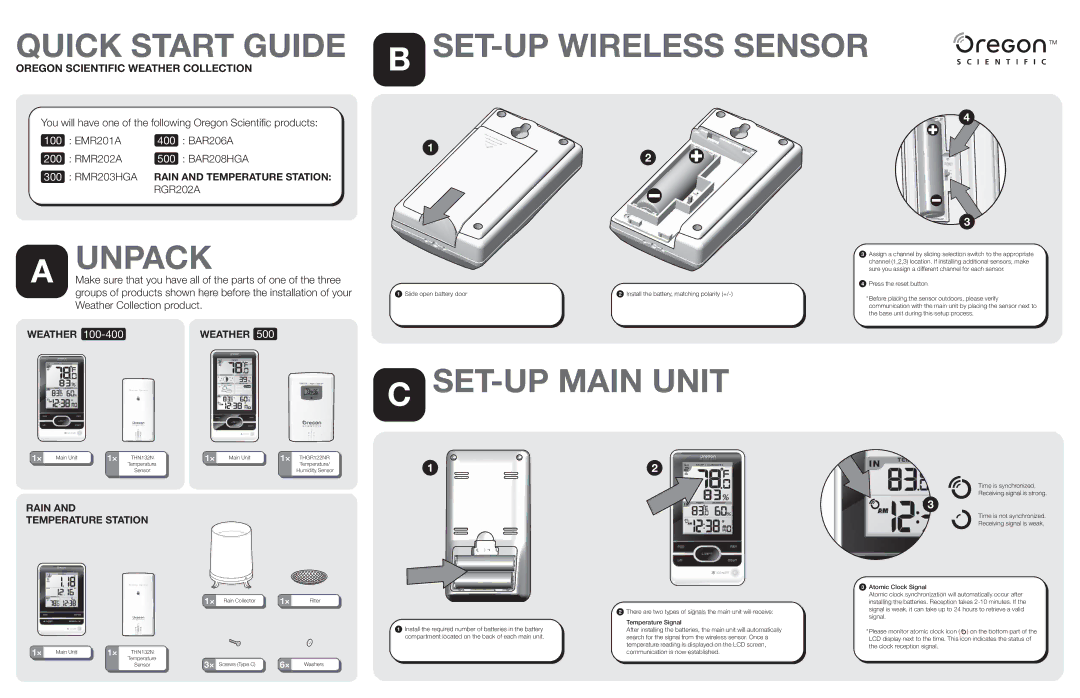
Make sure that you have all of the parts of one of the three | ||
| groups of products shown here before the installation of your | |
| Weather Collection product. | |
WEATHER | WEATHER 500 | |
B SET-UP WIRELESS SENSOR
4
1
2
3
3 Assign a channel by sliding selection switch to the appropriate channel (1,2,3) location. If installing additional sensors, make sure you assign a different channel for each sensor.
4 Press the reset button
1 Slide open battery door | 2 Install the battery, matching polarity |
* Before placing the sensor outdoors, please verify communication with the main unit by placing the sensor next to the base unit during this setup process.
1× | Main Unit | 1× | THN132N | 1× | Main Unit | 1× THGR122NR |
|
|
| Temperature |
|
| Temperature/ |
|
|
| Sensor |
|
| Humidity Sensor |
RAIN AND
TEMPERATURE STATION
1× Rain Collector | 1× | Filter |
1× Main Unit | 1× THN132N |
|
|
| Temperature | 3× Screws (Type C) | 6× Washers |
| Sensor |
CSET-UP MAIN UNIT
12
| 2 There are two types of signals the main unit will receive: |
1 Install the required number of batteries in the battery | Temperature Signal |
After installing the batteries, the main unit will automatically | |
compartment located on the back of each main unit. | search for the signal from the wireless sensor. Once a |
| temperature reading is displayed on the LCD screen, |
| communication is now established. |
Time is synchronized.
Receiving signal is strong.
3
Time is not synchronized.
Receiving signal is weak.
3Atomic Clock Signal
Atomic clock synchronization will automatically occur after installing the batteries. Reception takes
*Please monitor atomic clock icon (![]() ) on the bottom part of the LCD display next to the time. This icon indicates the status of the clock reception signal.
) on the bottom part of the LCD display next to the time. This icon indicates the status of the clock reception signal.
