D
EPLACE WIRELESS SENSOR OUTSIDE
13
2
45
1 |
|
|
|
|
|
|
|
|
|
|
|
| 2 |
|
|
|
|
|
|
|
|
|
|
|
|
|
|
|
|
|
|
|
|
|
|
|
|
|
|
|
|
|
|
|
|
|
|
|
|
|
|
|
|
|
|
|
|
|
|
|
|
|
|
|
|
|
|
|
|
|
|
|
|
|
|
|
|
|
|
|
|
|
|
|
|
|
|
|
|
|
|
|
|
|
|
|
|
|
|
|
|
|
|
|
|
|
|
|
|
|
|
|
|
|
|
|
|
|
|
|
|
|
|
|
|
|
|
|
|
|
|
|
|
|
|
|
|
|
|
|
|
|
|
|
|
|
|
|
|
|
|
|
|
|
|
|
|
|
|
|
|
|
|
|
|
|
|
|
|
|
|
|
|
|
|
|
|
|
|
|
|
|
|
|
|
|
|
|
|
|
|
|
|
|
|
|
|
|
|
|
|
|
|
|
|
|
|
|
|
|
|
|
|
|
|
|
|
|
|
|
|
|
|
|
|
|
|
|
|
|
|
|
|
|
|
|
|
|
|
|
|
|
|
|
|
|
|
|
|
|
|
|
|
|
|
|
|
|
|
|
|
|
|
|
|
|
|
|
|
|
|
|
|
|
|
|
|
|
|
|
|
|
|
|
|
|
|
|
|
|
|
|
|
|
|
|
|
|
|
|
|
|
|
|
|
|
|
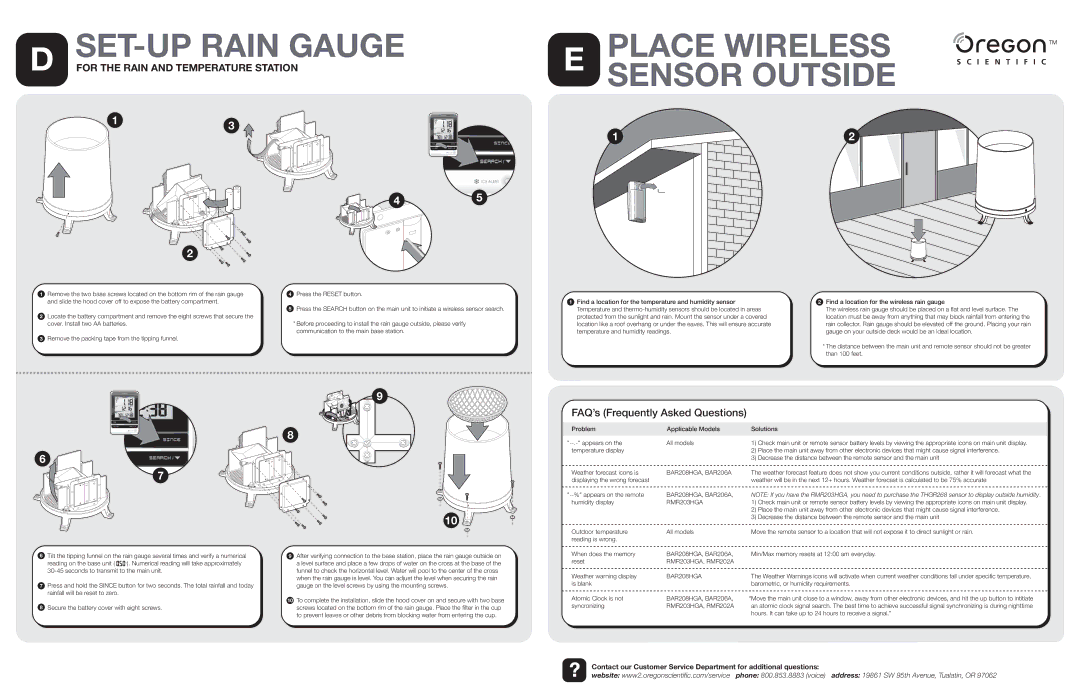
1Remove the two base screws located on the bottom rim of the rain gauge and slide the hood cover off to expose the battery compartment.
2Locate the battery compartment and remove the eight screws that secure the cover. Install two AA batteries.
3Remove the packing tape from the tipping funnel.
4Press the RESET button.
5Press the SEARCH button on the main unit to initiate a wireless sensor search.
*Before proceeding to install the rain gauge outside, please verify communication to the main base station.
1Find a location for the temperature and humidity sensor Temperature and
2Find a location for the wireless rain gauge
The wireless rain gauge should be placed on a flat and level surface. The location must be away from anything that may block rainfall from entering the rain collector. Rain gauge should be elevated off the ground. Placing your rain gauge on your outside deck would be an ideal location.
*The distance between the main unit and remote sensor should not be greater than 100 feet.
8
6
7
9
10 ![]()
FAQ’s (Frequently Asked Questions)
Problem | Applicable Models | Solutions | |
|
|
|
|
All models | 1) | Check main unit or remote sensor battery levels by viewing the appropriate icons on main unit display. | |
temperature display |
| 2) | Place the main unit away from other electronic devices that might cause signal interference. |
|
| 3) | Decrease the distance between the remote sensor and the main unit |
Weather forecast icons is | BAR208HGA, BAR206A | The weather forecast feature does not show you current conditions outside, rather it will forecast what the | |
displaying the wrong forecast |
| weather will be in the next 12+ hours. Weather forecast is calculated to be 75% accurate | |
BAR208HGA, BAR206A, | NOTE: If you have the RMR203HGA, you need to purchase the THGR268 sensor to display outside humidity. | ||
humidity display | RMR203HGA | 1) | Check main unit or remote sensor battery levels by viewing the appropriate icons on main unit display. |
|
| 2) | Place the main unit away from other electronic devices that might cause signal interference. |
|
| 3) | Decrease the distance between the remote sensor and the main unit |
Outdoor temperature | All models | Move the remote sensor to a location that will not expose it to direct sunlight or rain. | |
reading is wrong. |
|
|
|
6 | Tilt the tipping funnel on the rain gauge several times and verify a numerical | 9 | After verifying connection to the base station, place the rain gauge outside on | |
| reading on the base unit ( | ). Numerical reading will take approximately |
| a level surface and place a few drops of water on the cross at the base of the |
|
|
| funnel to check the horizontal level. Water will pool to the center of the cross | |
|
|
|
| when the rain gauge is level. You can adjust the level when securing the rain |
7 | Press and hold the SINCE button for two seconds. The total rainfall and today |
| gauge on the level screws by using the mounting screws. | |
| rainfall will be reset to zero. |
|
|
|
|
|
| 10 | To complete the installation, slide the hood cover on and secure with two base |
8 | Secure the battery cover with eight screws. |
| screws located on the bottom rim of the rain gauge. Place the filter in the cup | |
|
|
|
| to prevent leaves or other debris from blocking water from entering the cup. |
When does the memory | BAR208HGA, BAR206A, | Min/Max memory resets at 12:00 am everyday. |
reset | RMR203HGA, RMR202A |
|
Weather warning display | BAR208HGA | The Weather Warnings icons will activate when current weather conditions fall under specific temperature, |
is blank |
| barometric, or humidity requirements. |
Atomic Clock is not | BAR208HGA, BAR206A, | "Move the main unit close to a window, away from other electronic devices, and hit the up button to intitiate |
syncronizing | RMR203HGA, RMR202A | an atomic clock signal search. The best time to achieve successful signal synchronizing is during nighttime |
|
| hours. It can take up to 24 hours to receive a signal.” |
Contact our Customer Service Department for additional questions:
website: www2.oregonscientific.com/service phone: 800.853.8883 (voice) address: 19861 SW 95th Avenue, Tualatin, OR 97062