BBQ / Oven Meat Thermometer
Grill-Right Wireless and Talking
Model: AW131
USER MANUAL
EN
INTRODUCTION
Thank you for selecting the Oregon ScientificTM Wireless Talking BBQ Thermometer. Please keep this manual for instructions and information you should know about.
OVERVIEW
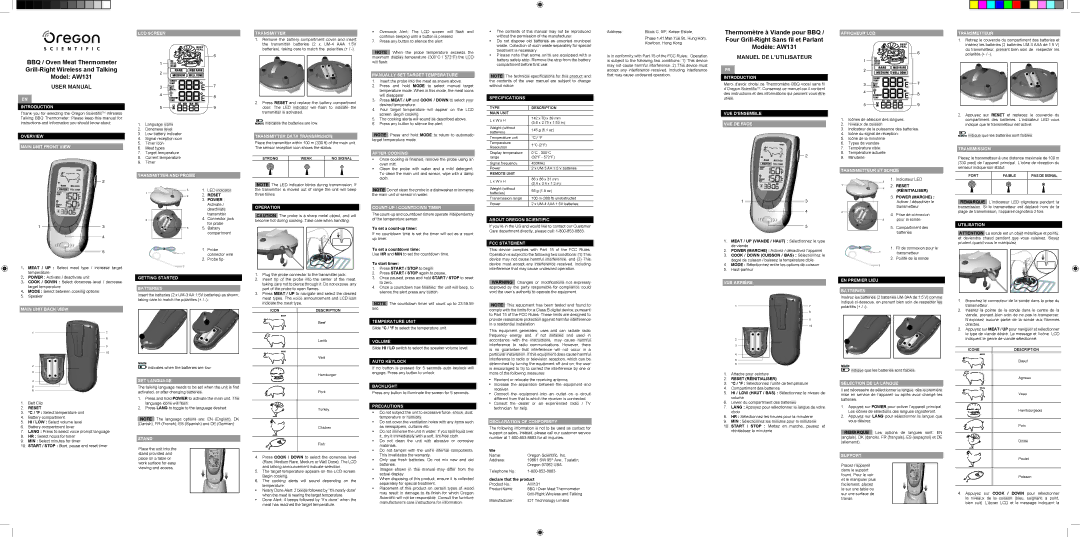
MAIN UNIT FRONT VIEW
2
LCD SCREEN


 6 1
6 1 


 2
2 

5 


 9
9
1.Language icons
2.Doneness level
3.Low battery indicator
4.Signal reception icon
5.Timer icon
6.Meat types
7.Target temperature
8.Current temperature
9.Timer
TRANSMITTER AND PROBE
TRANSMITTER
1.Remove the battery compartment cover and insert the transmitter batteries (2 x UM-4 AAA 1.5V batteries), taking care to match the polarities (+ / -).
2.Press RESET and replace the battery compartment door. The LED indicator will flash to indicate the transmitter is activated.
 indicates the batteries are low.
TRANSMITTER DATA TRANSMISSION
Place the transmitter within 100 m (330 ft) of the main unit. The sensor reception icon shows the status.
NOTE The LED indicator blinks during transmission. If the transmitter is moved out of range the unit will beep three times.
•Overcook Alert: The LCD screen will flash and continue beeping until a button is pressed.
7.Press any button to silence the alert.
NOTE When the probe temperature exceeds the maximum display temperature (300°C / 572°F) the LCD will flash.
MANUALLY SET TARGET TEMPERATURE
1.Insert the probe into the meat as shown above.
2.Press and hold MODE to select manual target temperature mode. When in this mode, the meat icons will disappear.
3.Press MEAT / UP and COOK / DOWN to select your desired temperature.
4.Your target temperature will appear on the LCD screen. Begin cooking.
5.The cooking alerts will sound as described above.
6.Press any button to silence the alert.
NOTE Press and hold MODE to return to automatic target temperature mode.
AFTER COOKING
•Once cooking is finished, remove the probe using an oven mitt.
•Clean the probe with water and a mild detergent. To clean the main unit and sensor, wipe with a damp cloth.
NOTE Do not clean the probe in a dishwasher or immerse the main unit or sensor in water.
•The contents of this manual may not be reproduced without the permission of the manufacturer.
•Do not dispose old batteries as unsorted municipal waste. Collection of such waste separately for special treatment is necessary.
•Please note that some units are equipped with a battery safety strip. Remove the strip from the battery compartment before first use.
NOTE The technical specifications for this product and the contents of the user manual are subject to change without notice.
SPECIFICATIONS
| TYPE | DESCRIPTION |
| MAIN UNIT | |
| L x W x H | 142 x 70 x 39 mm |
| (5.6 x 2.75 x 1.53 in) |
| |
| Weight (without | 145 g (5.1 oz) |
| batteries) |
| |
| Temperature unit | °C / °F |
| Temperature | 1°C (2°F) |
| Resolution |
| |
| Display temperature | 0°C - 300°C |
| range | (32°F - 572°F) |
| | |
| Signal frequency | 433MHz |
| Power | 2 x UM-3 AA 1.5 V batteries |
| REMOTE UNIT | |
| | |
| L x W x H | 86 x 86 x 31 mm |
| (3.4 x 3.4 x 1.2 in) |
| |
| Weight (without | 55 g (1.9 oz) |
| batteries) |
| |
Address: | Block C, 9/F, Kaiser Estate, |
| Phase 1,41 Man Yue St., Hung Hom, |
| Kowloon, Hong Kong |
is in conformity with Part 15 of the FCC Rules. Operation is subject to the following two conditions: 1) This device may not cause harmful interference. 2) This device must accept any interference received, including interference that may cause undesired operation.
Thermomètre à Viande pour BBQ / Four Grill-Right Sans fil et Parlant Modèle: AW131
MANUEL DE L’UTILISATEUR
FR
INTRODUCTION
Merci d’avoir choisi ce Thermomètre BBQ vocal sans fil d’Oregon ScientificTM. Conservez ce manuel car il contient des instructions et des informations qui peuvent vous être utiles.
VUE D’ENSEMBLE
VUE DE FACE
2
AFFICHEUR LCD


 6 1
6 1 


 2
2 

5 


 9
9
1.Icônes de sélecion des langues
2.Niveaux de cuisson
3.Indicateur de la puissance des batteries
4.Icône du signal de réception
5.Icône de la minuterie
6.Types de viandes
7.Température cible
8.Température actuelle
9.Minuterie
TRANSMETTEUR ET SONDE
| 3 | 1. | Indicateur LED |
| 2. | RESET |
1 | |
| 4 | | (RÉINITIALISER) |
| | |
TRANSMETTEUR
1.Retirez le couvercle du compartiment des batteries et insérez les batteries (2 batteries UM-4 AAA de 1.5 V) du transmetteur, prenant bien soin de respecter les polarités (+ / -).
2.Appuyez sur RESET et replacez le couvercle du compartiment des batteries. L’indicateur LED vous indique que le transmetteur est activé.
 indique que les batteries sont faibles.
TRANSMISSION
Placez le transmetteur à une distance maximale de 100 m (330 pied) de l’appareil principal. L’icône de réception du senseur indique son statut.
4
5
1. MEAT / UP : Select meat type / increase target temperature
2. POWER : Activate / deactivate unit
3. COOK / DOWN : Select doneness level / decrease target temperature
4. MODE : Select between cooking options
5.Speaker
MAIN UNIT BACK VIEW
9
10
2
3
4
5
6
1.Belt Clip
2.RESET
3.°C / °F : Select temperature unit
4.Battery compartment
5.HI / LOW : Select volume level
6.Battery compartment lever
7.LANG : Press to select voice prompt language
8.HR : Select hours for timer
9.MIN : Select minutes for timer
10.START / STOP : Start, pause and reset timer
2 | | | | | | | | | | | | | | | 4. | Connector jack |
| | | | | | | | | | | | | |
| | | | | | | | | | | | | | | | for probe |
| | | | | | | | | | | | | 5 | 5. | Battery |
| | | | | | |
| | | | | | | | | | | | | | | | compartment |
| | | | | | | | | | | | | 1 | | 1. | Probe |
| | | | | | | | | | | | | |
| | | | | | connector wire |
| | | | | | | | | | | | | | | |
| | | | | | | | | | | | | | | 2. | Probe tip |
| | 2 | | | |
| | | |
GETTING STARTED
BATTERIES
Insert the batteries (2 x UM-3 AA 1.5V batteries) as shown, taking care to match the polarities (+ / -).
2
1
 indicates when the batteries are low.
SET LANGUAGE
The talking language needs to be set when the unit is first activated, or after changing batteries.
1.Press and hold POWER to activate the main unit. The language icons will flash.
2.Press LANG to toggle to the language desired.
NOTE The language options are: EN (English), DK (Danish), FR (French), ES (Spanish) and DE (German).
STAND
Place the unit into the stand provided and place on a table or work surface for easy viewing and access.
become hot during cooking. Take care when handling.
1.Plug the probe connector to the transmitter jack.
2.Insert tip of the probe into the center of the meat, taking care not to pierce through it. Do not expose any part of the probe to open flames.
3.Press MEAT / UP to navigate and select the desired meat types. The voice announcement and LCD icon indicate the meat type.
ICON | DESCRIPTION |
| Beef |
| Lamb |
| Veal |
| Hamburger |
| Pork |
| Turkey |
| Chicken |
| Fish |
4.Press COOK / DOWN to select the doneness level (Rare, Medium Rare, Medium or Well Done). The LCD and talking announcement indicate selection.
5.The target temperature appears on the LCD screen. Begin cooking.
6.The cooking alerts will sound depending on the
temperature:
•Nearly Done Alert: 2 beeps followed by “It’s nearly done” when the meat is nearing the target temperature.
•Done Alert: 4 beeps followed by “It’s done” when the meat has reached the target temperature.
of the temperature sensor.
To set a count-up timer:
If no countdown time is set the timer will act as a count up timer.
To set a countdown time:
Use HR and MIN to set the countdown time.
To start timer:
1.Press START / STOP to begin.
2.Press START / STOP again to pause,
3.Once paused, press and hold START / STOP to reset to zero.
4.Once a countdown has finished, the unit will beep, to silence the alert press any button.
NOTE The countdown timer will count up to 23:59.59 sec.
TEMPERATURE UNIT
Slide °C / °F to select the temperature unit.
VOLUME
Slide HI / LO switch to select the speaker volume level.
AUTO KEYLOCK
If no button is pressed for 5 seconds auto keylock will engage. Press any button to unlock.
BACKLIGHT
Press any button to illuminate the screen for 5 seconds.
PRECAUTIONS
•Do not subject the unit to excessive force, shock, dust, temperature or humidity.
•Do not cover the ventilation holes with any items such as newspapers, curtains etc.
•Do not immerse the unit in water. If you spill liquid over it, dry it immediately with a soft, lint-free cloth.
•Do not clean the unit with abrasive or corrosive materials.
•Do not tamper with the unit’s internal components. This invalidates the warranty.
•Only use fresh batteries. Do not mix new and old batteries.
•Images shown in this manual may differ from the actual display.
•When disposing of this product, ensure it is collected separately for special treatment.
•Placement of this product on certain types of wood may result in damage to its finish for which Oregon Scientific will not be responsible. Consult the furniture manufacturer's care instructions for information.
ABOUT OREGON SCIENTIFIC
If you’re in the US and would like to contact our Customer Care department directly, please call: 1-800-853-8883.
FCC STATEMENT
This device complies with Part 15 of the FCC Rules. Operation is subject to the following two conditions: (1) This device may not cause harmful interference, and (2) This device must accept any interference received, including interference that may cause undesired operation.
WARNING Changes or modifications not expressly approved by the party responsible for compliance could void the user’s authority to operate the equipment.
NOTE This equipment has been tested and found to comply with the limits for a Class B digital device, pursuant to Part 15 of the FCC Rules. These limits are designed to provide reasonable protection against harmful interference in a residential installation.
This equipment generates, uses and can radiate radio frequency energy and, if not installed and used in accordance with the instructions, may cause harmful interference to radio communications. However, there is no guarantee that interference will not occur in a particular installation. If this equipment does cause harmful interference to radio or television reception, which can be determined by turning the equipment off and on, the user is encouraged to try to correct the interference by one or more of the following measures:
•Reorient or relocate the receiving antenna.
•Increase the separation between the equipment and receiver.
•Connect the equipment into an outlet on a circuit different from that to which the receiver is connected.
•Consult the dealer or an experienced radio / TV technician for help.
DECLARATION OF CONFORMITY
The following information is not to be used as contact for support or sales. Instead, please call our customer service number at 1-800-853-8883 for all inquiries.
We | |
Name: | Oregon Scientific, Inc. |
Address: | 19861 SW 95th Ave., Tualatin, |
| Oregon 97062 USA |
Telephone No.: | 1-800-853-8883 |
declare that the product |
Product No.: | AW131 |
Product Name: | BBQ / Oven Meat Thermometer |
| Grill-Right Wireless and Talking |
Manufacturer: | IDT Technology Limited |
5
1.MEAT / UP (VIANDE / HAUT) : Sélectionnez le type de viande
2.POWER (MARCHE) : Activez / désactivez l’appareil
3.COOK / DOWN (CUISSON / BAS) : Sélectionnez le degré de cuisson / baissez la température cible
4.MODE : Sélectionnez entre les options de cuisson
5.Haut-parleur
VUE ARRIÈRE
9
10
2
3
4
5
6
1.Attache pour ceinture
2.RESET (RÉINITIALISER)
3.°C / °F : Sélectionnez l’unité de température
4.Compartiment des batteries
5.HI / LOW (HAUT / BAS) : Sélectionnez le niveau de volume
6.Levier du compartiment des batteries
7.LANG : Appuyez pour sélectionner la langue de votre choix
8.HR : Sélectionnez les heures pour la minuterie
9.MIN : Sélectionnez les minutes pour la minuterie
10.START / STOP : Mettez en marche, pausez et réinitialisez la minuterie
5 pour la sonde
5.Compartiment des batteries
1. Fil de connexion pour le

 1transmetteur
2. Pointe de la sonde
2
EN PREMIER LIEU
BATTERIES
Insérez les batteries (2 batteries UM-3AA de 1.5 V) comme indiqué ci-dessous, en prenant bien soin de respecter les polarités (+ / -).
2
1
 indique que les batteries sont faibles.
SÉLECTION DE LA LANGUE
Il est nécessaire de sélectionner la langue dès la première mise en service de l’appareil ou après avoir changé les batteries.
1.Appuyez sur POWER pour activer l’appareil principal. Les icônes de sélections des langues clignoteront.
2.Appuyez sur LANG pour sélectionner la langue que vous désirez.
REMARQUE Les options de langues sont: EN (anglais), DK (danois), FR (français), ES (espagnol) et DE (allemand).
SUPPORT
Placez l’appareil dans le support fourni. Pour le voir et le manipuler plus facilement, placez le sur une table ou sur une surface de travail.
UTILISATION
ATTENTION La sonde est un objet métallique et pointu, et deviendra chaud pendant que vous cuisinez. Soyez prudent quand vous le manipulez.
1.Branchez le connecteur de la sonde dans la prise du transmetteur.
2.Insérez la pointe de la sonde dans le centre de la viande, prenant bien soin de ne pas la transpercer. N’exposez aucune partie de la sonde aux flammes directes.
3.Appuyez sur MEAT / UP pour naviguer et sélectionner le type de viande désiré. Le message et l’icône LCD indiquent le genre de viande sélectionné.
ICONE | DESCRIPTION |
| Bœuf |
| Agneau |
| Veau |
| Hambourgeois |
| Porc |
| Dinde |
| Poulet |
| Poisson |
4.Appuyez sur COOK / DOWN pour sélectionner le niveaux de la cuisson (bleu, saignant, a point, bien cuit). L’écran LCD et le message indiquent la