DIGITAL TRAVEL RADIO-FREQUENCY (RF)
CONTROLLED CLOCK
MODEL: RM822 (UK VERSION RM823)
INSTRUCTION MANUAL
FIG. A
FIG. B
FIG. C
FIG. D
ENGLISH
DIGITAL TRAVEL RADIO-FREQUENCY (RF)
CONTROLLED CLOCK
MODEL: RM822 (UK VERSION RM823)
INSTRUCTION MANUAL
INTRODUCTION
Congratulations on your purchase of the Travel RF controlled Clock (RM822).
The RM822 / RM823 is a multifunction (RF) controlled clock. It can automatically synchronize its current time and date when brought within an approximate 1500 km radius of the radio signal DCF77 generated from Frankfurt, Germany (the UK version from MSF Rugby, England).
Other features of the RM822 include:
-Back light for easy reading in the dark
-Displays time, date and day of the week in 4 languages (E/F/G/I)
-A second time-zone display with time, date and day-of-the-week
-2 alarm times with 8-minute snooze function
-2-minute crescendo alarm that increase in volume & low battery indication.
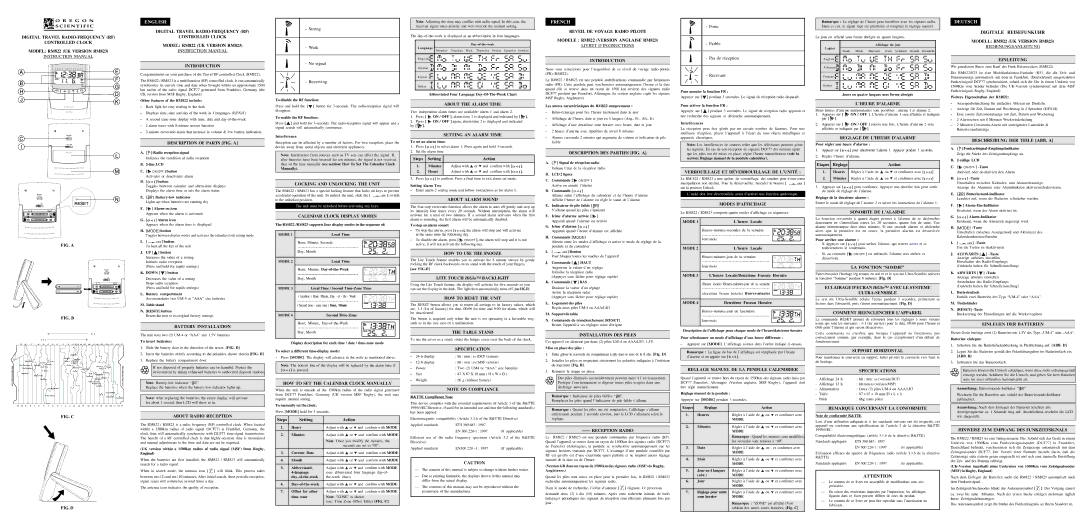
DESCRIPTION OF PARTS [FIG. A]
A.[  ] Radio reception signal
Indicates the condition of radio reception
B.2-line LCD
C.[  ON/OFF ] button
Activates or deactivates alarm
D.[ 


 ] button
Toggles between calendar and alarm-time displays Displays the alarm time or sets the alarm status
E.[ 

 ] Battery-low indicator
Lights up when batteries are running dry
F.[  ] Alarm-on icon
Appears when the alarm is activated
G . [ 


 ] Alarm icon
Appears when the alarm time is displayed
H.[MODE] button
Toggles between display modes and activates the calendar clock setting mode
I.[ 
 ] button
To lock all the key of the unit
J.UP [  ] button
Increases the value of a setting Initiates radio reception
(Press and hold for rapids settings)
K.DOWN [  ] button
Decreases the value of a setting Stops radio reception
(Press and hold for rapids settings)
L.Battery compartment
Accommodates two UM-4 or “AAA” size batteries
M.Table stand
N.[RESET] button
Resets the unit to its original factory settings
BATTERY INSTALLATION
The unit uses two (2) UM-4 or “AAA” size 1.5V batteries.
To insert batteries:
1.Slide the battery door in the direction of the arrow. [FIG. D]
2.Insert the batteries strictly according to the polarities shown therein.[FIG. B]
3.Replace the battery compartment door.
If not disposed of properly batteries can be harmful. Protect the environment by taking exhausted batteries to authorized disposal stations.
Note: Battery-low indicator “ 

 ”
”
Replace the batteries when the battery-low indicator lights up.
Note: After replacing the batteries, the entire display will activate for about 1 second, then LCD will show as in.
ABOUT RADIO RECEPTION
The RM822 / RM823 is a radio frequency (RF) controlled clock. When located within a 1500km radius of radio signal (DCF77) at Frankfurt, Germany, the clock time will automatically synchronize with DCF77 time-signal transmission. The benefit of a RF controlled clock is that highly-accurate time is maintained and manual adjustments to the time and date are not be required.
(UK version within a 1500km radius of radio signal (MSF) from Rugby, England)
When the batteries are first installed, the RM822 / RM823 will automatically search for a radio signal.
When in search mode, the antenna icon [ | ] will blink. This process takes |
between two (2) and ten (10) minutes. After initial search, short periodic reception- signal scans will commence several times a day.
The antenna icon indicates the quality of reception.
- Strong
- Weak
- No signal
- Receiving
To disable the RF function:
Press and hold the [  ] button for 3-seconds. The radio-reception signal will disappear.
To enable the RF funciton:
Press [  ] and hold for 3-seconds. The radio-reception signal will appear and a signal search will automatically commence.
Interference
Reception can be affected by a number of factors. For best reception, place the device away from metal objects and electrical appliances.
Note: Interference from sources such as TV sets can affect the signal. If, after batteries have been inserted for ten minutes, the signal is not received, then set the time manually (see section: How To Set The Calendar Clock
Manually).
LOCKING AND UNLOCKING THE UNIT
The RM822 / RM823 has a special locking feature that locks all keys to prevent
accidental operation of the unit. To unlock the unit, slide the [ 
 ] switch to the unlocked position.
The unit must be unlocked before activating any keys.
CALENDAR CLOCK DISPLAY MODES
The RM822 /RM823 supports four display modes in the sequence of:
MODE 1 | Local Time |
| Hour, Minute, Seconds |
| ------------------------------------------- |
| Day, Month |
MODE 2 | Local Time |
| Hour, Minute, Day-of-the-Week |
| ------------------------------------------- |
| Day, Month |
MODE 3 | Local Time / Second Time-Zone Time |
| ( localtime ) Hour, Minute, Day - of - the - Week |
| ------------------------------------------- |
| ( Second time - zone time ) Hour, Minute |
MODE 4 | Second Time-Zone |
| Hour, Minute, Day-of-the-Week |
| ------------------------------------------- |
| Day, Month |
Display description for each time / date / time-zone mode To select a different time-display mode:
-Press [MODE]. The display will advance in the order as mentioned above.
Note: The bottom line of the display will be replaced by the alarm time if
[ 


 ] is pressed.
HOW TO SET THE CALENDAR CLOCK MANUALLY
When the unit is outside of the 1500km radius of the radio signal generated from DCF77 Frankfurt, Germany (UK version MSF Rugby), the unit may require manual setting.
To manually set the clock:
Press [MODE] hold for 3 seconds.
Steps | Setting | Action | | |
1. | Hours | Adjust with | or | and | confirm with MODE |
| | | | | |
2. | Minutes | Adjust with | or | and | confirm with MODE |
| | |
| | Note: Once you modify the minutes, the |
| | seconds are set to “00”. |
| | | | | |
3.Current Date Adjust with  or
or  and confirm with MODE
4. Month | Adjust with or and confirm with MODE |
5.Abbreviated, Adjust with  or
or  and confirm with MODE
4-language(see: abbreviated four language day-of-
day-of-the-week | the-week chart) |
6.Day-of-the-weekAdjust with  or
or  and confirm with MODE
7.Offset for other Adjust with  or
or  and confirm with MODE
time zone | Note: “ZONE” is shown |
| (see: Time Zone Offset Table) [FIG. C] |
| |
Note: Adjusting the time may conflict with radio signal. In this case, the received signal takes priority and will override the manual setting.
The day-of-the-week is displayed as an abbreviation in four languages.
Day-of-the-week
L a n g u a g e
M o n d a y Tuesday W e d . Thursday Friday Saturday S u n d a y
English
German
French
Italian
Abbreviated Four Language Day-Of-The-Week Chart
ABOUT THE ALARM TIME
Two independent alarm times are available: alarm 1 and alarm 2.
1. Press [  ON / OFF ], alarm-time 1 is displayed and indicated by [ 1 ].
2.Press [  ON / OFF ] again, alarm-time 2 is displayed and indicated by [ 2 ].
SETTING AN ALARM TIME
To set an alarm time:
1.Press [


 ] to select alarm 1. Press again and hold 3-seconds.
2.Set the alarm time
1.Minutes Adjust with  or
or  and confirm with [


 ].
].
2.Hours Adjust with  or
or  and confirm with [


 ].
].
3. Press [ 


 ] to confirm. Press a final time to exit alarm set mode.
Setting Alarm Two
-Enter alarm-2 setting mode and follow instructions as for alarm 1.
ABOUT ALARM SOUND
The four-step crescendo function allows the alarm to start off gently and step up its intensity four times every 20 seconds. Without interruption, the alarm will activate for a total of two minutes. If a second alarm activates when the first alarm is sounding, the first alarm will be automatically disabled.
To stop an alarm sound:
-To stop the alarm, press [ 


 ], the alarm will stop and will activate at the same time the following day.
-To disable the alarm, press [  ON/OFF ], the alarm will stop and it is not active, it will not activate the following day.
HOW TO USE THE SNOOZE
The Lite Touch feature enables you to activate the 8 minute snooze by gently rocking the RF clock backwards on its stand with the touch of your fingers.
[see FIG.D]
LITE TOUCH HiGloTM BACKLIGHT
Using the Lite Touch feature, the display will activate for five seconds so you can see the display in the dark. The light then automatically turns off. [see FIG.D]
HOW TO RESET THE UNIT
The RESET button allows you to return all settings to its factory values, which are, 1-1 (1st of January) for date, 00:00 for time and 0:00 for alarm, which will be deactivated.
The button is required only when the unit is not operating in a favorable way, such as in the rare case of a malfunction.
THE TABLE STAND
To use the cover as a stand, rotate the hinges cover over the back of the clock.
| | SPECIFICATION |
- | 24-h display | : hh : mm : ss (DCF version) |
- | 12-h display | : hh : mm : ss (MSF version) |
- | Power | : Two (2) UM4 or “AAA” size batteries |
- | Size | : 87 X 67 X 18 mm ( H x W x D ) |
- | Weight | : 66 g (without battery) |
NOTE ON COMPLIANCE
R&TTE Compliance Note
This device complies with the essential requirements of Article 3 of the R&TTE 1999/5/EC Directive, if used for its intended use and that the following standard(s) has been applied:
Electromagnetic compatibility (Article 3.1.b of the R&TTE Directive)
Applied standards | ETS 300 683 : 1997 | |
| EN 300 220-1 : 1997 | (if applicable) |
Efficient use of the radio frequency spectrum (Article 3.2 of the R&TTE Directive)
Applied standards | EN300 220 –1 : 1997 | (if applicable) |
CAUTION
—The content of this manual is subject to change without further notice.
—Due to printing limitation, the displays shown in this manual may differ from the actual display.
—The contents of this manual may not be reproduced without the permission of the manufacturer.
FRENCH
REVEIL DE VOYAGE RADIO PILOTE
MODELE : RM822 (VERSION ANGLAISE RM823)
LIVRET D’INSTRUCTIONS
INTRODUCTION
Nous vous remercions pour l’acquisition de ce réveil de voyage radio-pilotée (FR) (RM822).
Le RM822 / RM823 est une pendule multifonctions commandée par fréquences radio (FR). Cette pendule peut synchroniser automatiquement l’heure et la date quand elle se trouve dans un rayon de 1500 km environ des signaux radio DCF77 produits par Francfort, Allemagne (la version anglaise capte les signaux MSF Rugby, Angleterre).
Les autres caractéristiques du RM822 comprennent :
-Rétro-éclairage pour lire l’heure facilement dans le noir
-Affichage de l’heure, date et jour en 4 langues (Ang., Fr., All., It.)
-Affichage d’une deuxième zone horaire avec heure, date et jour
-2 heures d’alarme avec répétition de réveil 8 minutes
-Alarme crescendo 2 minutes qui augmente de volume et indicateur de pile faible
A.[  ] Signal de réception radio Indique l’état de la réception radio
B.LCD 2 lignes
C.Commande [  ON/OFF ] Active ou annule l’alarme
D.Commande [ 


 ]
]
Alterne entre l’affichage du calendrier et de l’heure d’alarme Affiche l’heure de l’alarme ou règle le statut de l’alarme
E.Indicateur de pile faible [ 

 ] S’allume quand les piles s’épuisent
F.Icône d’alarme activée [  ] Apparaît quand l’alarme est activée
G.Icône d’alarme [ 


 ]
]
Apparaît quand l’heure d’alarme est affichée
H.Commande [MODE]
Alterne entre les modes d’affichage et active le mode de réglage de la pendule et du calendrier
I.[ 
 ] Bouton
Pour bloquer toutes les touches de l'appareil
J.Commande [  ] HAUT Augmente la valeur d’un réglage Initialise la réception radio
(Appuyer sans lâcher pour réglage rapide)
K.Commande [  ] BAS Diminue la valeur d’un réglage Arrête la réception radio
(Appuyer sans lâcher pour réglage rapide)
L.Logement des piles
Reçoit deux piles UM-4 ou AAA/LR3
M.Support de table
N.Commande de réenclenchement [RESET] Remet l'appareil à ses réglages usine d'origine
INSTALLATION DES PILES
Cet appareil est alimenté par deux (2) piles UM-4 ou AAA/LR3, 1,5V.
Mise en place des piles :
1.Faites glisser le couvercle du compartiment à pile dans le sens de la fl che. [Fig. D]
2.Installer les piles en respectant strictement les polarités indiquées à l’intérieur du logement [Fig. B].
3.Remettre la trappe en place.
Des piles éliminées inconsidérément peuvent nuire à l’environnement. Protéger l’environnement et déposer toutes piles usagées dans une décharge autorisée.
Remarque : Indicateur de piles faibles “ 

 ”.
”.
Remplacer les piles quand l’indicateur de pile faible s’allume.
Remarque : Quand les piles ont été remplacées, l’affichage s’allume entièrement pendant 1 seconde environ, puis le LCD s’allumera selon le réglage.
------ RECEPTION RADIO
Le RM822 / RM823 est une pendule commandée par fréquence radio (RF). Quand l’appareil se trouve dans un rayon de 1500km des signaux radio (DCF77) de Francfort (Allemagne), la pendule se synchronise automatiquement sur les signaux horaires transmis par DCF77. L’avantage d’une pendule contrôlée par RF est qu’elle est d’une exactitude quasi parfaite et ne requiert aucun réglage manuel de la date ou de l’heure.
(Version GB dans un rayon de 1500 km des signaux radio (MSF) de Rugby, Angleterre.)
Quand les piles sont mises en place pour la première fois, le RM822 / RM823 recherche automatiquement les signaux radio.
Dans le mode de recherche, l’icône d’antenne [  ] clignote. Ce processus
demande deux (2) à dix (10) minutes. Après cette recherche initiale, de brefs balayages périodiques des signaux de réception sont effectués plusieurs fois par jour.
- Forte
- Faible
- Pas de réception
- Recevant
Pour annuler la fonction FR :
Appuyer sur [ ] pendant 3 secondes. Le signal de réception radio disparaît.
Pour activer la fonction FR :
Appuyer sur [ ] pendant 3 secondes. Le signal de réception radio apparaît et une recherche des signaux se déclenche automatiquement.
Interférences
La réception peut être gênée par un certain nombre de facteurs. Pour une meilleure réception, placer l’appareil à l’écart de tous objets métalliques et appareils électriques.
Note: Les interférences de sources telles que les téléviseurs peuvent gêner les signaux. En cas de non-réception de signaux DCF77 dix minutes après que les piles ont été mises en place, régler l’heure manuellement (voir la
section: Réglage manuel de la pendule calendrier).
VERROUILLAGE ET DÉVERROUILLAGE DE L’UNITÉ :
Le RM 822 / RM823 a une option de verrouillage des touches pour éviter toute
manipulation non désirée. Pour le déverrouiller, basculer le bouton [  ] sur la position Unlock.
L’unité doit être déverrouillée avant d’activer une fonction quelconque.
MODES D'AFFICHAGE
Le RM822 / RM823 comporte quatre modes d'affichage en séquences:
MODE 1 | L'heure Locale |
| Heures-minutes-secondes de la semaine |
| ------------------------------------------------ |
| Jour-mois |
MODE 2 | L'heure Locale |
| Heures-minutes-jour de la semaine |
| ------------------------------------------------ |
| Jour-mois |
MODE 3 | L'heure Locale/Deuxième Fuseau Horaire |
| (l'heure locale) Heures-minutes-jour de la semaine |
| ------------------------------------------------ |
| (deuxième fuseau horaire) Heures-minutes |
MODE 4 | Deuxième Fuseau Horaire |
| Heures-minutes-jour de lasemaine |
| ------------------------------------------------ |
| Jour-mois |
Description de l’affichage pour chaque mode de l’heure/date/zone horaire
Pour sélectionner un mode d’affichage d’une heure différente :
-Appuyer sur [MODE]. L’affichage avance dans l’ordre indiqué ci-dessus.
Remarque : La ligne du bas de l’affichage est remplacée par l’heure
d’alarme si on appuie sur [

 ].
].
REGLAGE MANUEL DE LA PENDULE CALENDRIER
Quand l’appareil se trouve hors du rayon de 1500km des signaux radio émis par DCF77 Francfort, Allemagne (Version anglaise, MSF Rugby), l’appareil doit être réglé manuellement.
Réglage manuel de la pendule :
Appuyer sur [MODE] pendant 3 secondes.
Etapes | Réglage | | Action | |
1. | Heures | Régler à l’aide de | ou | et confirmer avec |
| | MODE | | |
| | | | |
2. | Minutes | Régler à l’aide de | ou | et confirmer avec |
| | MODE | | |
| | |
| | Remarque : Quand les minutes sont modifiées, |
| | les secondes sont remises à “00”. |
3. | Date | Régler à l’aide de | ou - et confirmer avec |
| | MODE | | |
| | | | |
4. | Mois | Régler à l’aide de | ou | et confirmer avec |
| | MODE | | |
5.Jour en 4 langues Régler à l’aide de  ou
ou  et confirmer avec
(abr.) | MODE |
6. Jour | Régler à l’aide de ou et confirmer avec |
| MODE |
7.Réglage pour autre Régler à l’aide de  ou
ou  et confirmer avec
Remarque : “ZONE” est affiché (Voir tableau des autres zones horaires) [Fig. C]
Remarque : Le réglage de l’heure peut interférer avec les signaux radio. Dans ce cas, le signal reçu est prioritaire et remplace le réglage manuel.
Le jour est affiché sous forme abrégée en quatre langues.
Affichage du jour
Lagues
Lundi Mardi Mercredi Jeudi Vendredi Samedi Dimanche
Anglais
Allemand
Français
Italian
Jours en quatre langues sous forme abrégée
L’HEURE D’ALARME
Deux heures d’alarme indépendantes sont possibles : alarme 1 et alarme 2.
1.Appuyer sur [  ON / OFF ]. L’heure d’alarme 1 sera affichée et indiquée par [ 1 ].
2.Appuyer sur [  ON / OFF ] encore une fois. L’heure d’alarme 2 sera affichée et indiquée par [ 2 ].
REGLAGE DE L’HEURE D’ALARME
Pour régler une heure d’alarme :
1. Appuyer sur [


 ] pour sélectionner l’alarme 1. Appuyer pendant 3 secondes.
2. Régler l’heure d’alarme.
1.Heures Régler à l’aide de  ou
ou  et confirmer avec [


 ]
]
2.Minutes Régler à l’aide de  ou
ou  et confirmer avec [


 ]
]
3.Appuyer sur [


 ] pour confirmer. Appuyer une dernière fois pour sortir du mode de réglage de l’alarme.
Réglage de la deuxième alarme :
Entrer le mode de réglage de l’alarme 2 et suivre les instructions de l’alarme 1.
SONORITE DE L’ALARME
La fonction crescendo à quatre étapes permet à l'alarme de se déclencher doucement en s'intensifiant toutes les 20 secondes, quatre fois de suite. Une alarme ininterrompue dure deux minutes. Si une seconde alarme se déclenche alors que la première est en cours, la première alarme est désactivée automatiquement.
Pour arrêter une alarme :
-X Appuyer sur [ 


 ] pour arrêter l'alarme, qui restera active et se redéclenchera le lendemain.
-Si, au contraire [ ON/OFF ] est enfoncée, l'alarme sera arrêtée et désactivée.
LA FONCTION “SOMME”
Faites basculer l'horloge lég rement en arri re et le syst me Ultra-Sensible activera la fonction “Somme” pendant 8 minutes. [Fig. D]
ECLAIRAGE D'ECRAN HiGloTM AVEC LE SYSTEME
ULTRA-SENSIBLE
Le syst me Ultra-Sensible éclaire l'écran pendant 3 secondes, permettant sa lecture dans l'obscurité, puis s'éteint automatiquement. [Fig. D]
COMMENT REENCLENCHER L'APPAREIL
La commande RESET permet de retourner tous les réglages à leurs valeurs usine qui sont les suivantes : 1-1 (ler janvier) pour la date, 00:00 pour l’heure et 0:00 pour l’alarme et qui seront désactivées.
Cette commande ne s’utilise que lorsque l’appareil ne fonctionne pas correctement comme, par exemple, dans le cas exceptionnel d’un défaut de fonctionnement.
SUPPORT HORIZONTAL
Pour transfomer le couvercle en support, faites pivoter le couvercle vers l'arri re de horloge.
| | SPECIFICATIONS |
- | Affichage 24 h | : hh : mm : ss (version DCF) |
- | Affichage 12 h | : hh:mm:ss (version MSF) |
- | Alimentation | : Deux (2) piles UM-4 ou AAA/LR3 |
- | Taille | : 87 x 67 x 18 mm (H x L x l) |
- | Poids | : 66g (sans piles) |
REMARQUE CONCERNANT LA CONFORMITE
Note de conformité R&TTE
Lors d’une utilisation adéquate et si les standards suivants ont été respectés, cet appareil est conforme aux spécifications de l’article 3 de la directive R&TTE 1999/5/EC.
Compatibilité électromagnétique: (article 3.1.b de la directive R&TTE)
Standards appliqués: | ETS 300 683 : 1997 | |
| EN 300 220-1 : 1997 | (si applicable) |
Utilisation efficace du spectre de fréquences radio (article 3.1.b de la directive R&TTE)
Standards appliqués: | EN 300 220-1 : 1997 | (si applicable) |
ATTENTION
—Le contenu de ce livret est susceptible de modifications sans avis préalable.
—En raison des restrictions imposées par l'impression, les affichages figurant dans ce livret peuvent différer de ceux du produit.
—Le contenu de ce livret ne peut être reproduit sans l’autorisation du fabricant.
DEUTSCH
DIGITALE REISEFUNKUHR
MODELL: RM822 (UK VERSION RM823)
BEDIENUNGSANLEITUNG
EINLEITUNG
Wir gratulieren Ihnen zum Kauf des Funk Reiseweckers (RM822).
Die RM822/823 ist eine Multifunktionen-Funkuhr (RF), die die Zeit- und Datumsanzeige automatisch mit dem in Frankfurt, (Deutschland) ausgestrahlten Funkzeitsignal DCF77 synchronisiert, sobald sich die Uhr in einem Umkreis von 1500Km vom Sender befindet (Die UK-Version synchronisiert mit dem MSF Funkzeitsignal, Rugby, England)
Weitere Eigenschaften der RM822:
-Anzeigenbeleuchtung für einfaches Ablesen im Dunkeln.
-Anzeige für Zeit, Datum und Wochentag in 4 Sprachen (E/F/G/I)
-Eine zweite Zeitzonenanzeige mit Zeit, Datum und Wochentag
-2 Alarmzeiten mit 8 Minuten Weckwiederholung
-2 Minuten Crescendo-Alarm mit ansteigender Lautstärke & Batteriestandanzeige
BESCHREIBUNG DER TEILE [ABB. A]
A.[  ] Funkzeitsignal-EmpfangsindikatorZeigt die Stärke des Zeitsignalempfangs an.
B.2-zeilige LCD
C.[  ON/OFF ] -Taste
Aktiviert oder de-aktiviert den Alarm
D.[ 


 ] -Taste
Umschalten zwischen Kalender- und Alarmzeitanzeige.
Anzeige der Alarmzeit oder Alarmfunktion aktivieren/deaktivieren.
E.[ 

 ] Batteriestand-Indikator
Leuchtet auf, wenn die Batterien schwächer werden.
F.[  ] Alarm-Ein-Indikator
Erscheint, wenn der Alarm aktiviert ist.
G.[ 


 ] Alarm-Indikator
Erscheint, wenn die Alarmzeit angezeigt wird.
H.[MODE] -Taste
Umschalten zwischen Anzeigemodi und Aktivieren des Kalenderuhreinstellmodus
I.[ 
 ] -Taste
Um die Tasten zu deaktivieren
J.AUFWÄRTS [  ] -Taste Anzeige aufwärts einstellen Einschalten des Radio-Empfangs (Gedrückt halten für Schnelleinstellung)
K.ABWÄRTS [  ] -TasteAnzeige abwärts einstellen Ausschalten des Radio-Empfangs (Gedrückt halten für Schnelleinstellung)
L.Batterienfach
Enthält zwei Batterien des Typs “UM-4” oder “AAA”.
M.Tischständer
N.[RESET] -Taste
Rucksetzung der Einstellungen auf die Werksvorgaben
EINLEGEN DER BATTERIEN
Dieses Gerät benötigt zwei (2) Batterien mit 1,5V des Typs „UM-4” oder „AAA“.
Batterien einlegen:
1.Schieben Sie die Batteriefachabdeckung in Pfeilrichtung auf. [ABB. D]
2.Legen Sie die Batterien gemäß den Polaritätsangaben im Batterienfach ein.
[ABB. B]
3.Schließen Sie das Batterienfach.
Batterien können die Umwelt schädigen, wenn diese nicht ordnungsgemäß entsorgt werden. Schützen Sie die Umwelt, und geben Sie leere Batterien stets bei einer offiziellen Sammelstelle ab.
Anmerkung: Batteriestands-Indikator “ 

 ”
”
Wechseln Sie die Batterien aus, sobald der Batteriestands-Indikator aufleuchtet.
Anmerkung: Nach dem Einlegen der Batterien leuchten alle Anzeigesegmente ca. 1 Sekunde lang auf. Anschließend erscheint die LCD wie dargestellt.
HINWEISE ZUM EMPFANG DES FUNKZEITSIGNALS
Die RM822 / RM823 ist eine funkgesteuerte Uhr. Sobald sich das Gerät in einem Umkreis von 1500Km vom Funkzeitsignalsender (DCF77) in Frankfurt, Deutschland befindet, synchronisiert sich die Zeitanzeige automatisch mit dem Zeitsignalsender DCF77. Der Vorteil einer Funkuhr besteht darin, daß die Zeitanzeige stets extrem genau eingestellt ist und sich eine manuelle Einstellung der Zeit und des Datums erübrigt.
(UK-Version innerhalb eines Umkreises von 1500Km vom Zeitsignalsender (MSF) in Rugby, England)
Nach dem Einlegen der Batterien sucht die RM822 / RM823 automatisch nach dem Funkzeitsignal.
Im Zeitsignal-Suchmodus blinkt das Antennensymbol [  ]. Der Vorgang dauert
ca. zwei bis zehn Minuten. Nach der ersten Suche erfolgen mehrmals täglich kurze Zeitsignalabtastungen.
Das Antennensymbol zeigt die Stärke des Funkzeitsignals an Ihrem Standort an.