The telescope is now balanced on both axes. Now when you loosen the lock lever on one or both axes and manually point the telescope, it should move without resistance and should not drift from where you point it.
4. Aligning the Finder Scope
A finder scope has a wide field of view to facilitate the location of objects for subsequent viewing through the main tele- scope, which has a much narrower field of view. The finder scope and the main telescope must be aligned so they point to exactly the same spot in the sky.
Alignment is easiest to do in daylight hours. First, insert the lowest- power (25mm) eyepiece into the star diagonal. Then loosen the R.A. and Dec. lock levers so the telescope can be moved freely.
Point the main telescope at a discrete object such as the top of a telephone pole or a street sign that is at least a
Now look through the finder scope. Is the object centered in the finder scope’s field of view, i.e., on the crosshairs? If not, hopefully it will be visible somewhere in the field of view, so that only fine adjustment of the finder scope alignment screws will be needed to center it on the crosshairs. Otherwise you’ll have to make coarser adjustments to the two black nylon alignment thumbscrews to redirect the aim of the finder scope.
Note that the image seen through the finder scope appears upside down. This is normal for astronomical finder scopes.
finder scope (see Figure 3). Back the lock ring off by a few turns, for now. Refocus the finder scope on a distant object by threading the objective lens cell in or out of the finder scope body. Precise focusing will be achieved by focusing the finder scope on a bright star. Once the image appears sharp, retighten the lock ring behind the objective lens cell. The finder scope’s focus should not need to be adjusted again.
5.Setting Up and Using the Equatorial Mount
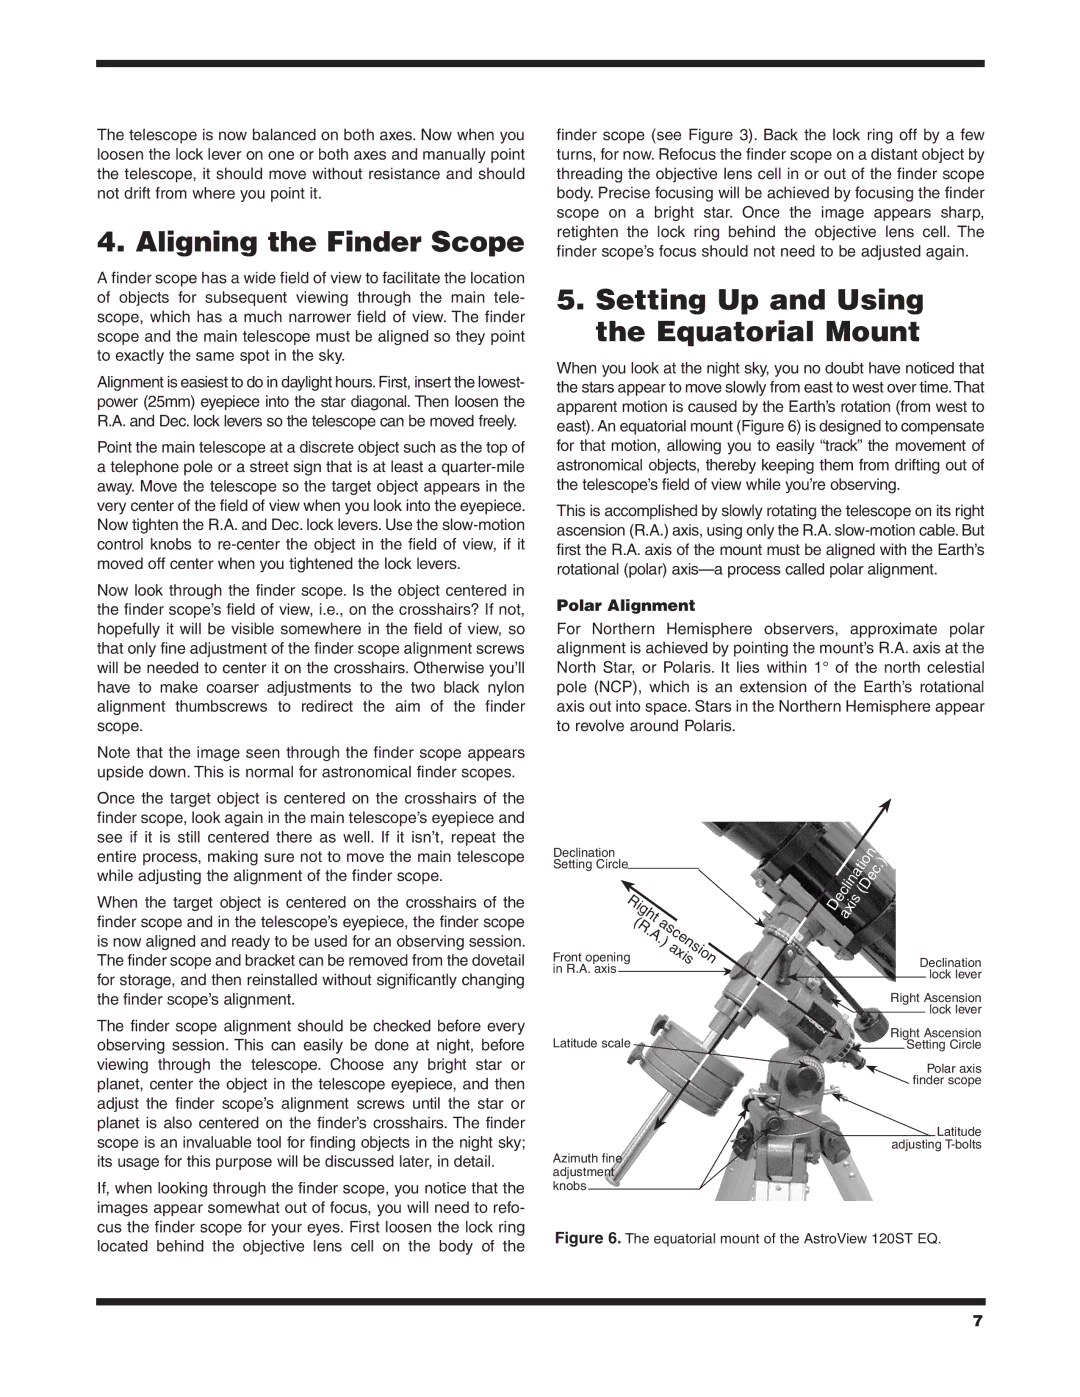
When you look at the night sky, you no doubt have noticed that the stars appear to move slowly from east to west over time.That apparent motion is caused by the Earth’s rotation (from west to east). An equatorial mount (Figure 6) is designed to compensate for that motion, allowing you to easily “track” the movement of astronomical objects, thereby keeping them from drifting out of the telescope’s field of view while you’re observing.
This is accomplished by slowly rotating the telescope on its right ascension (R.A.) axis, using only the R.A.
Polar Alignment
For Northern Hemisphere observers, approximate polar alignment is achieved by pointing the mount’s R.A. axis at the North Star, or Polaris. It lies within 1° of the north celestial pole (NCP), which is an extension of the Earth’s rotational axis out into space. Stars in the Northern Hemisphere appear to revolve around Polaris.
Once the target object is centered on the crosshairs of the finder scope, look again in the main telescope’s eyepiece and see if it is still centered there as well. If it isn’t, repeat the entire process, making sure not to move the main telescope while adjusting the alignment of the finder scope.
When the target object is centered on the crosshairs of the finder scope and in the telescope’s eyepiece, the finder scope is now aligned and ready to be used for an observing session. The finder scope and bracket can be removed from the dovetail for storage, and then reinstalled without significantly changing the finder scope’s alignment.
The finder scope alignment should be checked before every observing session. This can easily be done at night, before viewing through the telescope. Choose any bright star or planet, center the object in the telescope eyepiece, and then adjust the finder scope’s alignment screws until the star or planet is also centered on the finder’s crosshairs. The finder scope is an invaluable tool for finding objects in the night sky; its usage for this purpose will be discussed later, in detail.
If, when looking through the finder scope, you notice that the images appear somewhat out of focus, you will need to refo- cus the finder scope for your eyes. First loosen the lock ring
Declination
Setting Circle
Right | ascensionaxis | |
Front opening | (R | |
| . | |
| A | |
|
| . |
|
| ) |
in R.A. axis
Latitude scale
Azimuth fine adjustment knobs
Declination | ) |
|
|
| |||
| axis | (Dec . | |||||
|
|
|
|
|
| ||
|
|
|
|
| Declination | ||
|
|
|
|
|
| lock lever | |
|
|
|
|
|
| ||
|
|
|
| Right Ascension | |||
|
|
|
|
|
| lock lever | |
|
|
|
|
|
| ||
|
|
|
| Right Ascension | |||
|
|
|
|
| Setting Circle | ||
|
|
|
|
| |||
|
|
|
|
|
| Polar axis | |
|
|
|
|
| finder scope | ||
|
|
|
|
|
|
| Latitude |
|
|
|
| adjusting | |||
located behind the objective lens cell on the body of the
Figure 6. The equatorial mount of the AstroView 120ST EQ.
7