
3 L Immersion Deep Fryer, CKSTDFZM55 specifications
The Oster CKSTDFZM55 is a compact yet powerful immersion deep fryer designed to effortlessly create crispy, delicious fried foods right in your kitchen. With a generous 3-liter capacity, this fryer is perfect for preparing family meals or entertaining guests, allowing you to immerse various ingredients for an even cooking experience.One of the standout features of the Oster CKSTDFZM55 is its adjustable temperature control. This allows users to set the frying temperature according to the recipe requirements, ensuring that whether you’re frying chicken, potatoes, or donuts, the food comes out perfectly cooked every time. The fryer heats up quickly, thanks to its powerful heating element, and maintains the heat throughout the cooking process, reducing food absorption of oil and promoting healthier frying.
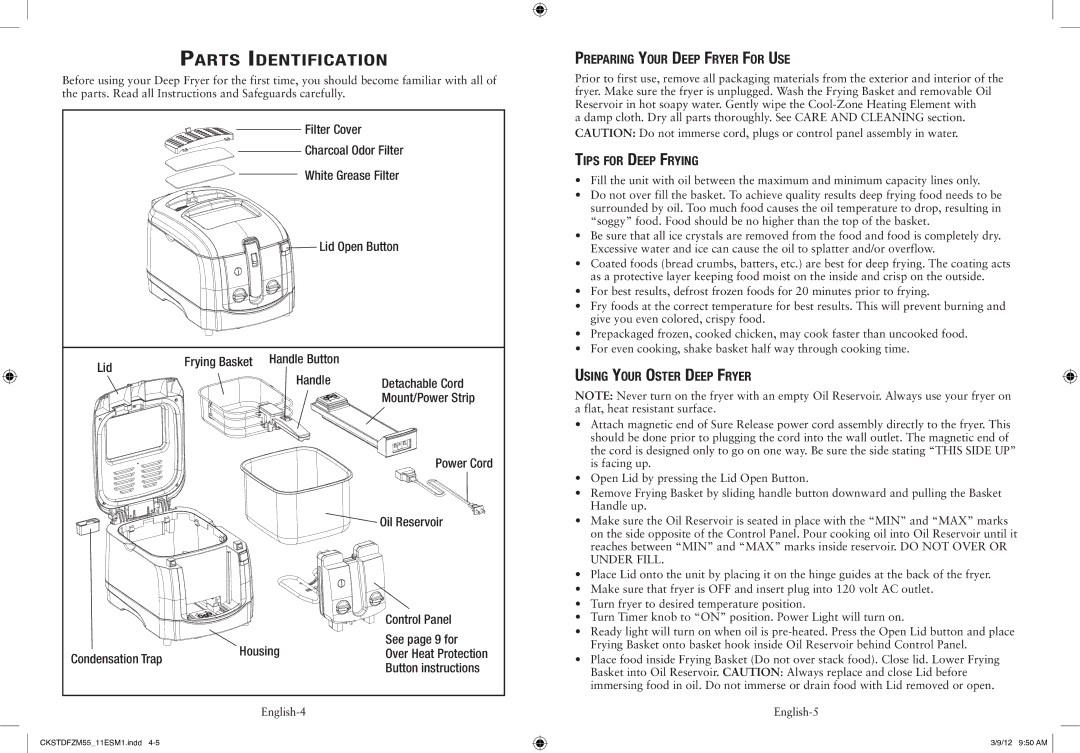
Safety is a priority with the Oster immersion fryer. It comes equipped with a built-in lid that has a viewing window, allowing you to monitor the cooking process without risking burns. Moreover, the cool-touch side handles provide an additional layer of safety, enabling you to handle the fryer comfortably while ensuring heat is contained.
Convenience is another significant characteristic of this fryer. The basket is designed for easy lifting and lowering into hot oil, featuring a lift-and-lock mechanism to secure food while it cooks. It also includes a removable basket with a handle that makes draining excess oil a breeze, ultimately leading to less mess in the kitchen.
Cleanup is simplified through its removable oil container, which helps to store used oil easily for future frying sessions. The interior components are easy to clean, and the fryer can be stored conveniently in compact spaces, making it an excellent addition to any kitchen.
In terms of technology, the Oster CKSTDFZM55 features a durable stainless steel construction that not only provides an upscale look but is also resistant to corrosion and easy to maintain. The thoughtful design and thoughtful features combine to make this immersion fryer a favorite among cooking enthusiasts looking to enjoy fried foods without the hassle of traditional frying methods.
Overall, the Oster CKSTDFZM55 offers an efficient, user-friendly experience for deep frying a variety of foods, making it a must-have appliance for anyone looking to elevate their culinary skills at home.