VPW | Arbitration | Class 2 | J1850 |
| |||
1 0 0 0 1 1 1 0 1 1 1 1 0 0 1 0 0 1 1 0 1 1 0 0 | |||
Class 2 | EOD | J1850 | CRC |
1 1 1 0 1 0 0 0 0 1 1 0 1 1 0 1 1 1 0 0 1 1 0 0
Class 2 | J1850 | Class 2 |
1 0 0 0 1 1 1 0 1 1 1 1 0 0 1 0 0 1 1 0 1 1 0 0 | 1 1 1 0 1 0 0 0 0 1 1 0 1 1 0 1 1 1 0 0 1 1 0 0 | |
Volume Control/Level Matching:
This feature is very important for matching the volume level of the Motorola kit to the radio. When you first install the Motorola kit with the
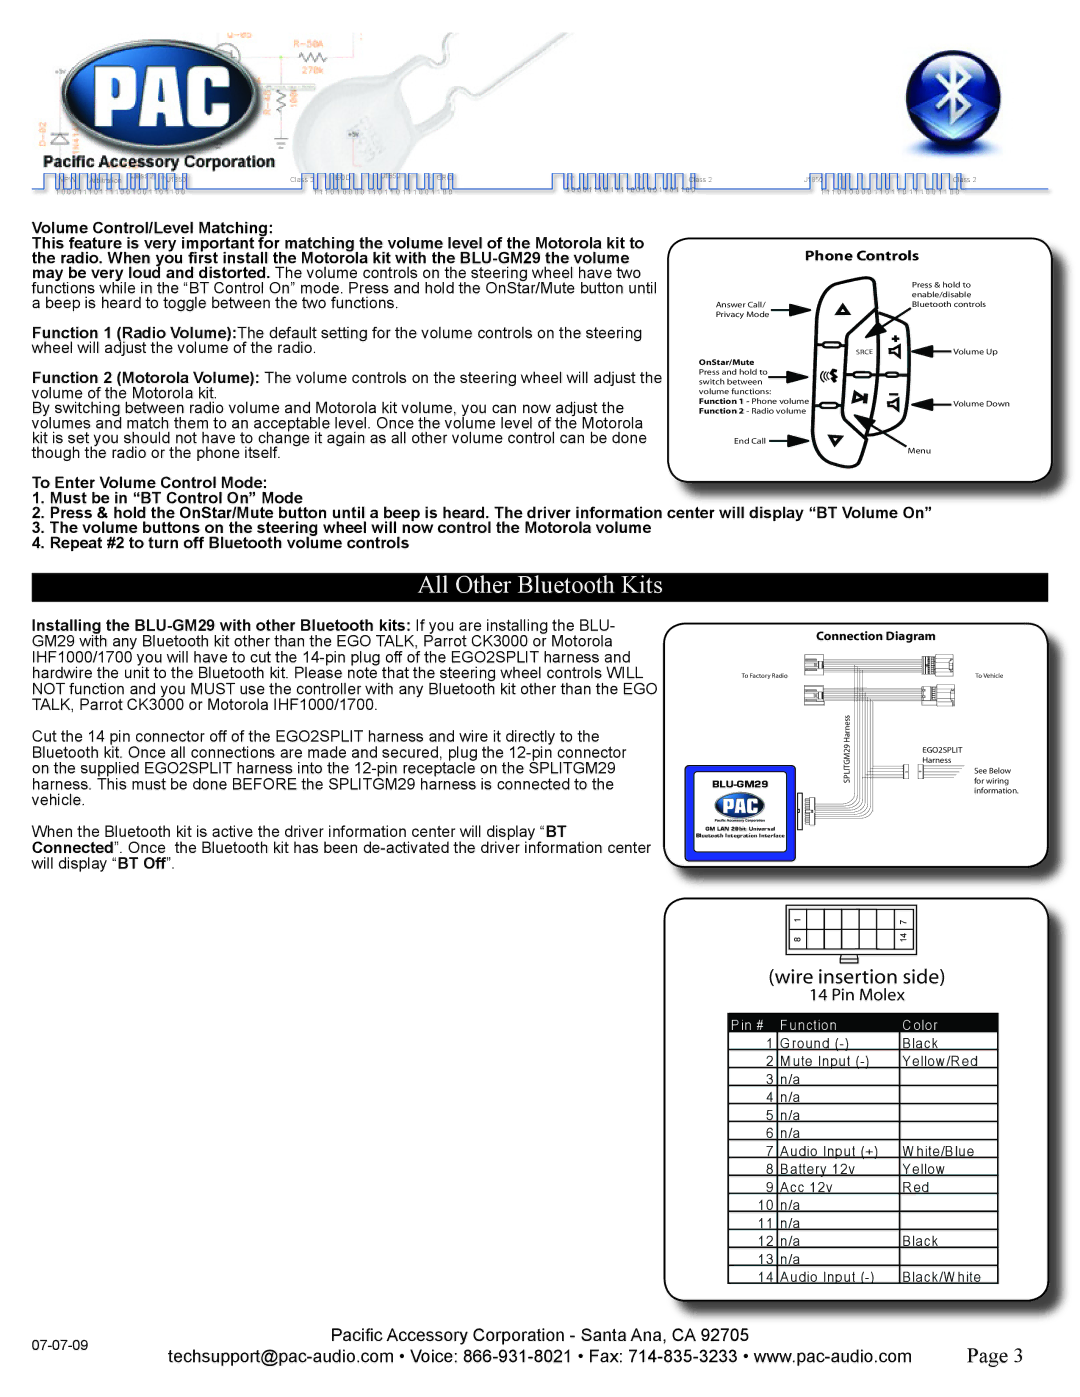
Phone Controls
functions while in the “BT Control On” mode. Press and hold the OnStar/Mute button until a beep is heard to toggle between the two functions.
Function 1 (Radio Volume):The default setting for the volume controls on the steering wheel will adjust the volume of the radio.
Function 2 (Motorola Volume): The volume controls on the steering wheel will adjust the volume of the Motorola kit.
By switching between radio volume and Motorola kit volume, you can now adjust the volumes and match them to an acceptable level. Once the volume level of the Motorola kit is set you should not have to change it again as all other volume control can be done though the radio or the phone itself.
Answer Call/
Privacy Mode
OnStar/Mute
Press and hold to switch between volume functions: Function 1 - Phone volume Function 2 - Radio volume
End Call
Press & hold to enable/disable Bluetooth controls
Volume Up
![]() Volume Down
Volume Down
Menu
To Enter Volume Control Mode:
1. Must be in “BT Control On” Mode
2. Press & hold the OnStar/Mute button until a beep is heard. The driver information center will display “BT Volume On”
3. The volume buttons on the steering wheel will now control the Motorola volume
4. Repeat #2 to turn off Bluetooth volume controls
All Other Bluetooth Kits
Installing the
Connection Diagram
NOT function and you MUST use the controller with any Bluetooth kit other than the EGO TALK, Parrot CK3000 or Motorola IHF1000/1700.
Cut the 14 pin connector off of the EGO2SPLIT harness and wire it directly to the Bluetooth kit. Once all connections are made and secured, plug the
When the Bluetooth kit is active the driver information center will display “BT Connected”. Once the Bluetooth kit has been
To Factory Radio
GM LAN 29bit Universal
Bluetooth Integration Interface
SPLITGM29 Harness
To Vehicle
EGO2SPLIT Harness
See Below for wiring information.
|
|
|
|
|
|
|
|
|
|
|
| 1 |
|
|
|
|
| 7 |
|
|
|
|
|
|
|
|
|
|
|
|
| 8 |
|
|
|
|
| 14 |
|
|
|
|
|
|
|
|
|
| |
|
|
|
|
|
|
|
|
|
|
(wire insertion side) | |||||||||
|
|
| 14 Pin Molex | ||||||
|
|
| |||||||
P in # | F unction | C olor | |||||||
1 | G round | B lack | |||||||
2 | M ute Input | Y ellow /R ed | |||||||
3 | n/a |
|
| ||||||
4 | n/a |
|
| ||||||
5 | n/a |
|
| ||||||
6 | n/a |
|
| ||||||
7 | A udio Input (+ ) | W hite/B lue | |||||||
8 | B attery 12v | Y ellow | |||||||
9 | A cc 12v | R ed | |||||||
10n/a
11n/a
12 | n/a | B lack |
13 | n/a |
|
14 | A udio Input | B lack/W hite |
Pacific Accessory Corporation - Santa Ana, CA 92705 | Page 3 | ||
|
