Timer Recording
Set up to 8 Programs
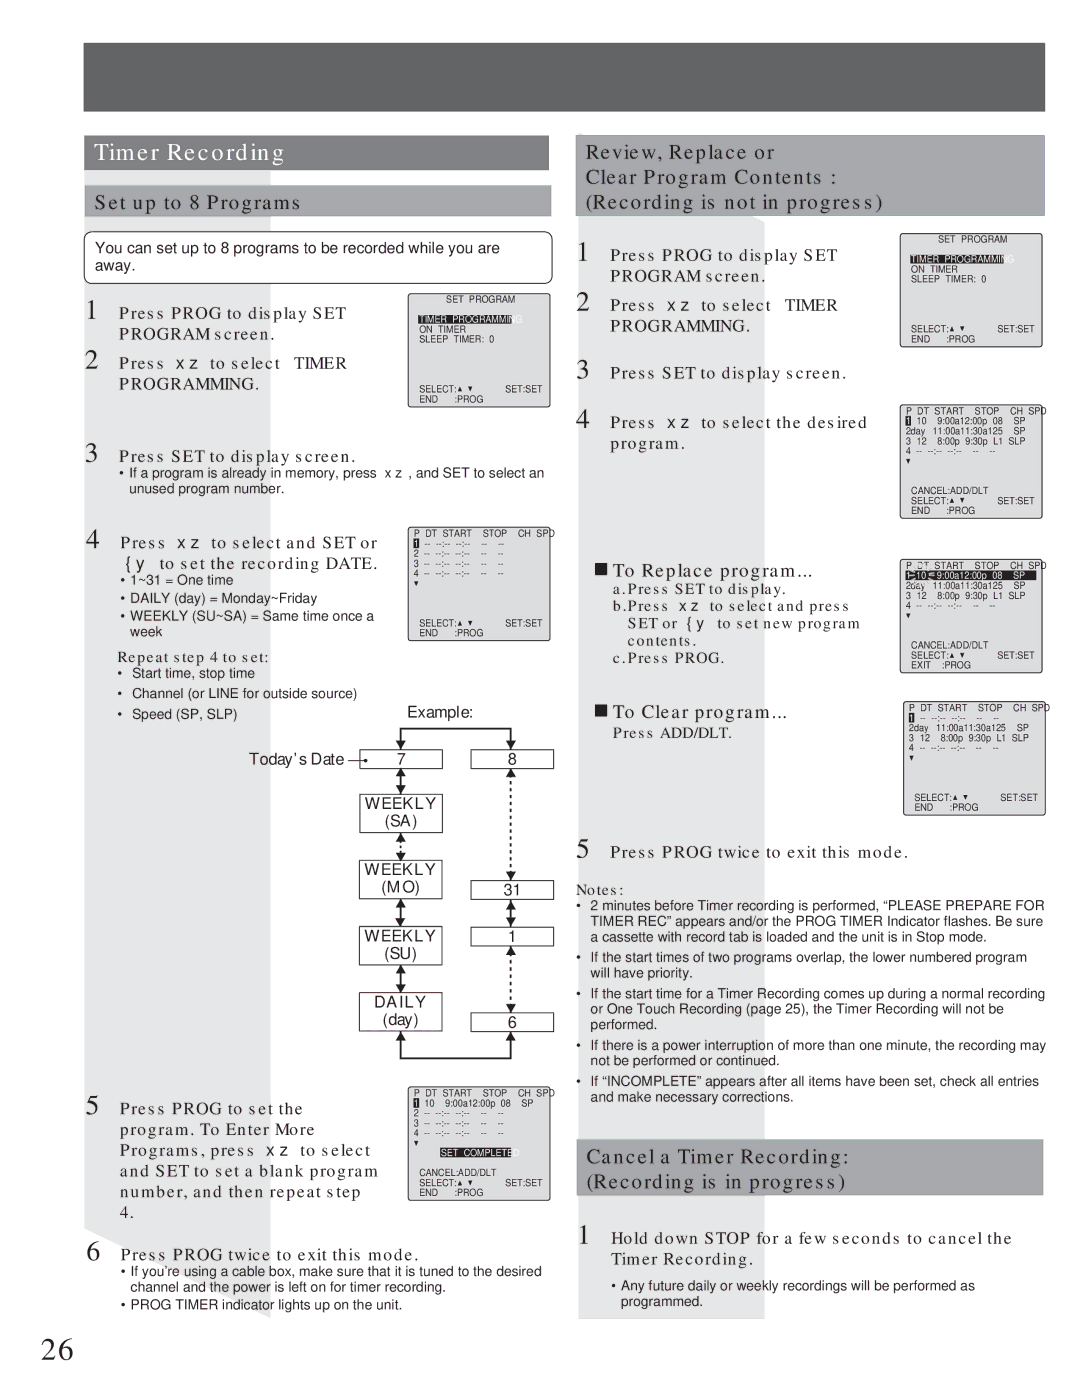
You can set up to 8 programs to be recorded while you are away.
1 Press PROG to display SET | SET PROGRAM |
| |
TIMER PROGRAMMING | |
PROGRAM screen. | ON TIMER |
SLEEP TIMER: 0 |
Review, Replace or Clear Program Contents : (Recording is not in progress)
1 | Press PROG to display SET | SET PROGRAM |
|
|
|
| |||
TIMER PROGRAMMING | ||||
| PROGRAM screen. | ON TIMER |
|
|
2 | SLEEP TIMER: 0 |
|
| |
Press Ÿź to select “TIMER |
|
|
| |
| PROGRAMMING.” | SELECT: | SET:SET | |
|
| END :PROG |
|
|
2 Press Ÿź to select “TIMER |
|
|
PROGRAMMING.” | SELECT: | SET:SET |
| END :PROG |
|
3 Press SET to display screen.
•If a program is already in memory, press Ÿź, and SET to select an unused program number.
4 Press Ÿź to select and SET or | P DT START | STOP | CH SPD | ||
2 | |||||
| 1 | ||||
ŻŹ to set the recording DATE. | 3 | ||||
| |||||
• 1~31 = One time | 4 | ||||
|
|
|
|
| |
• DAILY (day) = Monday~Friday |
|
|
|
|
|
• WEEKLY (SU~SA) = Same time once a |
| SELECT: |
| SET:SET | |
week |
|
| |||
| END :PROG |
|
|
| |
Repeat step 4 to set:
•Start time, stop time
•Channel (or LINE for outside source)
• Speed (SP, SLP) |
|
| Example: |
| |||
Today’s Date |
|
|
|
|
|
|
|
|
|
|
|
|
|
| |
| 7 |
|
| 8 | |||
|
|
|
| ||||
|
|
|
|
|
|
|
|
|
| WEEKLY |
|
|
| ||
|
|
| (SA) |
|
|
| |
3
4 Press Ÿź to select the desired program.
To Replace program...
a.Press SET to display. b.Press Ÿź to select and press
SET or ŻŹ to set new program contents.
c.Press PROG.
To Clear program...
Press ADD/DLT.
P DT | START | STOP | CH SPD | ||
1 | 10 | 9:00a12:00p | 08 | SP | |
2day | 11:00a11:30a125 | SP | |||
3 | 12 | 8:00p 9:30p | L1 | SLP | |
4 | |||||
CANCEL:ADD/DLT
SELECT:![]()
![]() SET:SET END :PROG
SET:SET END :PROG
P START STOP CH SPD
109:00a12:00p 08 SP 11:00a11:30a125 SP
3 12 | 8:00p 9:30p L1 SLP | ||||
4 | |||||
| CANCEL:ADD/DLT |
|
| ||
| SELECT: | SET:SET | |||
| EXIT | :PROG |
|
| |
| P DT | START STOP | CH SPD | ||
| 1 | ||||
| 2day | 11:00a11:30a125 | SP | ||
3 | 12 | 8:00p 9:30p L1 SLP | |||
4 | |||||
|
| SELECT: | SET:SET | ||
|
| END | :PROG |
|
|
WEEKLY |
|
(MO) | 31 |
WEEKLY | 1 |
(SU) |
|
DAILY |
|
(day) | 6 |
5 Press PROG twice to exit this mode.
Notes:
• 2 minutes before Timer recording is performed, “PLEASE PREPARE FOR |
TIMER REC” appears and/or the PROG TIMER Indicator flashes. Be sure |
a cassette with record tab is loaded and the unit is in Stop mode. |
• If the start times of two programs overlap, the lower numbered program |
will have priority. |
• If the start time for a Timer Recording comes up during a normal recording |
or One Touch Recording (page 25), the Timer Recording will not be |
performed. |
• If there is a power interruption of more than one minute, the recording may |
not be performed or continued. |
• If “INCOMPLETE” appears after all items have been set, check all entries |
5 Press PROG to set the program. To Enter More Programs, press Ÿź to select and SET to set a blank program number, and then repeat step 4.
P DT START | STOP |
| CH SPD | |||
1 | 10 | 9:00a12:00p | 08 | SP | ||
2 | ||||||
3 | ||||||
4 | ||||||
|
|
|
| |||
|
| SET COMPLETED |
|
| ||
| CANCEL:ADD/DLT |
|
|
| ||
| SELECT: |
| SET:SET | |||
| END | :PROG |
|
|
|
|
and make necessary corrections. |
Cancel a Timer Recording:
(Recording is in progress)
6 Press PROG twice to exit this mode.
•If you’re using a cable box, make sure that it is tuned to the desired channel and the power is left on for timer recording.
•PROG TIMER indicator lights up on the unit.
1 Hold down STOP for a few seconds to cancel the Timer Recording.
•Any future daily or weekly recordings will be performed as programmed.
26