Setup (initial settings)

This VTR’s main settings are performed while making selections using a system of menus.

If a TV monitor has been connected to the VIDEO OUT 3 connector or SDI OUT 3 connector on the rear panel, the setting menus are displayed on the TV monitor.


4

3


ON

POWER


DVCPRO

DVCPRO 50


DV


OFF


METER


COUNTER ASSEM

VIDEO

CUE

TC

STAND BY

PLAYER

RECORDER

JOG

SHTL

SLOW

FULL/FINE


L


RESET CH1

CH2

CH3

CH4


MONITOR SELECT


EDIT


PLAY


REC


R


A IN

INSERT

A OUT


TRIM


PREVIEW/PREVIEW

AUTO EDIT PREROLL


SET


REW


STOP


FF


HEADPHONES

MONITOR MIX

INPUT SELECT


IN


OUT


VIDEO

AUDIO


CH1

CH2

CH3

CH4

TC


SUPER

REC INH

INT


TCG

MODE

CONTROL


REC LEVEL


UNITY

PRESET MENU SET DIAG

ON

ON

REGEN

TAPE

REMOTE


PRESET


PB LEVEL


VAR


OFF

OFF


EXIT


EE

LOCAL


FF button

1 62

Changing the settings

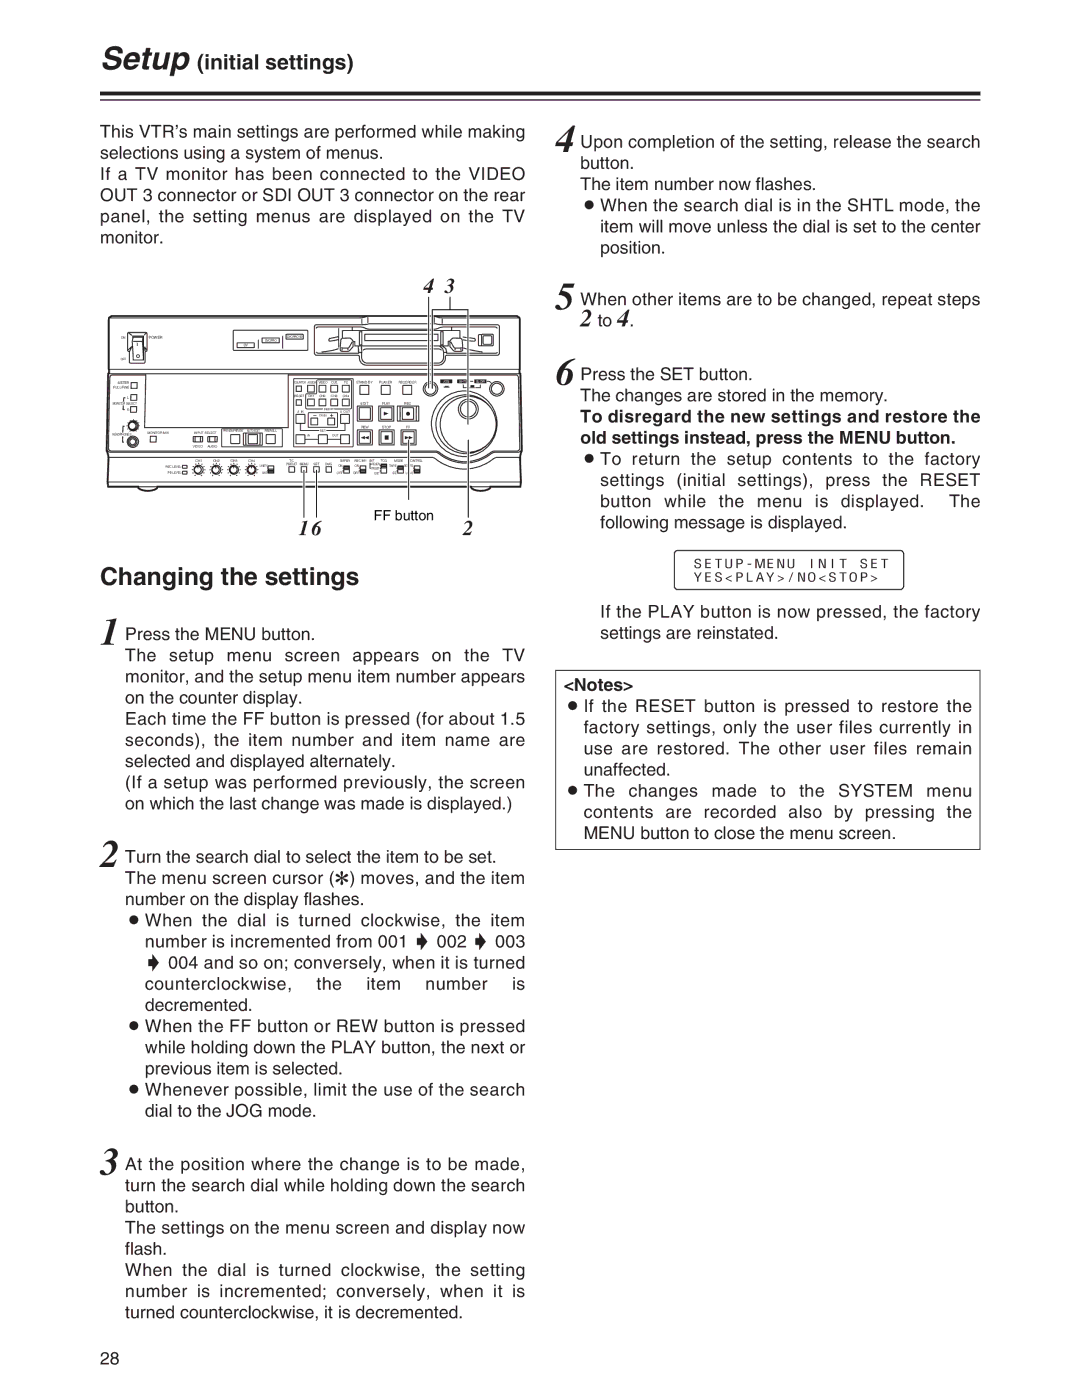
1 Press the MENU button.

The setup menu screen appears on the TV monitor, and the setup menu item number appears on the counter display.

Each time the FF button is pressed (for about 1.5 seconds), the item number and item name are selected and displayed alternately.

(If a setup was performed previously, the screen on which the last change was made is displayed.)

2 Turn the search dial to select the item to be set. The menu screen cursor (2) moves, and the item number on the display flashes.

O When the dial is turned clockwise, the item number is incremented from 001 5 002 5 003 5 004 and so on; conversely, when it is turned counterclockwise, the item number is decremented.

O When the FF button or REW button is pressed while holding down the PLAY button, the next or previous item is selected.

O Whenever possible, limit the use of the search dial to the JOG mode.

3 At the position where the change is to be made, turn the search dial while holding down the search button.

The settings on the menu screen and display now flash.

When the dial is turned clockwise, the setting number is incremented; conversely, when it is turned counterclockwise, it is decremented.

4 Upon completion of the setting, release the search button.

The item number now flashes.

O When the search dial is in the SHTL mode, the item will move unless the dial is set to the center position.

5 When other items are to be changed, repeat steps 2 to 4.

6 Press the SET button.

The changes are stored in the memory.

To disregard the new settings and restore the old settings instead, press the MENU button.

O To return the setup contents to the factory settings (initial settings), press the RESET button while the menu is displayed. The following message is displayed.

SETUP-MENU INIT SET

YES<PLAY>/NO<STOP>

If the PLAY button is now pressed, the factory settings are reinstated.

<Notes>

O If the RESET button is pressed to restore the factory settings, only the user files currently in use are restored. The other user files remain unaffected.

O The changes made to the SYSTEM menu contents are recorded also by pressing the MENU button to close the menu screen.

28

Page 28
Image 28
Panasonic AJ-SD955A, AJ-SD930 manual Changing the settings, Setup initial settings

AJ-SD930, AJ-SD955A specifications

The Panasonic AJ-SD955A and AJ-SD930 are noteworthy additions to the world of professional video production, combining cutting-edge technology with user-friendly features. Both models are designed for broadcast and post-production environments, offering high-quality video capture and playback at an impressive level of performance.

The AJ-SD955A is a versatile digital disk recorder that supports a wide range of formats, including DV and DVCPRO. This model stands out due to its capability to record in both standard definition and high definition, making it suitable for various production requirements. One of its main features is its dual-slot P2 card system, which allows for hot-swappable memory cards, enabling uninterrupted recording and extended shooting times. This flexibility is invaluable in fast-paced production settings.

The AJ-SD930 is a more compact option, ideal for mobile applications. Like the AJ-SD955A, it supports both DV and DVCPRO formats, but it offers slightly fewer advanced features, focusing instead on portability and user convenience. The SD930 includes balanced audio inputs, a built-in LCD monitor, and a straightforward interface that allows for intuitive operation in the field.

Both models utilize MPEG-2 compression technology, providing high-quality video while minimizing file sizes. This is particularly important for content that demands efficient storage and fast transfer rates. Additionally, they support both 16-bit linear PCM audio and embedded audio recording, catering to professionals who require top-notch audio fidelity alongside their video.

The build quality of both the AJ-SD955A and AJ-SD930 is robust, making them suitable for rigorous use in various environments. The devices feature extensive connectivity options, including SDI and analog outputs, which facilitate seamless integration into existing production setups. This versatility ensures that users can adapt to different workflows with ease.

In conclusion, the Panasonic AJ-SD955A and AJ-SD930 are exemplary choices for professionals seeking reliable and high-quality video recording solutions. Their combination of innovative technology, flexibility, and durable design makes them indispensable tools for anyone serious about video production, whether in a studio or on location. With their ability to deliver outstanding performance while accommodating evolving industry standards, they remain relevant in the ever-changing landscape of professional videography.