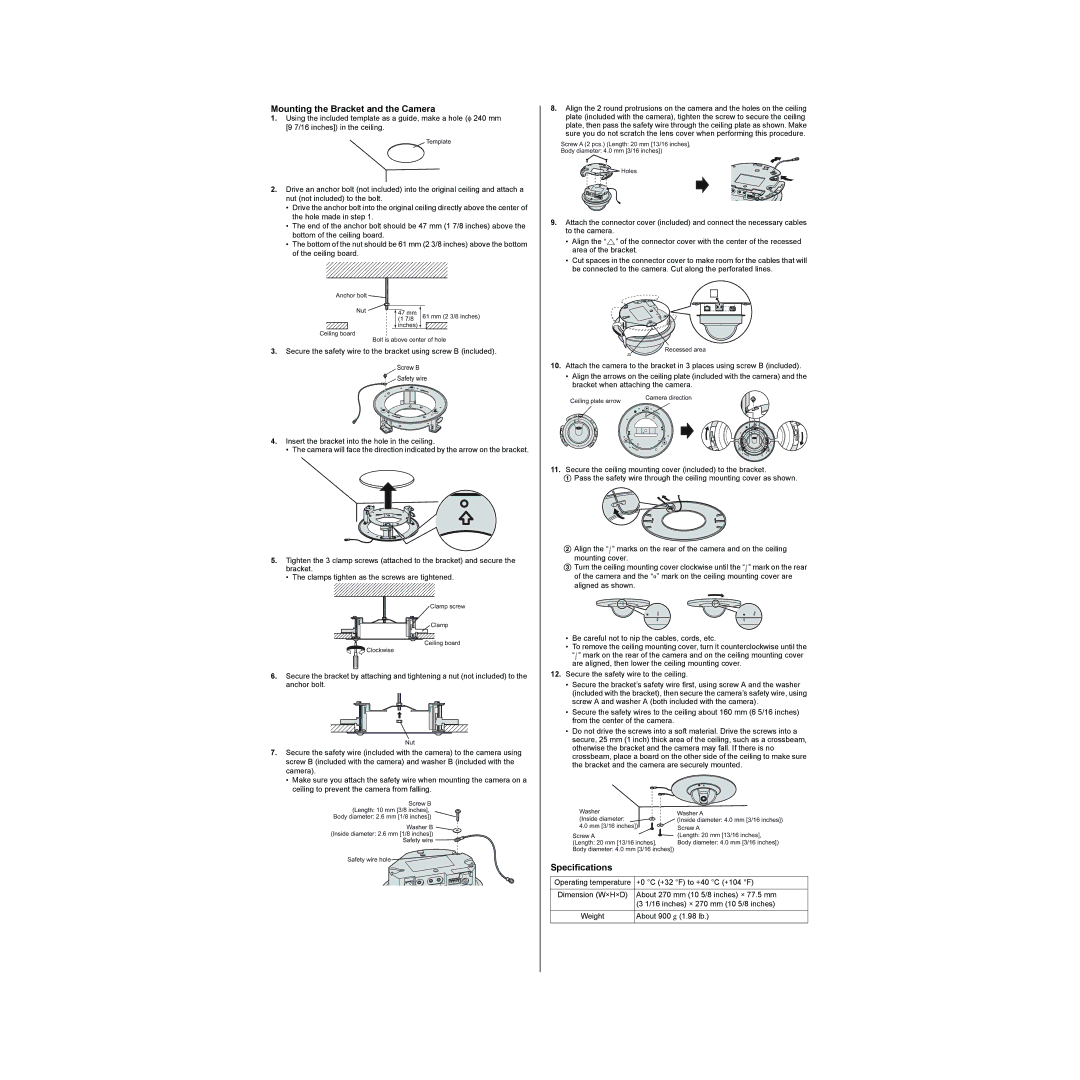
Mounting the Bracket and the Camera

1.Using the included template as a guide, make a hole (φ 240 mm [9 7/16 inches]) in the ceiling.

Template

2.Drive an anchor bolt (not included) into the original ceiling and attach a nut (not included) to the bolt.

Drive the anchor bolt into the original ceiling directly above the center of the hole made in step 1.

The end of the anchor bolt should be 47 mm (1 7/8 inches) above the bottom of the ceiling board.

The bottom of the nut should be 61 mm (2 3/8 inches) above the bottom of the ceiling board.

Anchor bolt


Nut

47 mm


61 mm (2 3/8 inches)


(1 7/8


inches)


Ceiling board

Bolt is above center of hole

3.Secure the safety wire to the bracket using screw B (included).

Screw B

Safety wire

4.Insert the bracket into the hole in the ceiling.

• The camera will face the direction indicated by the arrow on the bracket.

5.Tighten the 3 clamp screws (attached to the bracket) and secure the bracket.

• The clamps tighten as the screws are tightened.

Clamp screw

Clamp

Ceiling board

Clockwise

6.Secure the bracket by attaching and tightening a nut (not included) to the anchor bolt.

Nut

7.Secure the safety wire (included with the camera) to the camera using screw B (included with the camera) and washer B (included with the camera).

Make sure you attach the safety wire when mounting the camera on a ceiling to prevent the camera from falling.

Screw B (Length: 10 mm [3/8 inches], Body diameter: 2.6 mm [1/8 inches])

Washer B

(Inside diameter: 2.6 mm [1/8 inches]) Safety wire

Safety wire hole

8.Align the 2 round protrusions on the camera and the holes on the ceiling plate (included with the camera), tighten the screw to secure the ceiling plate, then pass the safety wire through the ceiling plate as shown. Make sure you do not scratch the lens cover when performing this procedure.

Screw A (2 pcs.) (Length: 20 mm [13/16 inches],

Body diameter: 4.0 mm [3/16 inches])

Holes

9.Attach the connector cover (included) and connect the necessary cables to the camera.

Align the “” of the connector cover with the center of the recessed area of the bracket.

Cut spaces in the connector cover to make room for the cables that will be connected to the camera. Cut along the perforated lines.

Recessed area

10.Attach the camera to the bracket in 3 places using screw B (included).

Align the arrows on the ceiling plate (included with the camera) and the bracket when attaching the camera.

Ceiling plate arrow

Camera direction


11.Secure the ceiling mounting cover (included) to the bracket.

1 Pass the safety wire through the ceiling mounting cover as shown.

2Align the “ ” marks on the rear of the camera and on the ceiling mounting cover.

3Turn the ceiling mounting cover clockwise until the “ ” mark on the rear of the camera and the “” mark on the ceiling mounting cover are aligned as shown.

Be careful not to nip the cables, cords, etc.

To remove the ceiling mounting cover, turn it counterclockwise until the “ ” mark on the rear of the camera and on the ceiling mounting cover are aligned, then lower the ceiling mounting cover.

12.Secure the safety wire to the ceiling.

Secure the bracket’s safety wire first, using screw A and the washer (included with the bracket), then secure the camera’s safety wire, using screw A and washer A (both included with the camera).

Secure the safety wires to the ceiling about 160 mm (6 5/16 inches) from the center of the camera.

Do not drive the screws into a soft material. Drive the screws into a secure, 25 mm (1 inch) thick area of the ceiling, such as a crossbeam, otherwise the bracket and the camera may fall. If there is no crossbeam, place a board on the other side of the ceiling to make sure the bracket and the camera are securely mounted.

Washer

Washer A

(Inside diameter:

(Inside diameter: 4.0 mm [3/16 inches])

4.0 mm [3/16 inches])

Screw A


Screw A

(Length: 20 mm [13/16 inches],

(Length: 20 mm [13/16 inches],

Body diameter: 4.0 mm [3/16 inches])

Body diameter: 4.0 mm [3/16 inches])

Specifications

Operating temperature

+0 °C (+32 °F) to +40 °C (+104 °F)


Dimension (W×H×D)

About 270 mm (10 5/8 inches) × 77.5 mm


(3 1/16 inches) × 270 mm (10 5/8 inches)


Weight

About 900 g (1.98 lb.)


Page 2
Image 2
Panasonic BB-HCA10A manual Mounting the Bracket and the Camera, Specifications

BB-HCA10A specifications

The Panasonic BB-HCA10A is a sophisticated network camera designed for effective surveillance and monitoring in both home and business environments. With a compact and sleek design, this device seamlessly integrates into various settings, ensuring discreet observation while delivering high-quality video footage.

One of the standout features of the BB-HCA10A is its high-resolution image capture. The camera supports a maximum resolution of 640x480 pixels, providing clear and detailed video that enables users to identify faces and license plates with ease. This level of clarity is crucial for security applications, where recognizing potential threats can be pivotal.

The BB-HCA10A utilizes advanced digital signal processing technology to enhance image quality, even in challenging lighting conditions. With its built-in automatic light adjustment, the camera can effectively handle both bright and dim environments, ensuring reliable performance around the clock. Additionally, the integration of a wide-angle lens allows for greater coverage, reducing the need for multiple cameras to monitor a single area.

Another important characteristic of the Panasonic BB-HCA10A is its robust connectivity options. Equipped with Ethernet and wireless connectivity, the camera can easily be integrated into existing networks, enabling remote access and real-time monitoring via smartphones or PCs. This feature is particularly beneficial for users who require consistent updates about their premises, no matter where they are.

The camera also comes with a built-in motion detection feature. This technology notifies users immediately when movement is detected in the field of view, allowing for a prompt response to any unusual activity. Furthermore, it supports use in various temperature environments, withstanding conditions as low as -10 degrees Celsius up to 50 degrees Celsius, making it suitable for both indoor and outdoor applications.

In terms of security, the BB-HCA10A supports advanced encryption standards, ensuring that video feeds are protected from unauthorized access. This is especially critical for businesses that handle sensitive information.

Overall, the Panasonic BB-HCA10A network camera combines high-performance video quality, versatile connectivity, and reliable security features, making it an ideal choice for those seeking effective surveillance solutions. Its user-friendly interface and advanced technology empower users to maintain a secure environment effortlessly.