NE Accessories |
| |
G |
|
|
L |
|
|
I |
|
|
S |
|
|
H |
| |
|
| |
5 |
|
|
| Operating Installation Lock Cancel Mounting Rubber | Power |
Preparation |
| N | |
|
| E | |
|
| G | |
| Remote Control Unit | L | |
| S | ||
|
| I | |
Preparation Before Initial Use | Warning | H | |
6 | |||
Pull the insulation film out from the | ¡Keep batteries away from children to avoid the risk of | ||
| |||
backside of the remote control gently. | accidents. If an infant ingests a battery, please seek |
| |
| immediate medical attention. |
|
Instructions | Instructions | Plate |
| Bolt | Bushing | Connector | |||
|
| (YEFM293960) |
| ||||||
|
|
|
|
|
|
|
|
| |
(YEFM285617) | (YEFM293961) |
|
| Q’ty: 2 | Q’ty: 1 | Q’ty: 1 | (YEAJ02877) | ||
| Q’ty: 1 | Q’ty: 2 |
|
| |||||
|
|
|
|
|
|
| Q’ty: 1 | ||
| Instruction kit |
|
| Installation kit (YEP0FZ5698) | |||||
|
|
|
| ||||||
Battery Replacement
q Remove the battery holder with the remote control unit placed on a flat surface.
qStick your thumbnail into the groove and push the holder in the
Tough pointed object
![]() Caution
Caution
¡Remove and dispose of an old battery immediately. ¡Do not disassemble, heat or short a battery. Do not
throw a battery into a fire or water.
¡Follow local regulations when disposing of a battery. ¡Improper use of a battery may cause overheating, an
Trim Plate
Mounting Collar
Removable Face Plate Case
POWER
SOURCE MENU
SRC SEL
SETVOL
BAND MUTE
1 2 3
4 5 6
7 | 8 | 9 |
#0
CAR AUDIO
Remote Control Unit
direction of the arrow at the same time.
wPull it out in the direction of the arrow using a tough pointed object.
wPut a battery in the case with (+) side facing up.
ePut the case back.
![]() w q
w q
Back side
![]() 2
2
3
explosion or ignition, resulting in injury or a fire.
Note:
¡Battery Information:
Battery Type: Panasonic lithium battery (CR2025) (Included in the remote control)
Battery Life: Approximately 6 months under normal use (at room temperature)
(YEFC051003)
(YEFX0217263)
(YEFA131839)
(includes a battery)
(EUR7641010)
Main Unit
Q’ty: 1
Q’ty: 1
Q’ty: 1
Q’ty: 1
Cancellation of demonstration
Clock Setting
Note:
¡The number in parentheses underneath each accessory part name is the part number for maintenance and service.
¡Accessories and their parts numbers are subject to modification without prior notice due to improvements.
¡Trim Plate and Mounting Collar are mounted on the main unit at shipment.
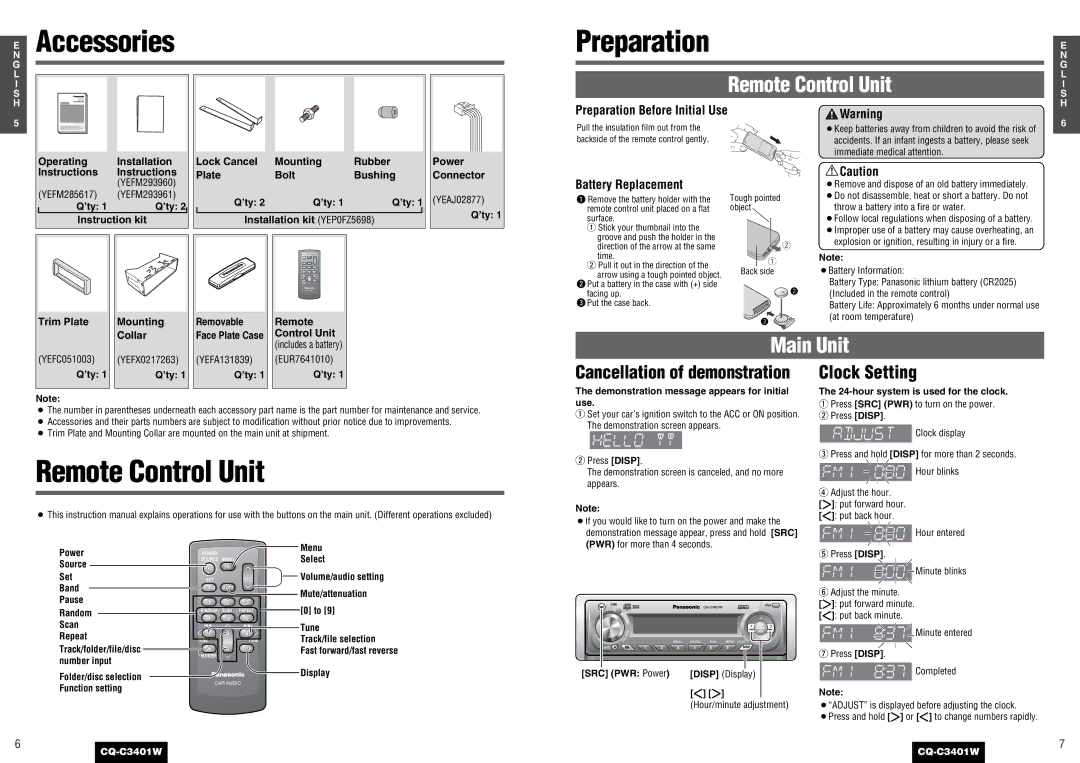
Remote Control Unit
¡This instruction manual explains operations for use with the buttons on the main unit. (Different operations excluded)
Power | POWER |
|
| Menu | |
|
| Select | |||
Source | SOURCE | MENU |
| ||
SRC | SEL |
|
| ||
Set |
|
| Volume/audio setting | ||
SET |
| VOL | |||
Band | BAND | MUTE |
| Mute/attenuation | |
Pause | 1 | 2 | 3 | ||
[0] to [9] | |||||
Random | RANDOM | SCAN | REPEAT | ||
Scan | 4 | 5 | 6 |
| |
7 | 8 | 9 | Tune | ||
Repeat | Track/file selection | ||||
TUNE |
| TUNE | |||
Track/folder/file/disc | # | 0 | DISP | Fast forward/fast reverse | |
|
|
|
|
number input | NUMBER | |
| ||
Folder/disc selection | Display | |
CAR AUDIO | ||
Function setting | ||
|
The demonstration message appears for initial use.
qSet your car’s ignition switch to the ACC or ON position. The demonstration screen appears.
wPress [DISP].
The demonstration screen is canceled, and no more appears.
Note:
¡If you would like to turn on the power and make the demonstration message appear, press and hold [SRC] (PWR) for more than 4 seconds.
SRC | PWR |
|
|
|
|
|
|
|
|
|
|
| OPEN | |
|
|
|
|
|
|
|
|
|
|
|
| DISC | ||
| V |
|
|
|
|
|
|
|
|
|
|
|
| |
|
|
|
|
|
|
|
|
|
|
|
|
| K | |
| O |
|
|
|
|
|
|
|
|
|
| C | ||
| L |
|
|
|
|
|
|
|
|
| A |
| ||
| U |
|
|
|
|
|
| /T | R |
|
| |||
|
| M |
|
|
|
|
|
|
|
|
| |||
|
|
| E |
|
|
|
|
|
|
|
|
|
| |
|
|
|
|
|
|
|
|
| E |
|
|
|
| |
|
|
|
|
|
|
|
|
|
| N |
|
|
|
|
|
|
|
|
|
|
|
|
|
| U |
|
|
| BAND |
|
|
| P |
|
|
|
|
|
| T |
|
|
| |
|
|
|
|
|
|
|
|
|
|
|
|
| APM | |
|
|
| U |
|
|
|
|
|
|
|
|
|
|
|
|
|
| S |
|
|
|
|
|
| F |
|
|
| |
|
| S |
|
|
|
|
|
|
| O |
| |||
| E |
|
|
|
|
|
|
| L |
| ||||
|
|
|
|
|
|
|
|
| D | |||||
| L |
|
|
|
| SCROLL | RANDOM | SCAN | REPEAT | CLOCK | R | |||
MUTE |
| SQ | 1 | 2 | 3 | 4 | 5 | 6 | DISP | |||||
[SRC] (PWR: Power) | [DISP] (Display) |
[]] [[]
(Hour/minute adjustment)
The 24-hour system is used for the clock.
qPress [SRC] (PWR) to turn on the power. w Press [DISP].
![]() Clock display
Clock display
ePress and hold [DISP] for more than 2 seconds. ![]() Hour blinks
Hour blinks
rAdjust the hour.
[[]: put forward hour.
[]]: put back hour.
![]() Hour entered
Hour entered
tPress [DISP]. ![]() Minute blinks
Minute blinks
yAdjust the minute.
[[]: put forward minute.
[]]: put back minute.
Minute entered
uPress [DISP]. ![]() Completed
Completed
Note:
¡“ADJUST” is displayed before adjusting the clock.
¡Press and hold [[] or []] to change numbers rapidly.
6
7