INTERNAL VIEW
Screws Drain pan (optional)

2

INSTALLATION

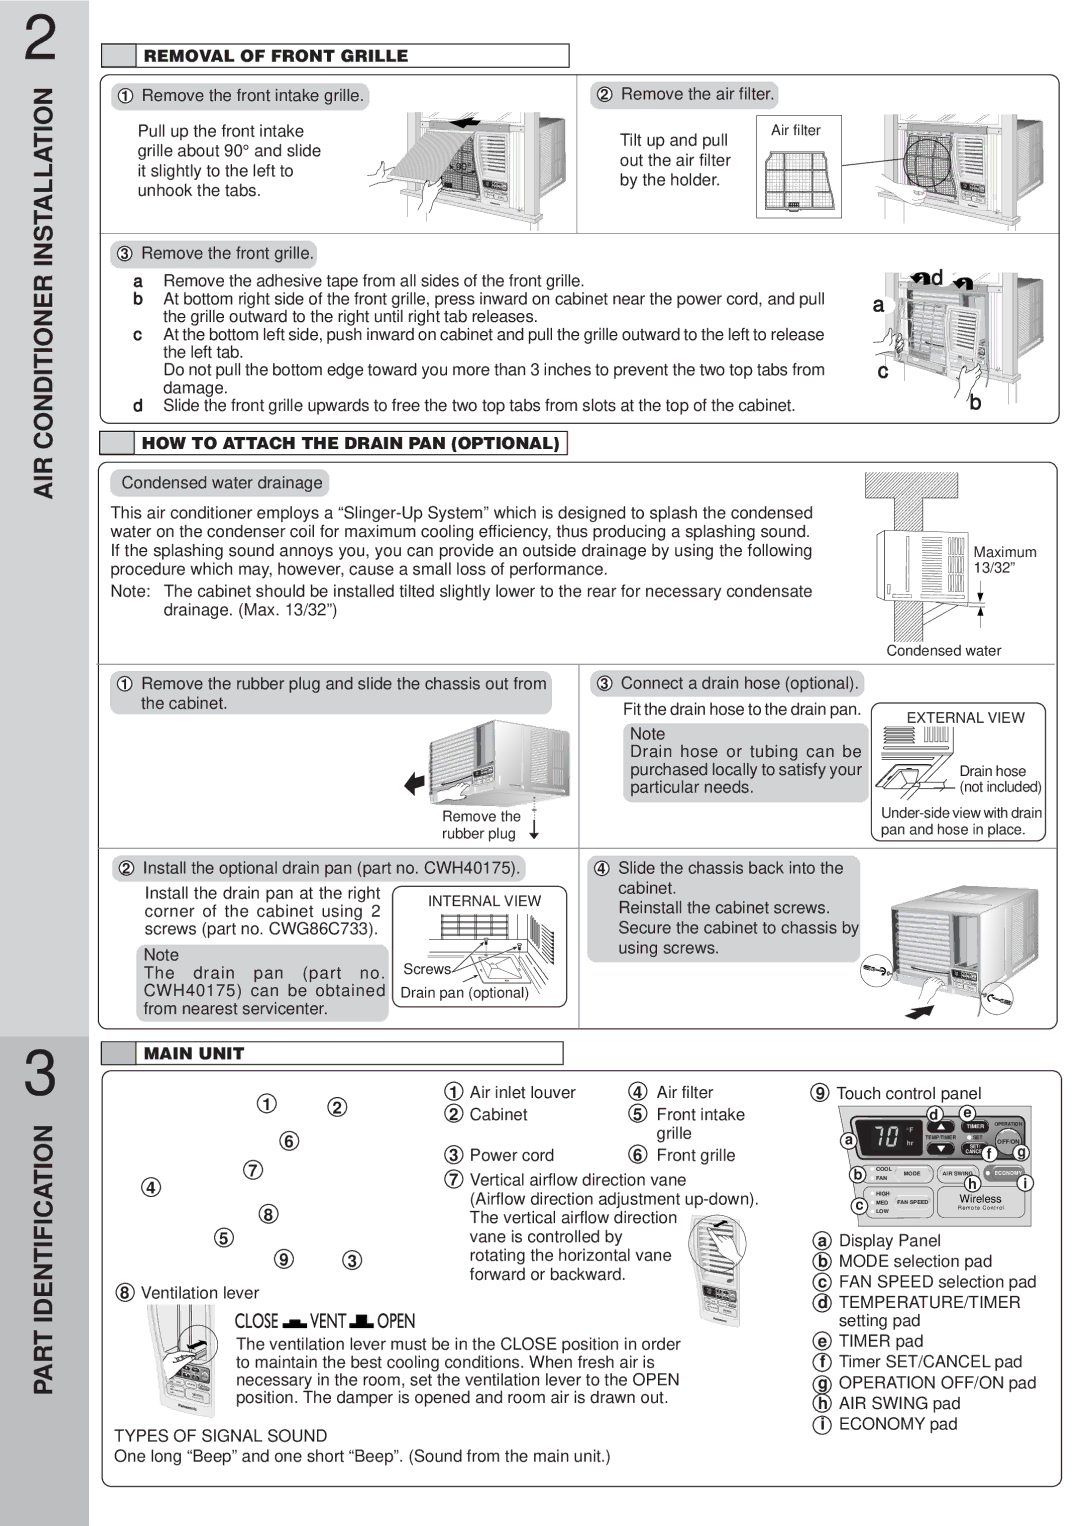
REMOVAL OF FRONT GRILLE

1Remove the front intake grille.

Pull up the front intake


grille about 90° and slide


it slightly to the left to


unhook the tabs.

Wireless

2Remove the air filter.

Tilt up and pull

Air filter


out the air filter


by the holder.


Wireless

AIR CONDITIONER

3Remove the front grille.

aRemove the adhesive tape from all sides of the front grille.

bAt bottom right side of the front grille, press inward on cabinet near the power cord, and pull the grille outward to the right until right tab releases.

cAt the bottom left side, push inward on cabinet and pull the grille outward to the left to release the left tab.

Do not pull the bottom edge toward you more than 3 inches to prevent the two top tabs from damage.

dSlide the front grille upwards to free the two top tabs from slots at the top of the cabinet.

HOW TO ATTACH THE DRAIN PAN (OPTIONAL)

Condensed water drainage

This air conditioner employs a “Slinger-Up System” which is designed to splash the condensed water on the condenser coil for maximum cooling efficiency, thus producing a splashing sound. If the splashing sound annoys you, you can provide an outside drainage by using the following procedure which may, however, cause a small loss of performance.

Note: The cabinet should be installed tilted slightly lower to the rear for necessary condensate drainage. (Max. 13/32”)

d a

c

b

Maximum 13/32”

Condensed water

1Remove the rubber plug and slide the chassis out from the cabinet.

Remove the rubber plug

3Connect a drain hose (optional).

Fit the drain hose to the drain pan.

Note

Drain hose or tubing can be purchased locally to satisfy your particular needs.

EXTERNAL VIEW

Drain hose (not included)

Under-side view with drain pan and hose in place.

2Install the optional drain pan (part no. CWH40175).

Install the drain pan at the right corner of the cabinet using 2 screws (part no. CWG86C733).

Note

The drain pan (part no. CWH40175) can be obtained from nearest servicenter.

4Slide the chassis back into the

cabinet.

Reinstall the cabinet screws. Secure the cabinet to chassis by using screws.

Wireless

3

MAIN UNIT

IDENTIFICATION

1 2

6

7

4

8

5

9 3

8Ventilation lever

1

Air inlet louver

4

Air filter

2

Cabinet

5

Front intake


grille

3

Power cord

6

Front grille

7Vertical airflow direction vane

(Airflow direction adjustment up-down). The vertical airflow direction

vane is controlled by rotating the horizontal vane forward or backward.

Wireless

9Touch control panel


d


e

OPERATION


°F


TIMER

a


TEMP/TIMER

SET

OFF/ON

hr


SET/


CANCEL f

g

b

COOL

AIR SWING

ECONOMY

MODE

FAN


h

i


HIGH


c


Wireless

MED FAN SPEED


LOW


Remote Control

a

Display Panel

b MODE selection pad

c

FAN SPEED selection pad

d TEMPERATURE/TIMER


setting pad

PART


The ventilation lever must be in the CLOSE position in order

°hrF


to maintain the best cooling conditions. When fresh air is


OFF/ON

necessary in the room, set the ventilation lever to the OPEN


Wireless

position. The damper is opened and room air is drawn out.

TYPES OF SIGNAL SOUND

One long “Beep” and one short “Beep”. (Sound from the main unit.)

e TIMER pad

fTimer SET/CANCEL pad g OPERATION OFF/ON pad h AIR SWING pad

i ECONOMY pad

Page 4
Image 4
Panasonic CW-XC103VU manual AIR Conditioner, Identification, Removal of Front Grille, HOW to Attach the Drain PAN Optional

CW-XC123VU, CW-XC103VU specifications

Panasonic has long been recognized for its commitment to innovation and quality, and its latest air conditioning models, the CW-XC123VU and CW-XC103VU, epitomize this ethos. Both units are designed for residential applications, offering efficient cooling and heating solutions while maintaining environmental sustainability.

One of the standout features of the CW-XC123VU and CW-XC103VU is their advanced inverter technology. This allows the units to adjust their power consumption based on the current temperature, providing users with efficient cooling or heating that can significantly reduce energy costs. The inverter technology ensures that the units run smoothly, minimizing noise levels, which is an essential factor for comfort in any living space.

Both models also incorporate a high Energy Efficiency Ratio (EER) and Seasonal Energy Efficiency Ratio (SEER), making them highly efficient and eco-friendly options. The CW-XC123VU, with a cooling capacity tailored for larger spaces, is particularly suitable for open-plan living areas, while the CW-XC103VU is ideal for smaller rooms or offices. With their efficient energy consumption, these models help to reduce the carbon footprint, aligning with Panasonic's commitment to sustainability.

Additionally, these air conditioning units come equipped with a comprehensive air purification system. This includes a multi-filter system that not only cools or heats the air but also removes dust, allergens, and other harmful particles. Users can enjoy cleaner air quality, making these models particularly suitable for families with respiratory issues or allergies.

The design of both models is sleek and modern, ensuring that they blend seamlessly into various home interiors. The user-friendly remote control interface enables easy operation, allowing users to set their preferred temperature, select fan speeds, and program timers effortlessly.

In conclusion, Panasonic's CW-XC123VU and CW-XC103VU air conditioning models are a perfect blend of technology, efficiency, and design. With features such as advanced inverter technology, high EER and SEER ratings, and superior air purification systems, these units cater to diverse needs, offering both comfort and wellness. Panasonic continues to lead the way in developing air conditioning solutions that prioritize energy efficiency and environmental responsibility, making these models a smart choice for any modern household.