Printing

You can connect directly to a PictBridge- compatible printer for printing.

Set-up:

Use a fully charged battery, or connect the AC adaptor (DMW-AC5E, optional) and Multi Conversion Adaptor (DMW-MCA1, optional). (P.103)

• Card : Insert card Built-in memory: Remove card

(Copy clipboard pictures to the card (P.82))

Adjust settings on your printer (print quality, etc.) as required.

Set mode dial to any setting other than

CLIPBOARD.

Do not disconnect the USB connection cable when the cable disconnection icon is displayed (may not be displayed with some printers).

Check socket direction and insert straight in. (Damage to socket shape can lead to faulty operation.)

USB connection cable (always use cable supplied)

To cancel print Press ‘MENU/SET’

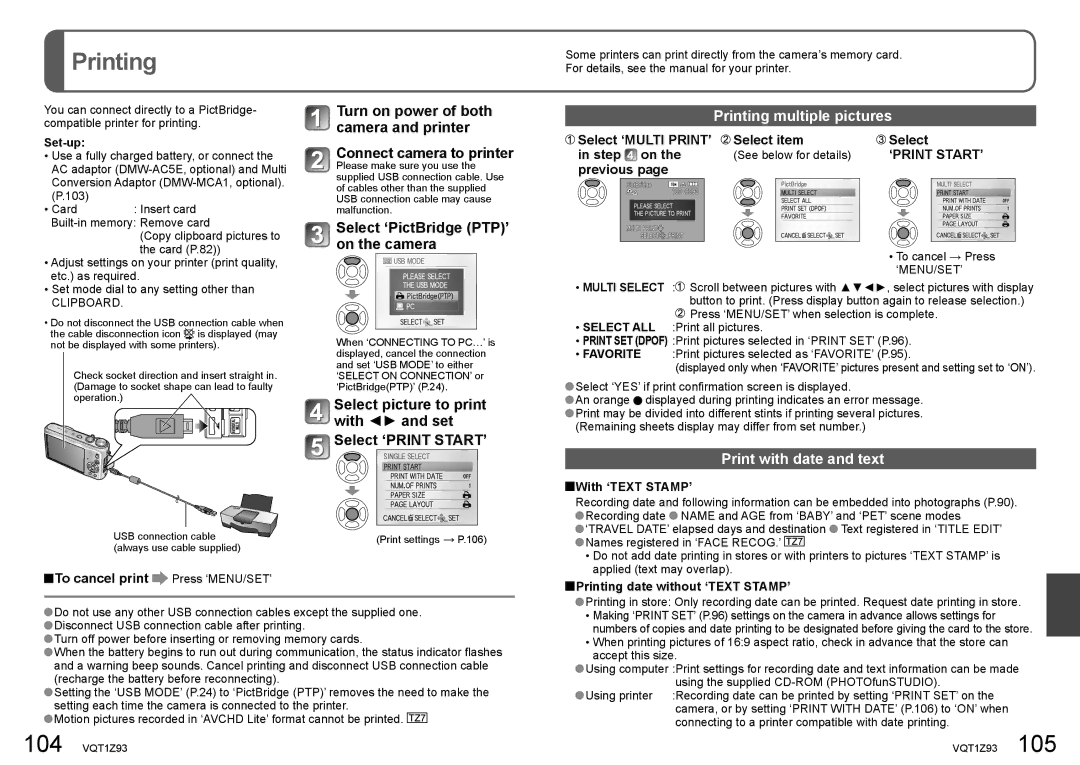
Turn on power of both camera and printer

Connect camera to printer

Please make sure you use the supplied USB connection cable. Use of cables other than the supplied USB connection cable may cause malfunction.

Select ‘PictBridge (PTP)’ on the camera

When ‘CONNECTING TO PC…’ is displayed, cancel the connection and set ‘USB MODE’ to either ‘SELECT ON CONNECTION’ or ‘PictBridge(PTP)’ (P.24).

Select picture to print with ◄► and set

Select ‘PRINT START’

(Print settings P.106)

Some printers can print directly from the camera’s memory card.

For details, see the manual for your printer.

Printing multiple pictures

Select ‘MULTI PRINT’

Select item

Select

in step on the

(See below for details)

‘PRINT START’

previous page


• To cancel → Press ‘MENU/SET’

MULTI SELECT : Scroll between pictures with ▲▼◄►, select pictures with display button to print. (Press display button again to release selection.)

Press ‘MENU/SET’ when selection is complete.

SELECT ALL :Print all pictures.

PRINT SET (DPOF) :Print pictures selected in ‘PRINT SET’ (P.96).

FAVORITE :Print pictures selected as ‘FAVORITE’ (P.95).

(displayed only when ‘FAVORITE’ pictures present and setting set to ‘ON’).

Select ‘YES’ if print confirmation screen is displayed.

An orange displayed during printing indicates an error message. Print may be divided into different stints if printing several pictures. (Remaining sheets display may differ from set number.)

Print with date and text

With ‘TEXT STAMP’

Recording date and following information can be embedded into photographs (P.90). Recording date NAME and AGE from ‘BABY’ and ‘PET’ scene modes

‘TRAVEL DATE’ elapsed days and destination Text registered in ‘TITLE EDIT’ Names registered in ‘FACE RECOG.’

Do not add date printing in stores or with printers to pictures ‘TEXT STAMP’ is applied (text may overlap).

Printing date without ‘TEXT STAMP’

Do not use any other USB connection cables except the supplied one.

Disconnect USB connection cable after printing.

Turn off power before inserting or removing memory cards.

When the battery begins to run out during communication, the status indicator flashes and a warning beep sounds. Cancel printing and disconnect USB connection cable (recharge the battery before reconnecting).

Setting the ‘USB MODE’ (P.24) to ‘PictBridge (PTP)’ removes the need to make the setting each time the camera is connected to the printer.

Motion pictures recorded in ‘AVCHD Lite’ format cannot be printed.

Printing in store: Only recording date can be printed. Request date printing in store.

Making ‘PRINT SET’ (P.96) settings on the camera in advance allows settings for numbers of copies and date printing to be designated before giving the card to the store.

When printing pictures of 16:9 aspect ratio, check in advance that the store can accept this size.

Using computer :Print settings for recording date and text information can be made using the supplied CD-ROM (PHOTOfunSTUDIO).

Using printer :Recording date can be printed by setting ‘PRINT SET’ on the camera, or by setting ‘PRINT WITH DATE’ (P.106) to ‘ON’ when connecting to a printer compatible with date printing.

104 VQT1Z93

VQT1Z93 105

Page 53
Image 53
Panasonic DMC-TZ6, DMC-TZ7 Select ‘PictBridge PTP’ on the camera, Printing multiple pictures, Print with date and text

DMC-TZ7, DMC-TZ65, DMC-TZ6 specifications

The Panasonic DMC-TZ series has been a popular line of compact digital cameras, known for their versatility, user-friendly features, and quality performance. Among the notable models are the DMC-TZ6, DMC-TZ65, and DMC-TZ7, each offering a unique blend of technological advancements and innovative features to meet the needs of photography enthusiasts and casual users alike.

The DMC-TZ6, released as part of the series, boasts a 12.1-megapixel sensor and a Leica DC Vario-Elmar lens that offers a 12x optical zoom, providing impressive close-up shots and landscape photography capabilities. With the incorporation of Optical Image Stabilization (O.I.S.), users can capture sharp images even in low-light conditions or while on the move. The camera's Venus Engine allows for quick processing speeds, ensuring that users can capture images with reduced noise levels and vibrant colors.

Building on the success of its predecessor, the DMC-TZ65 features a slightly improved 16-megapixel sensor and an extensive zoom range of 20x, coupled with an impressive focal length that spans wide-angle to telephoto. This model continues to embrace features like O.I.S. to mitigate blurriness and deliver crystal-clear images. Additionally, the TZ65 introduces Wi-Fi connectivity, allowing users to easily share their photos and videos on social media platforms or transfer files directly to their smartphones. The built-in GPS feature also enhances travel photography, providing geotagging capabilities for memorable locations.

The DMC-TZ7 is another noteworthy entry in the lineup that offers advanced features appealing to a broader audience. With a 12.1-megapixel sensor and a 25mm ultra-wide-angle lens, this camera achieves stunning perspectives and greater depth in images. The TZ7 is equipped with HD video recording capabilities, making it just as adept at capturing high-definition video as it is at still photography. Its Intelligent Auto mode utilizes advanced scene detection technology to adjust settings automatically for optimal results, ensuring even novice photographers can achieve impressive shots effortlessly.

In summary, the Panasonic DMC-TZ6, DMC-TZ65, and DMC-TZ7 offer a remarkable array of features tailored to diverse photographic needs. From high-resolution sensors and powerful zoom capabilities to smart connectivity options and user-friendly modes, these cameras reflect Panasonic's commitment to delivering quality and innovation in compact photography. Whether for travel, events, or spontaneous moments, the TZ series continues to be a reliable choice for capturing life's memories with style and efficiency.