Changing the unit’s settings


Numbered

1

2

3


4

5

6

CH


buttons

AUDIO


7

8

9


CANCEL

0

VCR Plus+

CM SKIP


SKIP

SLOW/SEARCH


STOP

PAUSE PLAY/x1.3


DIRECT NAVIGATOR


FUNCTIONS


TOP MENU


ENTER

3 4 2 1


ENTER


SUB MENU


RETURN


RETURN


PROG/CHECK

DISPLAY

STATUS

TIME SLIP


ADD/DLT

ERASE

REC MODE

REC

functions


SETUP

OPEN/CLOSE

SETUP

CHAPTER

F Rec


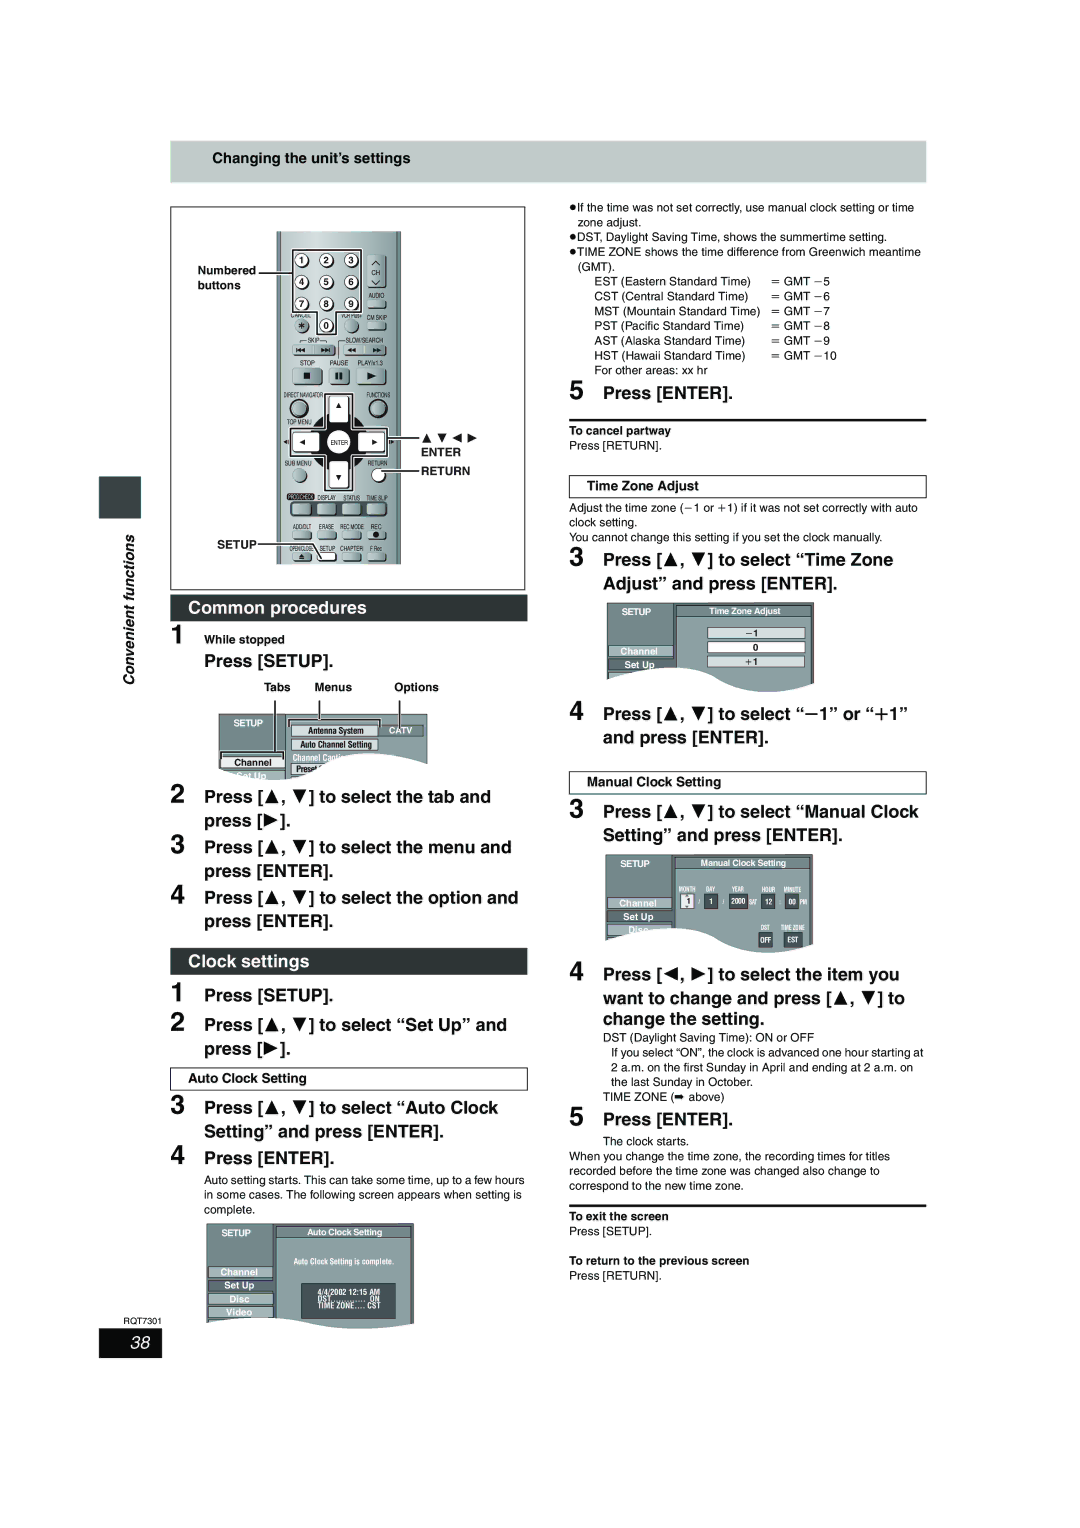
Common procedures

Convenient


1

While stopped


Press [SETUP].


Tabs

Menus

Options


SETUP

Antenna System

CATV


Auto Channel Setting


Channel

Channel Captions


Preset Channel Captions


Set Up


2


Press [

, ] to select the tab and


3

press [

].


Press [

, ] to select the menu and


4

press [ENTER].


Press [

, ] to select the option and


press [ENTER].


Clock settings

1Press [SETUP].

2

Press [

,

] to select “Set Up” and


press [

].


Auto Clock Setting


3

Press [

,

] to select “Auto Clock


Setting” and press [ENTER].

4Press [ENTER].

Auto setting starts. This can take some time, up to a few hours in some cases. The following screen appears when setting is complete.


SETUP


Auto Clock Setting


Auto Clock Setting is complete.


Channel


Set Up


4/4/2002 12:15 AM


Disc


DST

ON


RQT7301

Video


....TIME ZONE

CST


Audio


pIf the time was not set correctly, use manual clock setting or time zone adjust.

pDST, Daylight Saving Time, shows the summertime setting.

pTIME ZONE shows the time difference from Greenwich meantime

(GMT).


EST (Eastern Standard Time)

N GMT L5

CST (Central Standard Time)

N GMT L6

MST (Mountain Standard Time)

N GMT L7

PST (Pacific Standard Time)

N GMT L8

AST (Alaska Standard Time)

N GMT L9

HST (Hawaii Standard Time)

N GMT L10

For other areas: xx hr


5Press [ENTER].

To cancel partway

Press [RETURN].

Time Zone Adjust

Adjust the time zone (L1 or K1) if it was not set correctly with auto clock setting.

You cannot change this setting if you set the clock manually.

3

Press [

,


] to select “Time Zone


Adjust” and press [ENTER].


SETUP


Time Zone Adjust


j1


Channel


0


Set Up


i1


Disc


4


Video


Press [


,


] to select “U1” or “T1”


and press


[ENTER].


Manual Clock Setting


3

Press [

,


] to select “Manual Clock


Setting” and press [ENTER].


SETUP


Manual Clock Setting


MONTH


DAY


YEAR

HOUR

MINUTE


1

/

1

/

2000

SAT

12

:

00

PM


Channel


Set Up


Disc


DST

TIME ZONE


OFF


EST


Video


4


Press [

,


] to select the item you


want to change and press [ , ] to


change the setting.


DST (Daylight Saving Time): ON or OFF

If you select “ON”, the clock is advanced one hour starting at 2 a.m. on the first Sunday in April and ending at 2 a.m. on the last Sunday in October.

TIME ZONE (above)

5Press [ENTER].

The clock starts.

When you change the time zone, the recording times for titles recorded before the time zone was changed also change to correspond to the new time zone.

To exit the screen

Press [SETUP].

To return to the previous screen

Press [RETURN].

38

Page 38
Image 38
Panasonic DMR-E55 warranty Clock settings, Press Setup To select Set Up, Press To select Time Zone Adjust and press Enter

DMR-E55 specifications

The Panasonic DMR-E55 is a versatile DVD recorder that has garnered attention since its release for its user-friendly features and advanced recording technology. As part of Panasonic's esteemed line of DVD recorders, the DMR-E55 embodies the quality and innovation that the brand is known for.

One of the standout features of the DMR-E55 is its ability to record in high-quality MPEG-2 video format. This technology ensures that recordings maintain excellent picture quality, which is especially beneficial for preserving memories in vivid detail. With the capability to record on various DVD formats, including DVD-R, DVD-RW, and DVD-RAM, users have the flexibility to choose the media that best suits their needs.

The unit has a built-in digital tuner that allows it to receive over-the-air digital broadcasts. This feature enables users to enjoy clear and crisp digital television without needing an additional set-top box. The DMR-E55 also supports time-shifting capabilities, allowing users to pause and rewind live TV, making it easy to catch up on missed moments.

The sleek design of the DMR-E55 is complemented by its intuitive interface, making it simple for even novice users to navigate. The remote control is thoughtfully designed, providing easy access to essential functions such as recording, playback, and menu navigation.

Furthermore, the DMR-E55 incorporates advanced editing features that allow users to customize their recordings. Users can cut, splice, and arrange video segments, creating professional-looking compilations and highlight reels. The user can also create playlists for DVD-RW discs, enhancing the playback experience by organizing content effectively.

Another noteworthy characteristic is its progressive scan capability, which improves picture quality during playback by minimizing motion artifacts and enhancing clarity. This feature is particularly beneficial when watching movies on high-definition TVs, as it maximizes the viewing experience.

The DMR-E55 also includes various connectivity options, such as composite, S-Video, and component video outputs, allowing seamless integration with different types of home entertainment systems. With its robust feature set and reliability, the Panasonic DMR-E55 has proven to be a valuable asset for anyone looking to record and enjoy their favorite shows and movies with ease. Users appreciate the recorder's balance of performance, versatility, and user-friendliness, making it a sought-after choice in the realm of DVD recording technology.