Français Español
Remarques importantes pour votre sécurité
Sur les modèles dont la fiche est polarisée
Précautions
Alimentation
Précautions concernant les enceintes
Emplacement
Mise en garde concernant le signal d’entrée
Groupe d’enceintes a Pièce principale
Un son comme au cinéma dans votre salon
Groupes d’enceintes a et B
Rouge Blanc
Contenu de l’emballage
Vérifiez que votre emballage contient tous les éléments
Vert
Fonctions
Entrées numériques
Affichage d’entrée
Sommaire
Tour d’horizon de l’ampli-tuner AV
Panneau avant
Tour d’horizon de l’ampli-tuner AV-suite
Ecran
Antenne XM modèle pour l’Amérique du Nord
Panneau arrière
Digital in Optical 1, 2, 3 et Coaxial
Video 1 IN/OUT et Video 2
Utilisation de la télécommande
Télécommande
Installation des piles
Remarques
Télécommande-suite
Mode RECEIVER/TAPE
Bouton ON/STANDBY
Boutons Listening Mode
Boutons Remote Mode
Boutons Input Selector
Mode DVD
Boutons de curseur / et bouton
Modes CD/MD/CDR/HDD
Bouton DISC/ALBUM +
Boutons Playlist
Enceintes
Caisson de grave actif SKW-540
Connexion du groupe d’enceintes a
Connexion des enceintes
Précautions lors de la connexion des enceintes
Connexion du groupe d’enceintes B disponible séparément
Connexion de l’antenne FM intérieure
Connexion d’une antenne
Connexion de l’antenne-cadre AM
Autres modèles
Connexion d’une antenne AM extérieure
Connexion d’une antenne-suite
Connexion d’une antenne FM extérieure
Utilisation d’un répartiteur d’antenne TV/FM
Prises numériques optiques
Connexion d’éléments
Connexions AV
Code de couleurs des prises RCA pour appareils AV
Quelle connexion choisir?
Connexion d’éléments-suite
Connexions audio et vidéo de l’ampli-tuner AV
Formats de connexion vidéo
Étape 2 Signaux audio
Connexion d’un téléviseur ou d’un projecteur
Étape 1 Signaux vidéo
Connexion d’un lecteur DVD
Connexion de l’entrée DVD multicanal
Lecteur DVD
Connexion d’un magnétoscope ou graveur DVD pour la lecture
Video 3 Input L/R
Connexion d’un caméscope, d’une console de jeux, etc
Video 3 Input
Fr-29
Digital in Optical
Connexion d’un lecteur CD ou tourne-disque
CD in L/R
Connexion d’un élément compatible HDD
Video Audio OUT
Deux
Alimenter d’autres éléments avec les prises en face arrière
Utiliser une des
Enregistreur à cassette, CDR, etc
Connexion du cordon d’alimentation
Pilotage avec la télécommande
Connexion d’éléments compatibles Onkyo
Mise sous tension/en veille automatique
Simplifier les opérations
Mise sous tension de l’ampli-tuner AV
Mise sous tension et veille
Changer l’affichage de sélecteur d’entrée
Première utilisation
Assignation des sources d’entrée aux entrées numériques
Ecoute des appareils AV
Choisissez un mode d’écoute approprié et régalez-vous
Voyez Choix du mode d’écoute à la
Fonctionnement élémentaire de l’ampli-tuner AV
Affichage d’informations sur la source
Ecoute des appareils AV-suite
Utilisation des entrées DVD multicanal
Recherche de stations radio AM/FM
Ecouter la radio
Ecouter des stations AM/FM
Ecouter la radio-suite
Programmer des stations AM/FM et des canaux XM
Sélecteur d’entrée Tuner pour sélectionner XM
Connexion de XM Passport System
Sélectionner la radio XM par satellite
’abonner à XM Satellite Radio
Sélection de canaux de radio XM
En revue les informations dispo
Mode pour choisir le mode
Afficher les informations radio XM
Nibles
Messages de la radio XM
Positionnement de XM Passport System
Réglage du grave et de l’aigu
Fonctions générales
Réglage de luminosité de l’écran
Etouffer le son du ampli-tuner AV
Réglage du niveau des enceintes
Utilisation des fonctions Timer
Fonctions générales-suite
Utilisation d’un casque
Avec la télécommande
Choix du mode d’écoute
Choix du mode d’écoute
Avec la ampli-tuner AV
Choix du mode d’écoute-suite
DVD
Description des modes d’écoute
DTS
Modes DSP conçus par Onkyo
Utilisation de la fonction CinemaFILTER
Utilisation des fonctions de réglages sonores
Réglage du Dolby Digital EX Input Signal
Réglage du mode Plii Music et PLIIx Music
Réglage du mode DTS Neo6 Music
Réglages des canaux d’entrée
Distance des enceintes
Réglages plus avancés
Réglages d’enceintes avancés
Réglages plus avancés-suite
Niveau des enceintes Level Calibration
Configuration des enceintes SP Config
Fréquence de transfert Crossover
Double Bass
Formats de signal d’entrée numérique
Corriger la synchronisation du son et de l’image
Enregistrer des sources audio et vidéo différentes
Enregistrement d’un signal d’entrée
Enregistrement
Entrer un code de télécommande
Piloter d’autres éléments
Initialisation de la télécommande
Codes de télécommande pour éléments Onkyo reliés via
Initialiser les boutons Remote Mode
Piloter d’autres éléments-suite
CH +
ON/STANDBY, TV
TV VOL
Son
Dépannage
Alimentation
Dépannage-suite
Image
Enregistrement
Remote Télécommande
Tuner
Autres
Video ATT2 Le gain est réduit de 2 dB
Atténuation vidéo
Video ATT0 par défaut
Envoi de sources S-Video à des sorties vidéo com- posite
Section vidéo
Fiche technique
Section amplificateur
Section tuner
Fiche technique-suite
Enceinte
Memo
Instrucciones de seguridad importantes
Precauciones
Alimentación
Utilizar el equipo cerca de un televisor o de un ordenador
Precauciones con los altavoces
Colocación
Aviso acerca de la señal de entrada
Grupo de altavoces a Sala principal
Disfrutar del Home Theater
Grupos de altavoces a y B
Rojo Blanco
Contenido del paquete
Compruebe que la caja contiene los siguientes elementos
Verde
Funciones
Visualizacion de entrada
Página
Entradas digitales
Contenido
Descripción del Receptor de AV
Panel frontal
Descripción del Receptor de AV-Continúa
Pantalla
Antena XM modelos para los EE.UU
Panel posterior
Digital in Optical 1, 2, 3 y Coaxial
Front Speakers A, Surround SPEAKERS, Center Speaker y
Utilizar el controlador remoto
Controlador remoto
Instalar las baterías
Notas
Modo RECEIVER/TAPE
Controlador remoto-Continúa
Cómo utilizar el controlador remoto
Botones Input Selector
Botones Remote Mode
Botón ON/STANDBY
Botón Multi CH
Modo DVD
Botón DISC/ALBUM +
Modo CD/MD/CDR/HDD
Para seleccionar la fuente de entrada, pulse
Botón de flecha / & Enter
Altavoces
Subwoofer SKW-540
Al conectar el grupo de altavoces a
Conectar los altavoces
Precauciones durante la conexión de los altavoces
Al conectar el grupo de altavoces B vendido separadamente
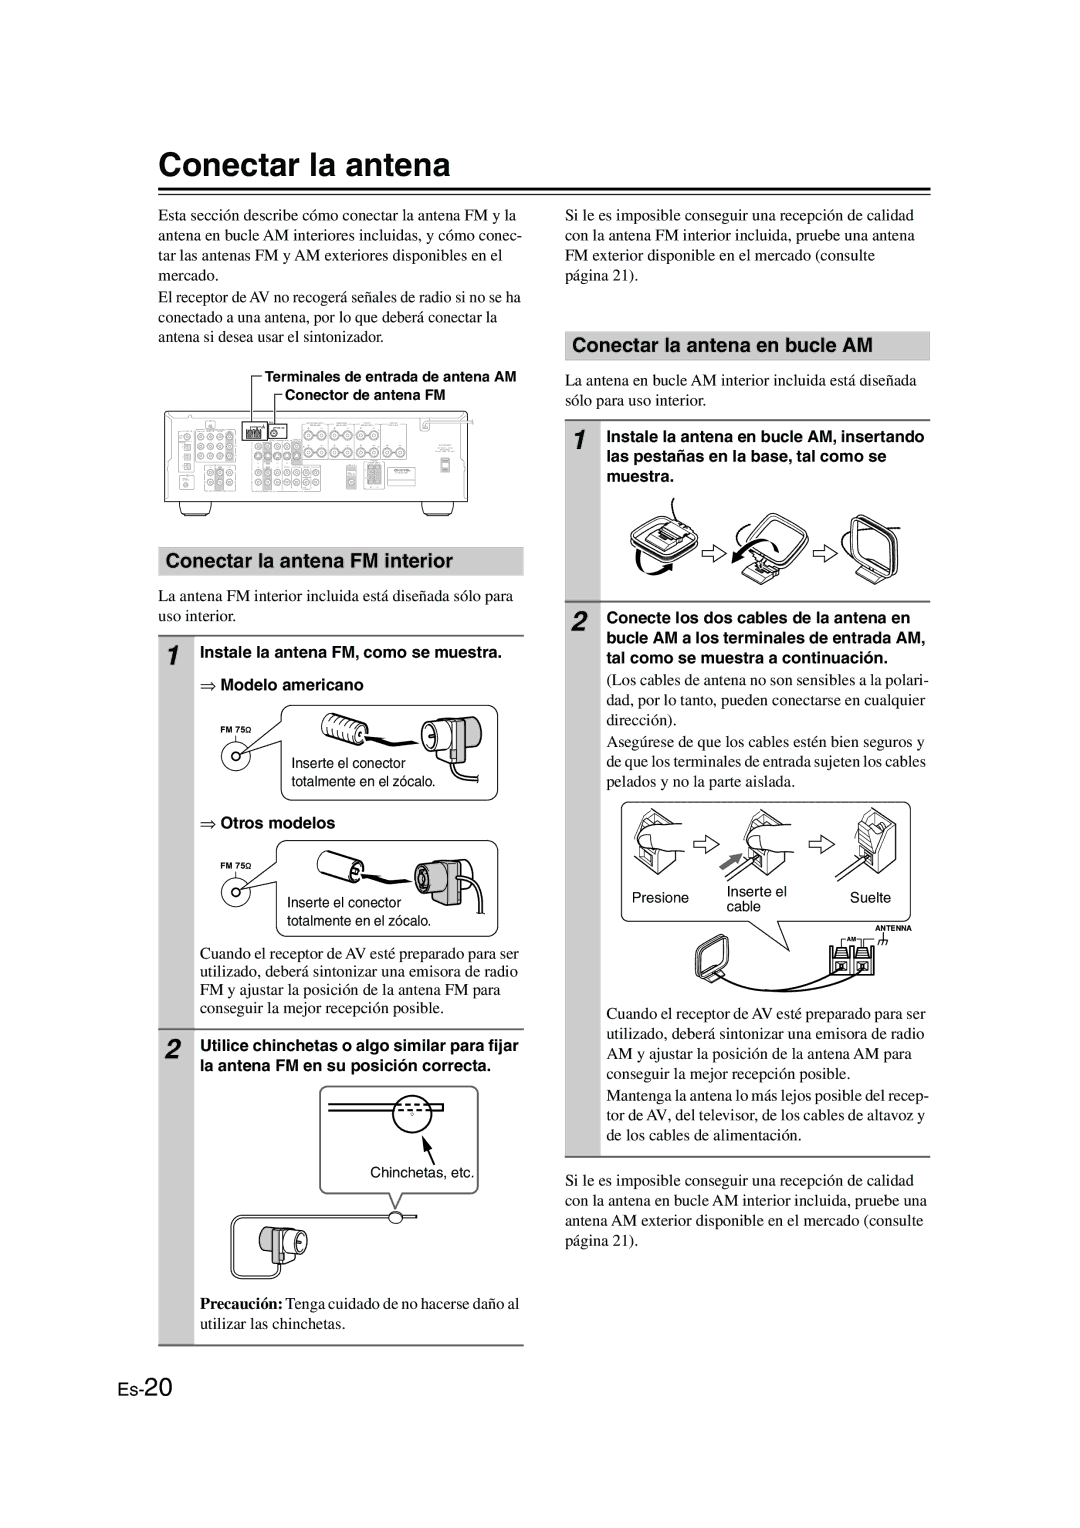
Conectar la antena en bucle AM
Conectar la antena
Conectar la antena FM interior
Instale la antena FM, como se muestra Modelo americano
Conectar una antena AM exterior
Conectar la antena-Continúa
Conectar una antena FM exterior
Utilizar un divisor de antena de TV/FM
Jacks digitales ópticos
Conectar los componentes
Acerca de las conexiones AV
¿Qué conexiones debo utilizar?
Conectar los componentes-Continúa
Conectar las señales de Audio y Vídeo al receptor AV
Formatos de conexión de vídeo
Paso 2 Conexiones de audio
Conectar el televisor o el proyector
Paso 1 Conexiones de vídeo
Consejo
Conectar un reproductor de DVD
Seleccionar la entrada multicanal del DVD
Reproductor de DVDs
Conectar un VCR o un grabador de DVDs para la reproducción
VCR, Grabador de DVDs
Grabador de DVDs
Conectar un VCR o un grabador de DVDs para la grabación
VCR
Camcorder Consola de juegos, etc
Conectar Satélite, Cable, Set-top box u otra fuente de vídeo
Satélite, cable, set-top box, etc
Conectar un reproductor de CDs o un Giradiscos
Conectar un componente compatibles con HDD
Audio OUT
Conecte uno de los Dos Debe asignar la
Conectar los cables de alimentación de otros componentes
Precaución
La página
Conectar el cable de alimentación
Auto Power On/Standby
Conectar los Onkyo componentes
Cambio directo
Posición on no en los modelos para los Estados Unidos
Activar el Receptor de AV
Activación y puesta en reposo Standby
¿Ha conectado un componente a una entrada de audio digital?
Cambiar la visualización de entrada
Primera configuración
Asignar entradas digitales a fuentes de entrada
Inicie la reproducción en el componente fuente
Reproducir los componentes AV
Funcionamiento básico del receptor AV
Seleccione un modo de escucha adecuado y ¡disfrute
Visualizar información de fuente
Reproducir los componentes AV-Continúa
Utilizar las entradas de DVD multicanal
Acceder a emisoras de radio de AM/FM
Escuchar la radio
Escuchar emisoras de AM/FM
Escuchar la radio-Continúa
Preseleccionar emisoras de AM/FM y canales XM
Entrada Tuner varias veces
Conectar la XM Passport System
Seleccionar XM Satellite Radio
Para seleccionar XM
Subscripción a XM Satellite Radio
Seleccionar canales de radio XM
Display para recorrer cíclica
Visualizar información de radio XM
Para seleccionar el modo Chan
Mente la información disponible
Mensajes de radio XM
Orientar la XM Passport System
Ajustar Bass y Treble
Funciones comunes
Ajustar el brillo de la pantalla
Enmudecer el receptor de AV
Ajustar los niveles de los altavoces
Funciones comunes-Continúa
Utilizar el temporizador Sleep
Utilizar auriculares
Utilizar el receptor de AV
Utilizar los modos de audición
Seleccionar los modos de audición
Utilizar el controlador remoto
Utilizar los modos de audición-Continúa
Acerca de los modos de audición
Pure Audio excepto para modelo EE.UU
Modos DSP originales de Onkyo
Neural Surround Sólo para los EE.UU
Utilizar las funciones de ajuste de audio
Utilizar la función Late Night sólo para Dolby Digital
Utilizar el CinemaFILTER
Ajustar el modo PL II o PL IIx Music
Ajustar el Dolby Digital EX Input Signal
Ajustes del canal de entrada
Ajustar el modo DTS Neo6 Music
Especificar las distancias de los altavoces
Configuración avanzada
Ajustes avanzados de los altavoces
Configuración avanzada-Continúa
Nivel de los altavoces
Configuración de los altavoces
Inversión
Frecuencia de inversión
Seleccionar una frecuencia de
Formato de señal de entrada digital
Corregir la sincronización del sonido y la imagen
Grabación de Audio y Vídeo a partir de fuentes separadas
Grabar
Grabar la fuente de entrada
Controlar otros componentes
Introducir un código de control remoto
Reajustar el controlador remoto
Reajustar los botones Remote Mode
Controlar otros componentes-Continúa
Selecciona el canal previo
Cancela funciones
Para introducir números
Selecciona canales Para introducir números
Audio
Solucionar Problemas
Power
Solucionar Problemas-Continúa
Video
Grabar
Sintonizador
Controlador remoto
Otros
Atenuación del vídeo
Memoria de seguridad
Sección de vídeo
Especificaciones
Sección del amplificador
Sección del sintonizador
Especificaciones-Continúa
Altavoces
Halten Sie die änderungsbedürftige Remote
Manteniendo pulsado el botón Remote Mode
Mode intryckt och tryck samtidigt in knappen
DISPLAY-Taste 3 Sekunden lang betätigen
DVD Recorder
DVD Codes
DVD Player
TV/DVD Combination
CD Recorder
CD/MD/CDR/HDD Codes CD
CD Player
MD Recorder
TV Codes
AOC
IRT
SBR
TMK
VCR Codes
ABS
TV/VCR Combination
DBS/PVR Combination
PVR
Cable/PVR Combination
CABLE/SAT Codes
Cable Converter
Satellite Receiver
QNS
3 4 4 1 8 8 a