Getting Started | Section 1 |
|
|
1-F Battery Charge
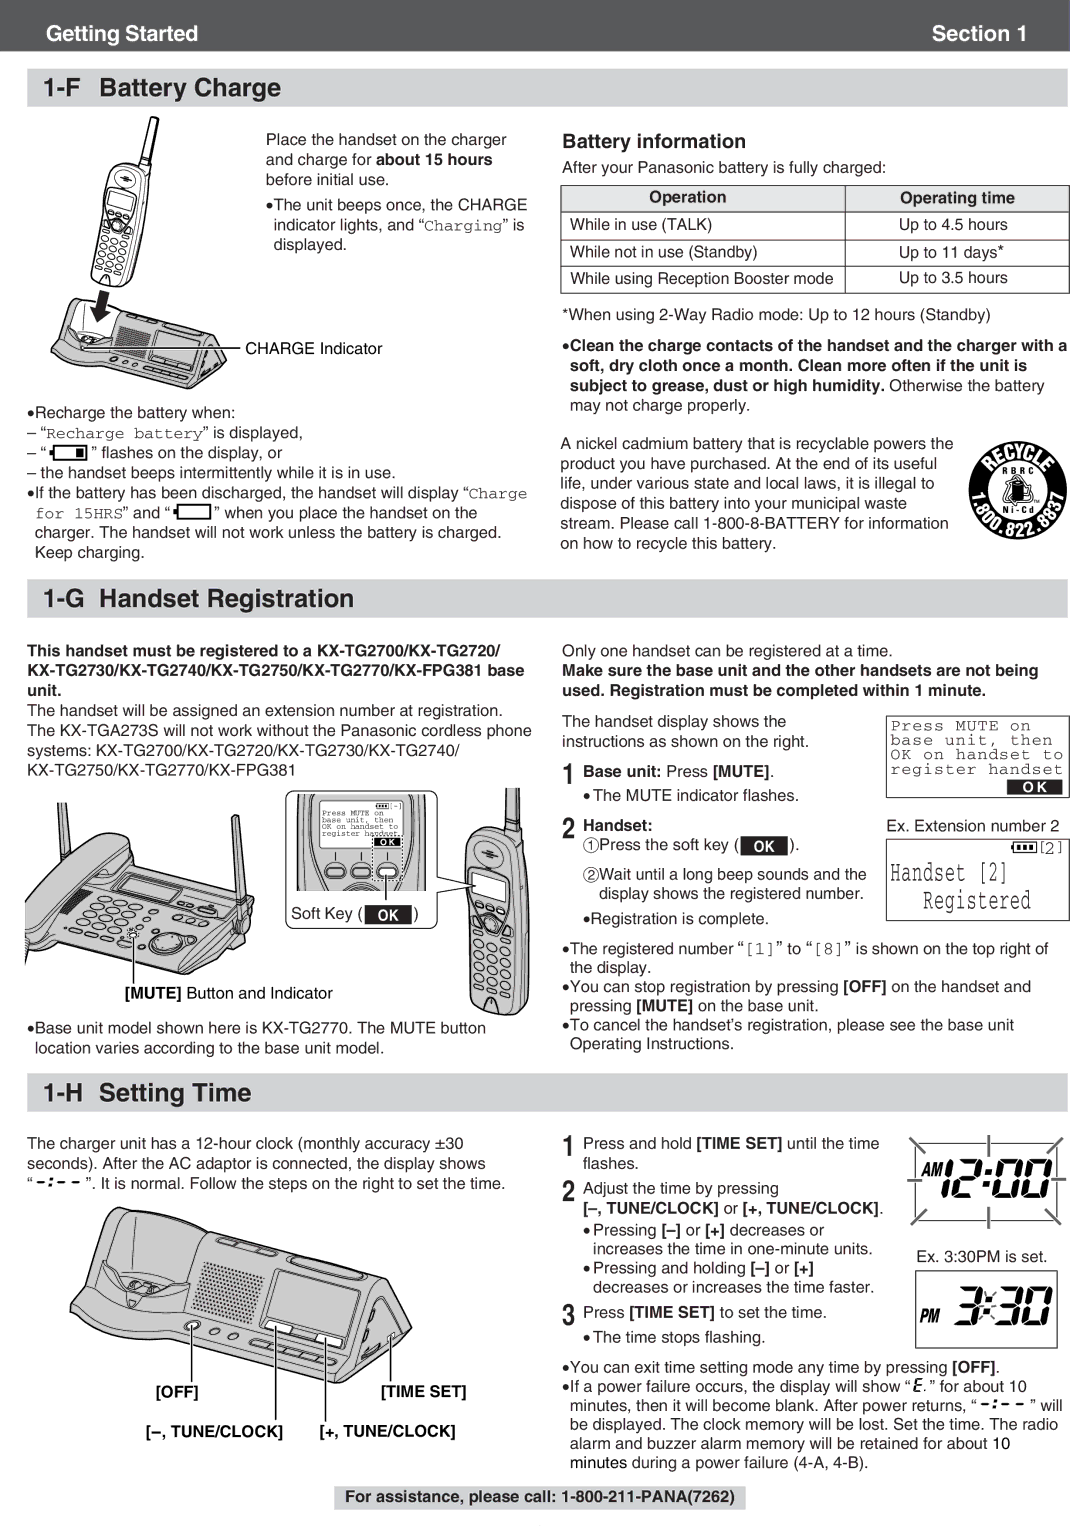
Place the handset on the charger and charge for about 15 hours before initial use.
•The unit beeps once, the CHARGE indicator lights, and “Charging” is displayed.
CHARGE Indicator
•Recharge the battery when:
–“Recharge battery” is displayed,
–“![]() ” flashes on the display, or
” flashes on the display, or
–the handset beeps intermittently while it is in use.
•If the battery has been discharged, the handset will display “Charge
for 15HRS” and “![]() ” when you place the handset on the charger. The handset will not work unless the battery is charged. Keep charging.
” when you place the handset on the charger. The handset will not work unless the battery is charged. Keep charging.
Battery information
After your Panasonic battery is fully charged:
Operation | Operating time |
While in use (TALK) | Up to 4.5 hours |
|
|
While not in use (Standby) | Up to 11 days* |
|
|
While using Reception Booster mode | Up to 3.5 hours |
|
|
*When using
•Clean the charge contacts of the handset and the charger with a soft, dry cloth once a month. Clean more often if the unit is subject to grease, dust or high humidity. Otherwise the battery may not charge properly.
A nickel cadmium battery that is recyclable powers the product you have purchased. At the end of its useful life, under various state and local laws, it is illegal to dispose of this battery into your municipal waste stream. Please call
1-G Handset Registration
This handset must be registered to a
Only one handset can be registered at a time.
Make sure the base unit and the other handsets are not being used. Registration must be completed within 1 minute.
The handset will be assigned an extension number at registration. The
![]()
![]() [-]
[-]
Press MUTE on base unit, then OK on handset to register handset
O K
Soft Key ( OK )
The handset display shows the instructions as shown on the right.
1Base unit: Press [MUTE].
• The MUTE indicator flashes.
2Handset:
#Press the soft key ( OK ).
$Wait until a long beep sounds and the display shows the registered number.
•Registration is complete.
Press MUTE on base unit, then OK on handset to register handset
O K
Ex. Extension number 2
SP PRIVACY ![]()
![]() [2]
[2]
Handset [2] Registered
[MUTE] Button and Indicator
•Base unit model shown here is
•The registered number “[1]” to “[8]” is shown on the top right of the display.
•You can stop registration by pressing [OFF] on the handset and pressing [MUTE] on the base unit.
•To cancel the handset’s registration, please see the base unit Operating Instructions.
1-H Setting Time
The charger unit has a
“ ![]()
![]()
![]() ”. It is normal. Follow the steps on the right to set the time.
”. It is normal. Follow the steps on the right to set the time.
|
|
|
|
|
|
|
|
|
|
|
|
[OFF] |
|
| [TIME SET] | ||
|
|
|
|
|
|
| [+, TUNE/CLOCK] | ||||
1 Press and hold [TIME SET] until the time flashes.
2 Adjust the time by pressing
[–, TUNE/CLOCK] or [+, TUNE/CLOCK].
•Pressing
increases the time in | Ex. 3:30PM is set. | |
• Pressing and holding | ||
| ||
| ||
decreases or increases the time faster. |
|
3 Press [TIME SET] to set the time.
•The time stops flashing.
•You can exit time setting mode any time by pressing [OFF].
•If a power failure occurs, the display will show “ ![]()
![]() ” for about 10
” for about 10
minutes, then it will become blank. After power returns, “ ![]()
![]()
![]()
![]() ” will be displayed. The clock memory will be lost. Set the time. The radio alarm and buzzer alarm memory will be retained for about 10 minutes during a power failure
” will be displayed. The clock memory will be lost. Set the time. The radio alarm and buzzer alarm memory will be retained for about 10 minutes during a power failure
For assistance, please call: