Spanish Quick Use Guide/ Guía para rápida consulta

CONEXIONES/CONFIGURACION INICIAL (READY TO PLAY)

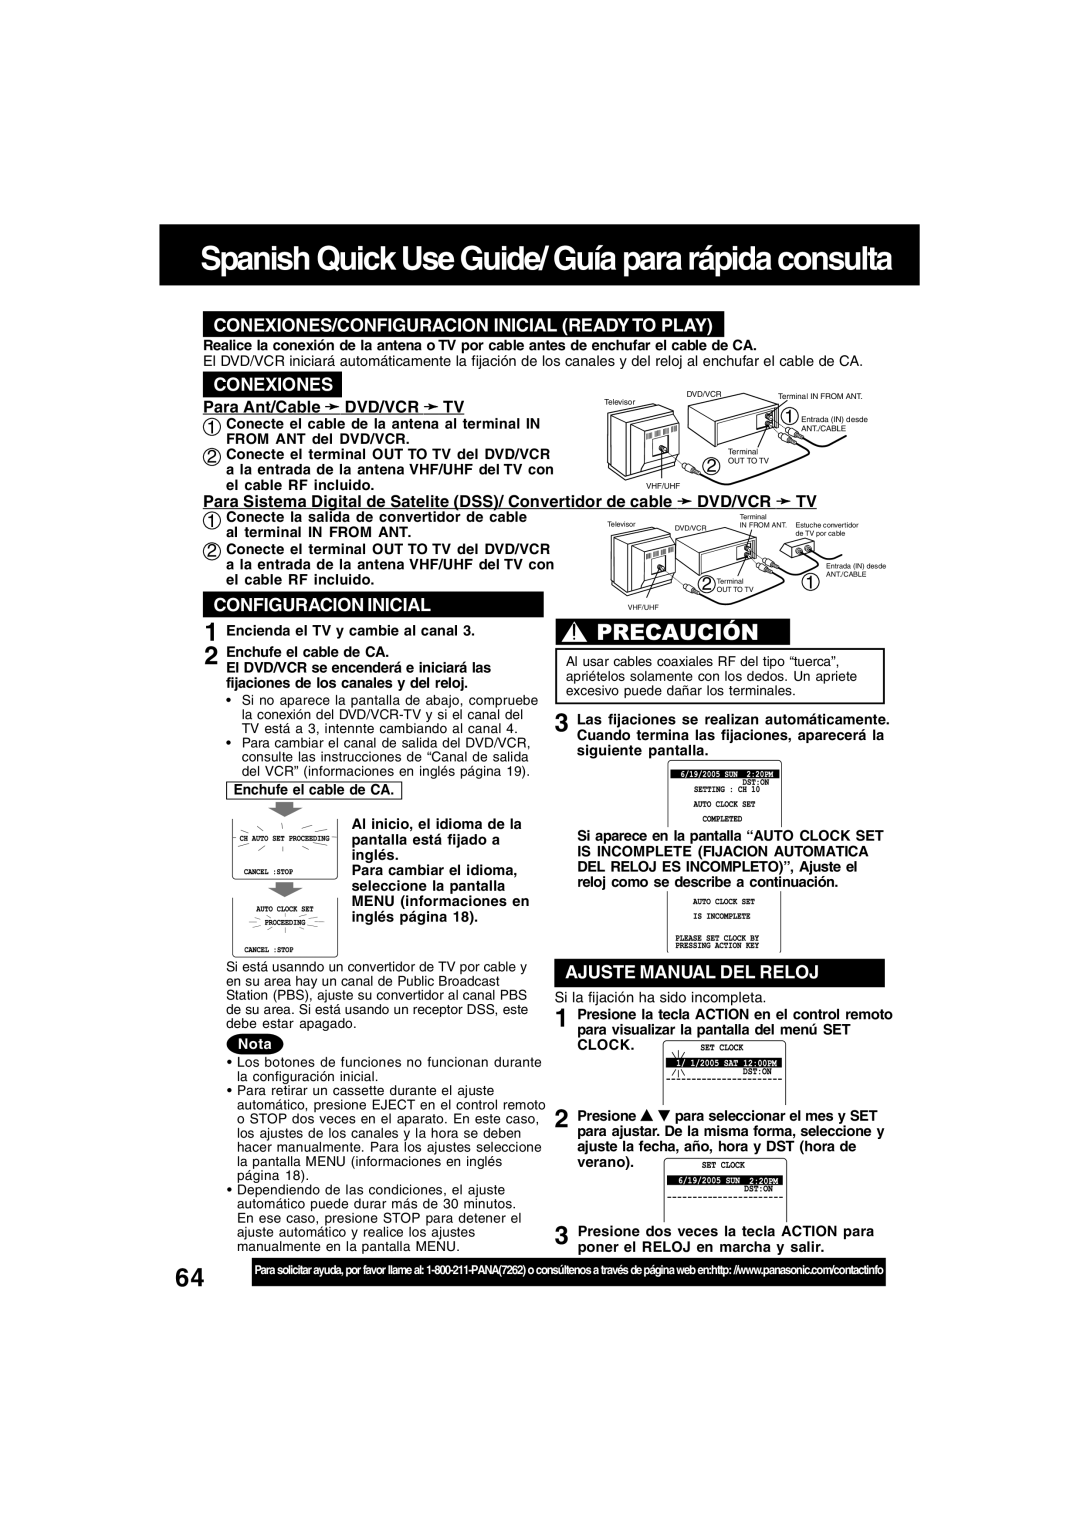
Realice la conexión de la antena o TV por cable antes de enchufar el cable de CA.

El DVD/VCR iniciará automáticamente la fijación de los canales y del reloj al enchufar el cable de CA.

CONEXIONES

Para Ant/Cable DVD/VCRTV

1Conecte el cable de la antena al terminal IN FROM ANT del DVD/VCR.

2Conecte el terminal OUT TO TV del DVD/VCR a la entrada de la antena VHF/UHF del TV con el cable RF incluido.

DVD/VCR

Terminal IN FROM ANT.

Televisor

1 Entrada (IN) desde


ANT./CABLE

Terminal


2 OUT TO TV


VHF/UHF


Para Sistema Digital de Satelite (DSS)/ Convertidor de cable DVD/VCR TV

1

Conecte la salida de convertidor de cable


Televisor

DVD/VCR

IN FROM ANT.

Estuche convertidor


Terminal


2

al terminal IN FROM ANT.


de TV por cable

Conecte el terminal OUT TO TV del DVD/VCR


a la entrada de la antena VHF/UHF del TV con


Entrada (IN) desde


el cable RF incluido.


2 OUT TO TV

1

ANT./CABLE


Terminal


CONFIGURACION INICIAL


VHF/UHF


1

Encienda el TV y cambie al canal 3.


2

Enchufe el cable de CA.

Al usar cables coaxiales RF del tipo “tuerca”,


El DVD/VCR se encenderá e iniciará las

apriételos solamente con los dedos. Un apriete


fijaciones de los canales y del reloj.


excesivo puede dañar los terminales.


• Si no aparece la pantalla de abajo, compruebe


la conexión del DVD/VCR-TV y si el canal del

3

Las fijaciones se realizan automáticamente.


TV está a 3, intennte cambiando al canal 4.


Cuando termina las fijaciones, aparecerá la

• Para cambiar el canal de salida del DVD/VCR,

siguiente pantalla.

consulte las instrucciones de “Canal de salida


del VCR” (informaciones en inglés página 19).


Enchufe el cable de CA.

Al inicio, el idioma de la pantalla está fijado a inglés.

Para cambiar el idioma, seleccione la pantalla MENU (informaciones en inglés página 18).

Si está usanndo un convertidor de TV por cable y en su area hay un canal de Public Broadcast Station (PBS), ajuste su convertidor al canal PBS de su area. Si está usando un receptor DSS, este debe estar apagado.

Nota

Los botones de funciones no funcionan durante la configuración inicial.

Para retirar un cassette durante el ajuste

automático, presione EJECT en el control remoto o STOP dos veces en el aparato. En este caso, los ajustes de los canales y la hora se deben hacer manualmente. Para los ajustes seleccione la pantalla MENU (informaciones en inglés página 18).

Dependiendo de las condiciones, el ajuste automático puede durar más de 30 minutos. En ese caso, presione STOP para detener el ajuste automático y realice los ajustes manualmente en la pantalla MENU.

Si aparece en la pantalla “AUTO CLOCK SET IS INCOMPLETE (FIJACION AUTOMATICA DEL RELOJ ES INCOMPLETO)”, Ajuste el reloj como se describe a continuación.

AJUSTE MANUAL DEL RELOJ

Si la fijación ha sido incompleta.

1

Presione la tecla ACTION en el control remoto


para visualizar la pantalla del menú SET


CLOCK.


2


Presione

para seleccionar el mes y SET


para ajustar. De la misma forma, seleccione y

ajuste la fecha, año, hora y DST (hora de verano).

3 Presione dos veces la tecla ACTION para poner el RELOJ en marcha y salir.

64

Para solicitar ayuda, por favor llame al: 1-800-211-PANA(7262) o consúltenos a través de página web en:http: //www.panasonic.com/contactinfo

Page 64
Image 64
Panasonic PV-D4745S manual Para Ant/Cable DVD/VCR TV, Clock

PV-D4745S, PV-D4745 specifications

The Panasonic PV-D4745 and PV-D4745S are advanced VCRs designed to deliver exceptional performance for home entertainment enthusiasts. These models, part of Panasonic's renowned line of video cassette recorders, boast a variety of features and technologies that cater to users seeking quality video recording and playback capabilities.

One of the standout features of the PV-D4745 and PV-D4745S is their advanced video processing technology, which ensures superior picture quality. These models utilize Panasonic's proprietary VHI technology, enhancing color accuracy and reducing noise for a clearer viewing experience. This is particularly noticeable in playback, where the vibrant details of your favorite films and shows come to life.

Another key characteristic is the built-in TBC (Time Base Corrector) functionality. This feature stabilizes video signals, correcting imperfections from previously recorded tapes. As a result, users can enjoy a smoother playback experience, minimizing jitter and other distortions commonly associated with older tapes.

The PV-D4745 and PV-D4745S also include a variety of convenient recording options. With their 4-head design, these VCRs offer the ability to record in SP (Standard Play) and LP (Long Play) modes, allowing users to choose between higher quality at a shorter duration or longer recording time at lower quality. Moreover, the programmable timer makes scheduling recordings straightforward, ensuring users never miss an episode of their favorite series.

In terms of connectivity, both models feature composite outputs that make them compatible with a variety of TVs and home entertainment systems, ensuring easy integration into any setup. Additionally, the VHS Hi-Fi audio system delivers high-fidelity sound, complementing the stunning visuals and enhancing the overall viewing experience.

The PV-D4745S model further includes enhanced features such as a sleek design with an easy-to-read display and intuitive controls, making operation user-friendly. Overall, the Panasonic PV-D4745 and PV-D4745S stand out as capable, reliable VCRs that bring together innovative technology and practical features for an optimal home video experience. These models are perfect for those looking to preserve memories on tape while enjoying the best possible playback quality.