Before using

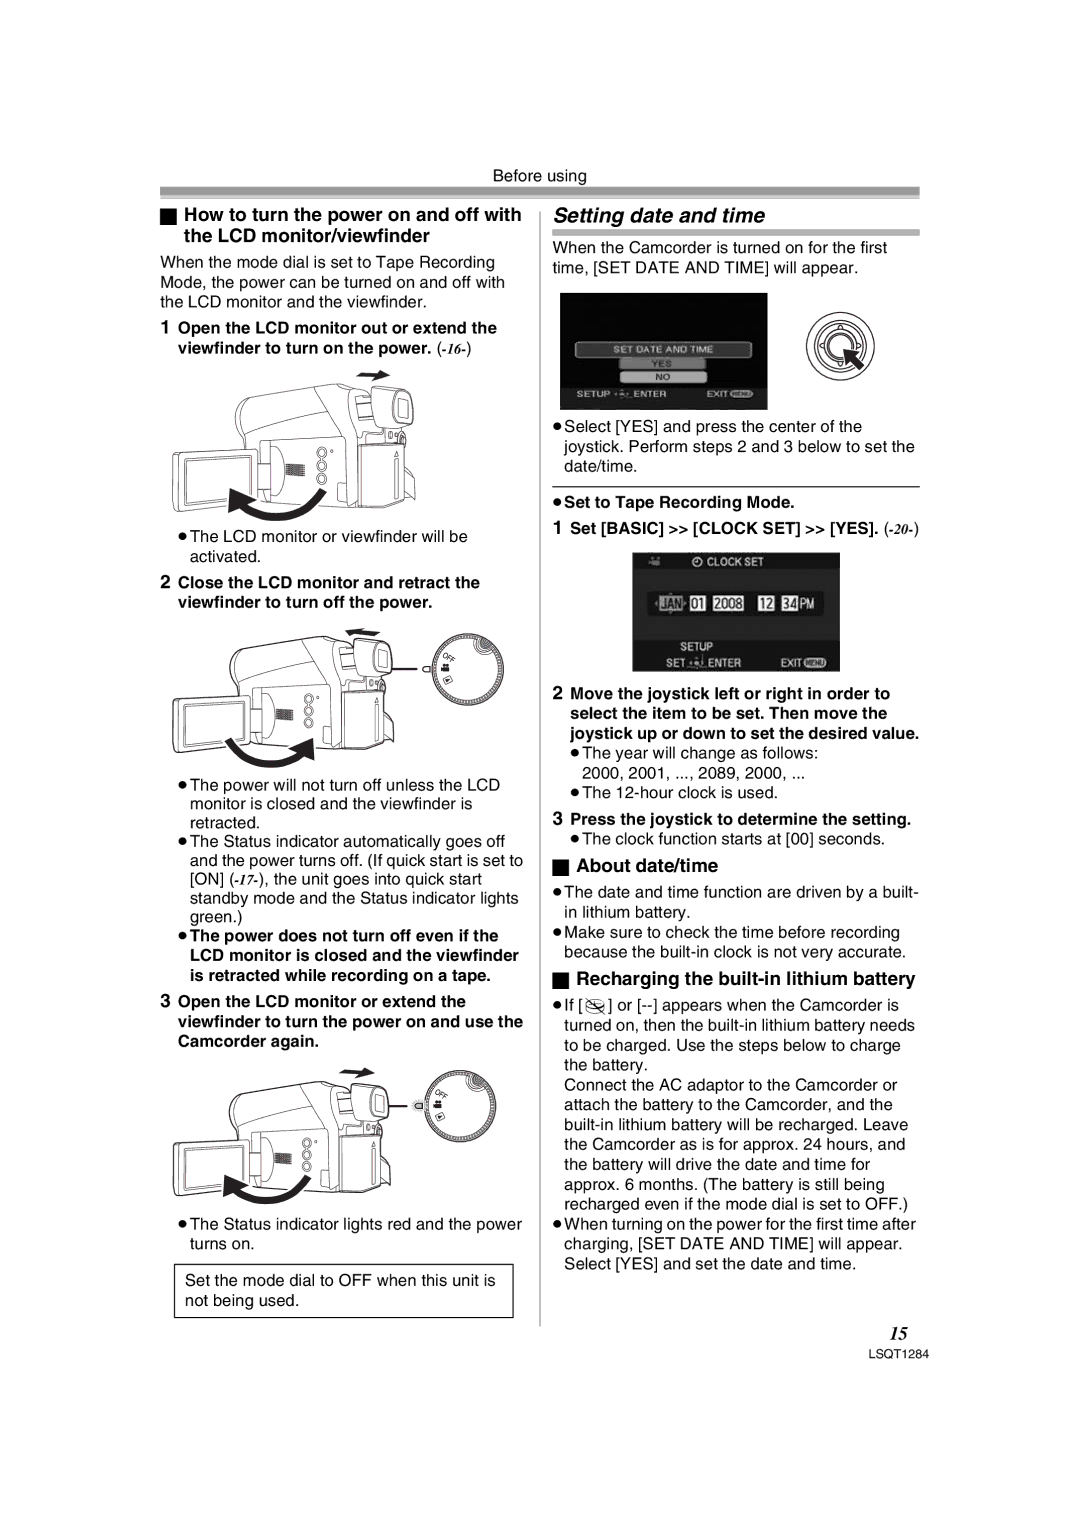
ªHow to turn the power on and off with the LCD monitor/viewfinder

When the mode dial is set to Tape Recording Mode, the power can be turned on and off with the LCD monitor and the viewfinder.

1Open the LCD monitor out or extend the viewfinder to turn on the power. (-16-)

The LCD monitor or viewfinder will be activated.

2Close the LCD monitor and retract the viewfinder to turn off the power.

The power will not turn off unless the LCD monitor is closed and the viewfinder is retracted.

The Status indicator automatically goes off and the power turns off. (If quick start is set to [ON] (-17-), the unit goes into quick start standby mode and the Status indicator lights green.)

The power does not turn off even if the

LCD monitor is closed and the viewfinder is retracted while recording on a tape.

3Open the LCD monitor or extend the viewfinder to turn the power on and use the Camcorder again.

The Status indicator lights red and the power turns on.

Set the mode dial to OFF when this unit is not being used.

Setting date and time

When the Camcorder is turned on for the first time, [SET DATE AND TIME] will appear.

Select [YES] and press the center of the joystick. Perform steps 2 and 3 below to set the date/time.

Set to Tape Recording Mode.

1Set [BASIC] >> [CLOCK SET] >> [YES]. (-20-)

2Move the joystick left or right in order to select the item to be set. Then move the joystick up or down to set the desired value.

The year will change as follows: 2000, 2001, ..., 2089, 2000, ...

The 12-hour clock is used.

3Press the joystick to determine the setting.

The clock function starts at [00] seconds.

ªAbout date/time

The date and time function are driven by a built- in lithium battery.

Make sure to check the time before recording because the built-in clock is not very accurate.

ªRecharging the built-in lithium battery

If [0] or [--] appears when the Camcorder is turned on, then the built-in lithium battery needs to be charged. Use the steps below to charge the battery.

Connect the AC adaptor to the Camcorder or attach the battery to the Camcorder, and the built-in lithium battery will be recharged. Leave the Camcorder as is for approx. 24 hours, and

the battery will drive the date and time for approx. 6 months. (The battery is still being recharged even if the mode dial is set to OFF.)

When turning on the power for the first time after charging, [SET DATE AND TIME] will appear. Select [YES] and set the date and time.

15

LSQT1284

Page 15
Image 15
Panasonic PVGS90P, PV-GS90PL-S Setting date and time, About date/time, Recharging the built-in lithium battery

PVGS90P, PV-GS90PL-S specifications

The Panasonic PV-GS90PL-S and PV-GS90P are compact yet feature-rich camcorders renowned for their impressive performance and user-friendly design. With their sleek aesthetic, they are designed to appeal to casual users and videography enthusiasts alike, combining portability with high-quality recording capabilities.

One of the standout features of the PV-GS90 is its 3CCD** technology, which significantly enhances color accuracy and richness. Unlike traditional single-chip systems, the 3CCD architecture allows the camcorder to capture vibrant and lifelike images by separating the light into red, green, and blue channels. This results in stunning video quality with minimal color distortion, making it a perfect choice for documenting life's special moments.

The camcorder boasts a 25x optical zoom lens, providing the versatility needed for a variety of shooting situations. Whether capturing distant subjects or creating dynamic close-ups, the Panasonic PV-GS90 delivers sharp and clear images. The built-in optical image stabilization ensures that even handheld shots maintain clarity, significantly reducing the impact of shaky hands during recording.

For those who enjoy shooting in diverse lighting conditions, this camcorder is equipped with a powerful low-light capability. The enhanced sensitivity of the 3CCD sensor allows users to capture clear images in dimly lit environments, expanding creative possibilities. Moreover, the advanced automatic exposure and white balance features help ensure optimal performance across various lighting scenarios.

Another significant advantage of the PV-GS90 series is its ease of use. The intuitive interface, complete with a flip-out LCD screen, enables users to navigate settings and review footage effortlessly. This makes it an excellent choice for beginners who are looking to explore the world of videography without being overwhelmed by complicated controls.

Additionally, the camcorders support a range of recording formats and resolutions, offering flexibility for both amateur and more serious filmmakers. With the capacity to capture both standard and high-resolution video, users can choose the setting that best suits their project needs.

In summary, the Panasonic PV-GS90PL-S and PV-GS90P stand out in the camcorder market due to their 3CCD technology, versatile zoom capabilities, low-light performance, and user-friendly design. They are ideal for anyone looking to capture life’s moments with high-quality video and ease of operation.