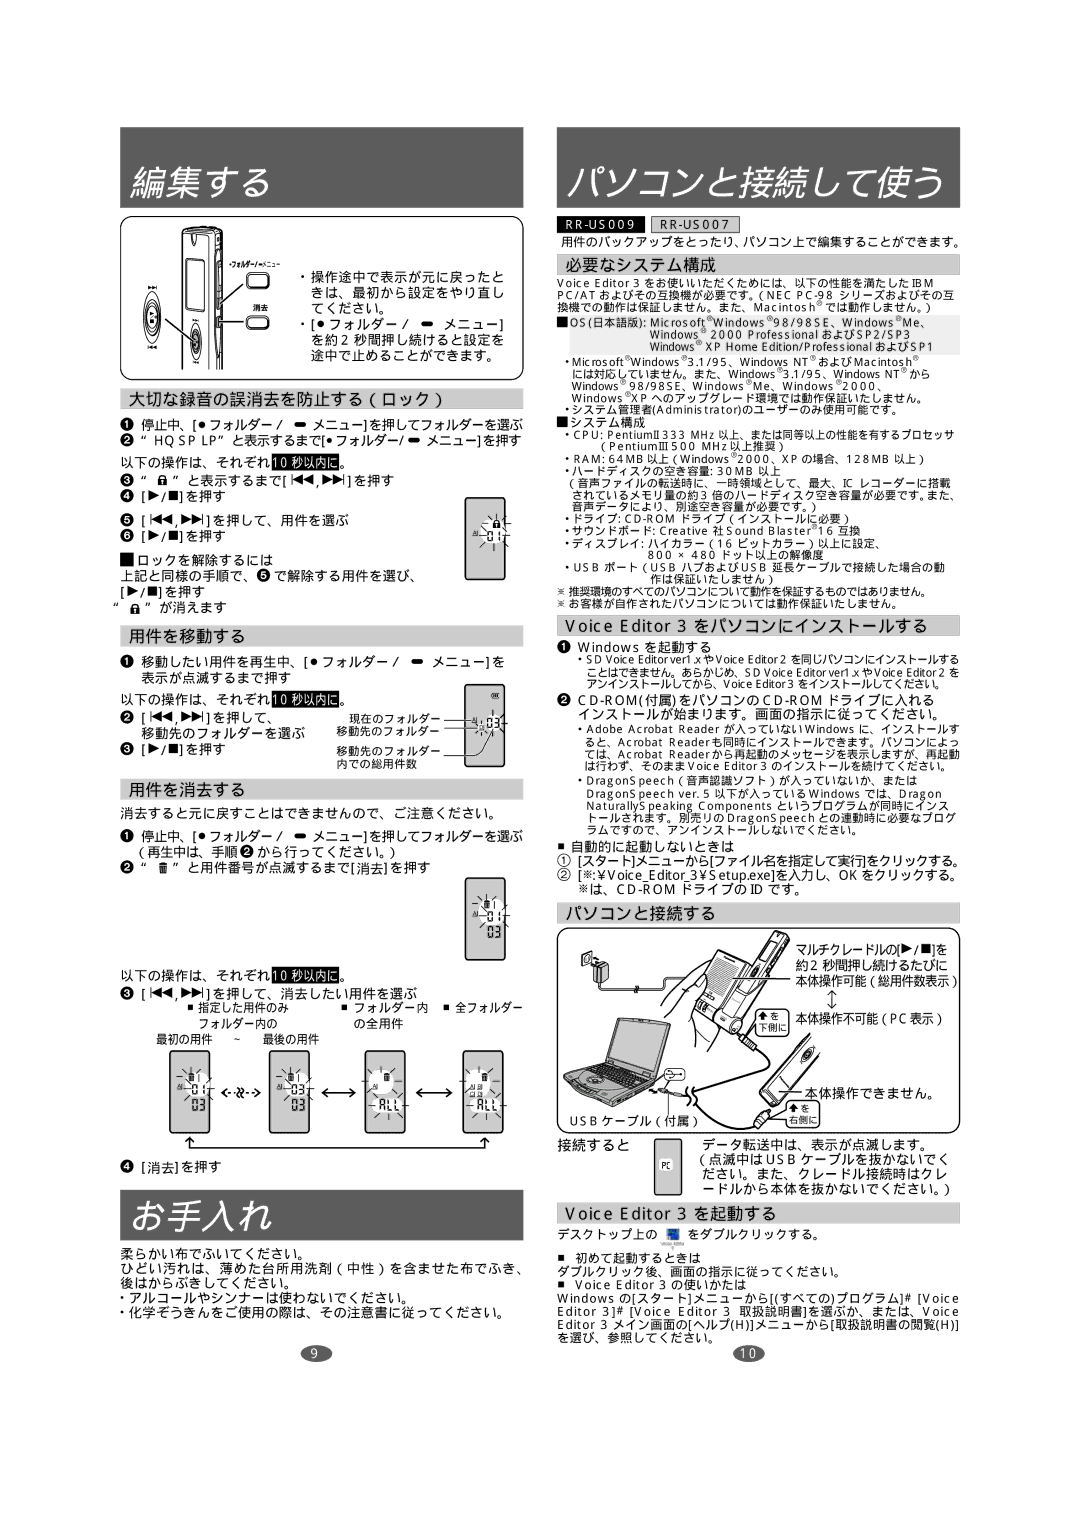
編集する

パソコンと接続して使う

/

フォルダー/メニュー

操作途中で表示が元に戻ったと きは、最初から設定をやり直し てください。

[フォルダー/ % メニュー] を約 2 秒間押し続けると設定を 途中で止めることができます。

RR-US009 RR-US007

用件のバックアップをとったり、パソコン上で編集することができます。

必要なシステム構成

Voice Editor 3 をお使いいただくためには、以下の性能を満たした IBM PC/AT およびその互換機が必要です。(NEC PC-98シリーズおよびその互 換機での動作は保証しません。また、Macintosh® では動作しません。)

ªOS(日本語版): Microsoft®Windows®98/98SEWindows®MeWindows® 2000 Professional および SP2/SP3 Windows® XP Home Edition/Professional および SP1

Microsoft®Windows®3.1/95Windows NT® および Macintosh®

には対応していません。また、Windows®3.1/95Windows NT® から

Windows® 98/98SEWindows®MeWindows®2000

大切な録音の誤消去を防止する(ロック)

1停止中、[フォルダー/ %メニュー]を押してフォルダーを選ぶ

2 “HQ SP LP”と表示するまで[フォルダー/%メニュー]を押す

以下の操作は、それぞれ10 秒以内に

3と表示するまで[:,9]を押す

4 [1/]を押す

5

[:,9]を押して、用件を選ぶ


6

[1/]を押す

A

ªロックを解除するには

上記と同様の手順で、5 で解除する用件を選び、

[1/]を押す

が消えます

用件を移動する

1移動したい用件を再生中、[フォルダー/ % メニュー]を 表示が点滅するまで押す

以下の操作は、それぞれ10 秒以内に

2

[:,9]を押して、

現在のフォルダー


A

D


移動先のフォルダーを選ぶ

移動先のフォルダー


3

[1/]を押す

移動先のフォルダー


内での総用件数


用件を消去する

消去すると元に戻すことはできませんので、ご注意ください。

1停止中、[フォルダー/ %メニュー]を押してフォルダーを選ぶ (再生中は、手順 2 から行ってください。)

2と用件番号が点滅するまで[消去]を押す

A

以下の操作は、それぞれ10 秒以内に

3[:,9]を押して、消去したい用件を選ぶ

指定した用件のみ フォルダー内 全フォルダー

フォルダー内の の全用件 最初の用件 ~ 最後の用件

A A AA B

C D

4[消去]を押す

お手入れ

柔らかい布でふいてください。

ひどい汚れは、薄めた台所用洗剤(中性)を含ませた布でふき、 後はからぶきしてください。

アルコールやシンナーは使わないでください。

化学ぞうきんをご使用の際は、その注意書に従ってください。

Windows®XP へのアップグレード環境では動作保証いたしません。 システム管理者(Administrator)のユーザーのみ使用可能です。

ªシステム構成

CPU: PentiumII 333 MHz 以上、または同等以上の性能を有するプロセッサ (PentiumIII 500 MHz 以上推奨)

RAM: 64MB 以上(Windows®2000XP の場合、128MB 以上)

ハードディスクの空き容量: 30MB 以上

(音声ファイルの転送時に、一時領域として、最大、IC レコーダーに搭載 されているメモリ量の約 3 倍のハードディスク空き容量が必要です。また、 音声データにより、別途空き容量が必要です。)

ドライブ: CD-ROMドライブ(インストールに必要)

サウンドボード: Creative Sound Blaster®16 互換

ディスプレイ: ハイカラー(16 ビットカラー)以上に設定、

800× 480 ドット以上の解像度

USB ポート(USB ハブおよび USB 延長ケーブルで接続した場合の動 作は保証いたしません)

※推奨環境のすべてのパソコンについて動作を保証するものではありません。 ※お客様が自作されたパソコンについては動作保証いたしません。

Voice Editor 3 をパソコンにインストールする

1Windows を起動する

SD Voice Editor ver1.xVoice Editor 2を同じパソコンにインストールする

ことはできません。あらかじめ、SD Voice Editor ver1.xVoice Editor 2

アンインストールしてから、Voice Editor 3をインストールしてください。

2CD-ROM(付属)をパソコンの CD-ROMドライブに入れる インストールが始まります。画面の指示に従ってください。

Adobe Acrobat Reader が入っていない Windows に、インストールす ると、Acrobat Reader も同時にインストールできます。パソコンによっ ては、Acrobat Reader から再起動のメッセージを表示しますが、再起動 は行わず、そのまま Voice Editor 3 のインストールを続けてください。

DragonSpeech(音声認識ソフト)が入っていないか、または

DragonSpeech ver. 5 以下が入っている Windows では、Dragon NaturallySpeaking Components というプログラムが同時にインス トールされます。別売リの DragonSpeech との連動時に必要なプログ ラムですので、アンインストールしないでください。

自動的に起動しないときは

1[スタート]メニューから[ファイル名を指定して実行]をクリックする。

2 [§:Voice_Editor_3¥Setup.exe]を入力し、OKをクリックする。

§は、CD-ROMドライブの ID です。

パソコンと接続する


マルチクレードルの[1/]


去消

2秒間押し続けるたびに


本体操作可能(総用件数表示)


音量


RR-


US009


録音/


停止

本体操作不可能(PC 表示)


CHARGE USB


下側に


本体操作できません。

USB ケーブル(付属)


右側に

接続すると

データ転送中は、表示が点滅します。


(点滅中は USB ケーブルを抜かないでく


ださい。また、クレードル接続時はクレ


ードルから本体を抜かないでください。)

Voice Editor 3 を起動する

デスクトップ上の をダブルクリックする。

初めて起動するときは

ダブルクリック後、画面の指示に従ってください。

Voice Editor 3 の使いかたは

Windows [スタート]メニューから[(すべての)プログラム]#[Voice Editor 3]#[Voice Editor 3 取扱説明書]を選ぶか、または、Voice Editor 3 メイン画面の[ヘルプ(H)]メニューから[取扱説明書の閲覧(H)] を選び、参照してください。

9

10

Page 5
Image 5
Panasonic RR-US007, RR-QR005, RR-US009 manual 編集する パソコンと接続して使う, お手入れ

RR-QR005, RR-US009, RR-US007 specifications

Panasonic has made a significant mark in the audio recording industry with its impressive lineup of digital voice recorders, namely the RR-US007, RR-US009, and RR-QR005. These devices cater to a variety of recording needs, from personal memos to professional interviews, blending advanced technology with user-friendly designs.

The Panasonic RR-US007 is characterized by its compact size and lightweight design, making it an ideal companion for users who are constantly on the go. This voice recorder features a built-in microphone that captures high-quality audio, ensuring clarity during recording sessions. One of its standout features is the Voice Activation function, which initiates recording automatically when it detects sound, conserving memory space and battery life. The device supports long hours of recording and playback, making it suitable for lectures and meetings.

In contrast, the RR-US009 offers a more sophisticated approach with its dual microphone system. This feature allows it to capture stereo sound, enhancing the listening experience for those who prioritize audio quality. The RR-US009 also comes equipped with a high-capacity built-in memory, providing ample space for storing recordings. It includes a USB connection for easy file transfer to computers, enhancing the usability of the device for professionals who need to manage audio files efficiently.

The Panasonic RR-QR005 stands out with its unique design focused on users looking for portability without sacrificing performance. This model features an intuitive interface, making it easy to navigate between different recording settings. The RR-QR005 also includes a convenient automatic recording level adjustment, ensuring that recordings maintain optimal volume and clarity, regardless of the sound environment. Additionally, its rechargeable battery ensures that users can record for extended periods without the concern of running out of power.

All three models are equipped with noise-cancellation technology, which minimizes background noise, allowing for clearer audio capture. They are compatible with various audio formats, making them versatile tools not only for voice recordings but also for music and other audio applications. Overall, the Panasonic RR-US007, RR-US009, and RR-QR005 exemplify the perfect blend of portability, audio quality, and advanced features that cater to both casual users and professionals alike. Their commitment to innovation and user-centric design solidifies Panasonic's position as a leader in digital recording technology.