Simple Setup
step3
Cable connections
3 | |
AM ANT |
|
| LOOP ANT GND |
| EXT |
| LOOP |
FM ANT | |
(75 | ) |
Main unit
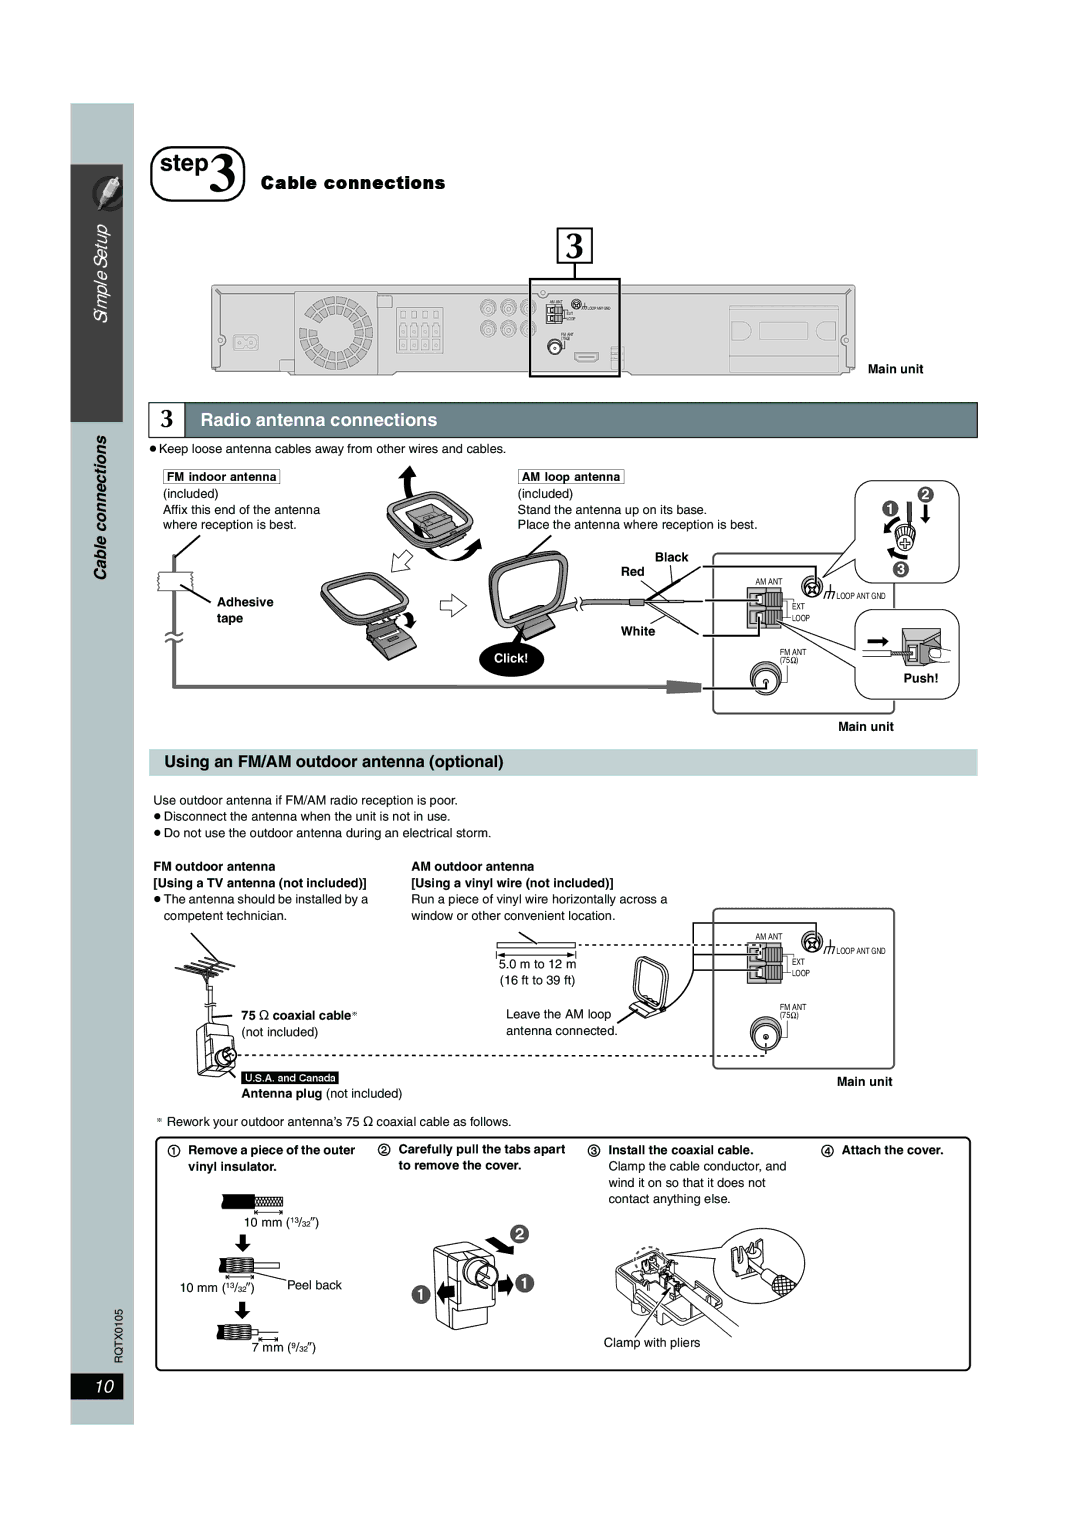
3 Radio antenna connections
≥Keep loose antenna cables away from other wires and cables.
Cable connections
[FM\indoor\antenna]
(included)
Affix this end of the antenna where reception is best.
![]() Adhesive tape
Adhesive tape
[AM\loop\antenna] |
|
|
(included) |
|
|
Stand the antenna up on its base. |
|
|
Place the antenna where reception is best. |
| |
Black |
|
|
Red | AM ANT |
|
|
| |
|
| EXT |
|
| LOOP |
White |
|
|
Click! | FM ANT | |
(75 | ) | |
2
1
3
![]() LOOP ANT GND
LOOP ANT GND
Push!
Main unit
Using an FM/AM outdoor antenna (optional)
Use outdoor antenna if FM/AM radio reception is poor.
≥Disconnect the antenna when the unit is not in use.
≥Do not use the outdoor antenna during an electrical storm.
FM outdoor antenna | AM outdoor antenna |
[Using a TV antenna (not included)] | [Using a vinyl wire (not included)] |
≥The antenna should be installed by a | Run a piece of vinyl wire horizontally across a |
competent technician. | window or other convenient location. |
| 5.0 m to 12 m |
| (16 ft to 39 ft) |
75 ≠ coaxial cable§ | Leave the AM loop |
(not included) | antenna connected. |
![]()
![]() \U.S.A.\and\Canada]
\U.S.A.\and\Canada]
Antenna plug (not included)
§Rework your outdoor antenna’s 75 ≠ coaxial cable as follows.
AM ANT
![]() LOOP ANT GND
LOOP ANT GND
EXT
![]()
![]()
![]()
![]()
![]()
![]()
![]()
![]() LOOP
LOOP
FM ANT (75![]() )
)
Main unit
RQTX0105
1 Remove a piece of the outer | 2 Carefully pull the tabs apart | 3 Install the coaxial cable. | 4 Attach the cover. | ||
vinyl insulator. |
| to remove the cover. | Clamp the cable conductor, and |
| |
|
|
|
| wind it on so that it does not |
|
|
|
|
| contact anything else. |
|
10 mm (13/32z) |
| |
|
| |
|
|
|
|
| |
10 mm (13/32z) | Peel back | | |
|
|
|
|
|
|
| |
7 mm (9/32z) |
|
| Clamp with pliers |
| |
10
