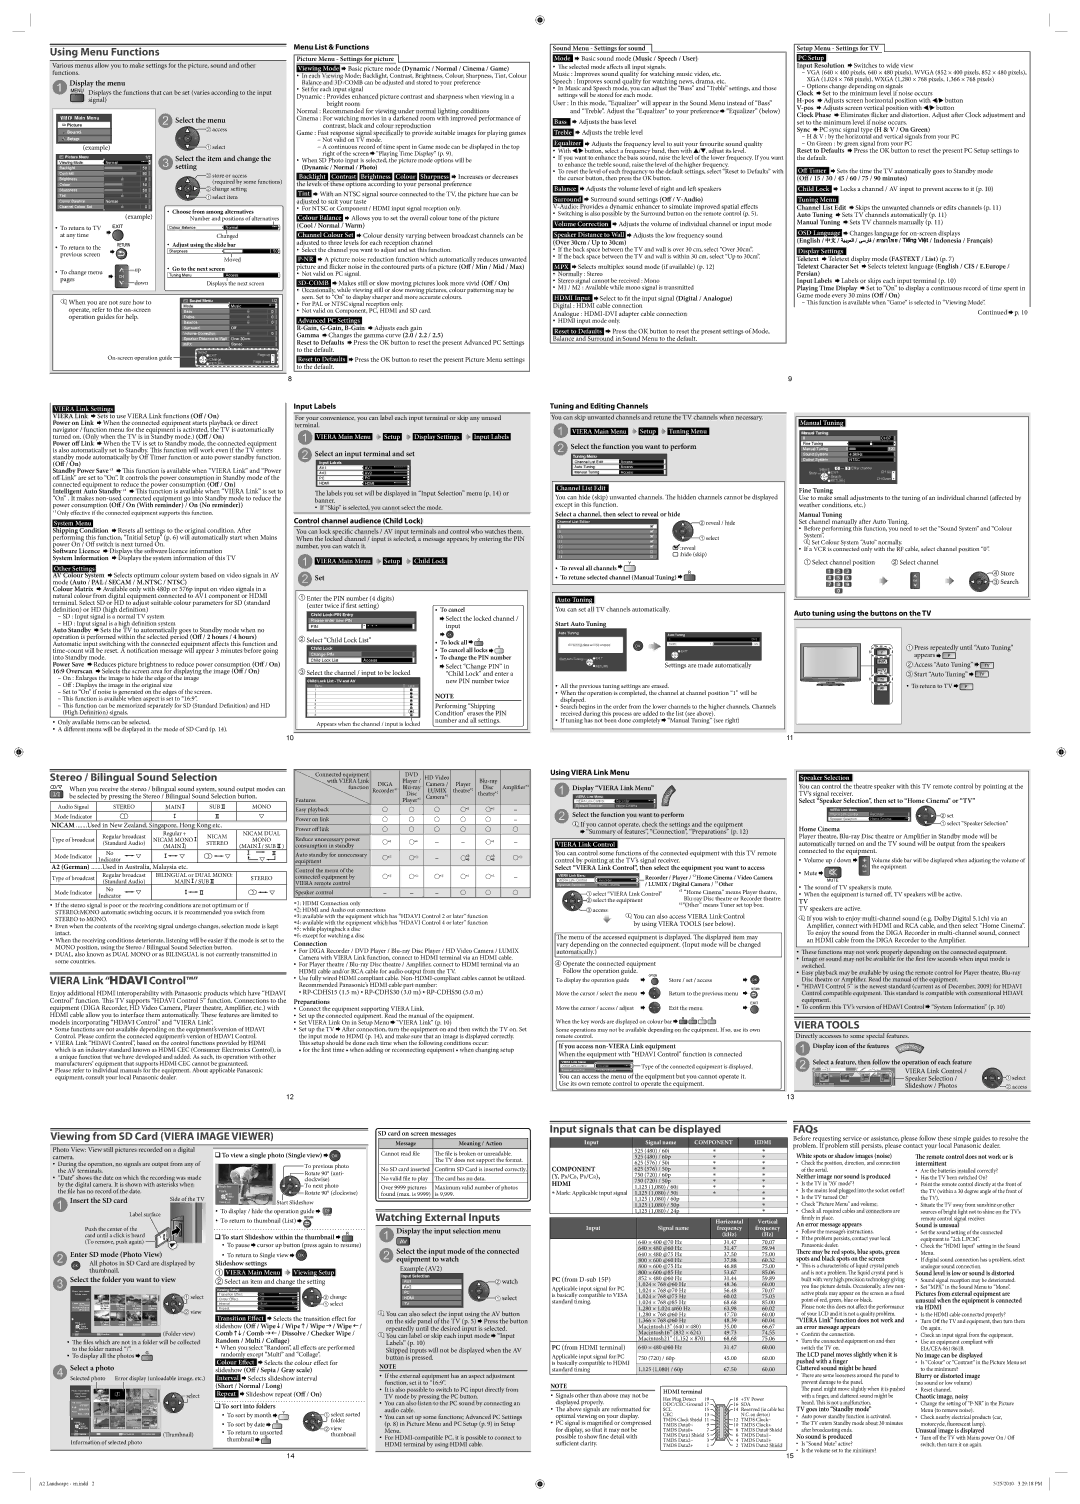
select
access
Select EXIT
Change
RETURN
Page up
Page down
Sound Menu 1/2
Mode Music
Bass
Treble
Balance
Surround
Volume Correction
Speaker Distance to Wall Over 30cm
MPX
0
0
0
0
Off
Stereo
(example)
(example)
Main Menu
Picture
Sound
Setup
Choose from among alternatives
Adjust using the slide bar
Go to the next screen
Colour Balance Normal
Changed
Number and positions of alternatives
Sharpness 50
Moved
Tuning Menu Access
Displays the next screen
select item
change setting
store or access
(required by some functions)
Picture Menu 1/2
Viewing Mode Normal
Contrast
Brightness
Colour
Sharpness
Tint
Colour Balance
Channel Colour Set
Normal
0
0
90
50
50
50
Backlight
0
Various menus allow you to make settings for the picture, sound and other
functions.
Using Menu Functions
When you are not sure how to
operate, refer to the on-screen
operation guides for help.
On-screen operation guide

Menu List & Functions

Picture Menu - Settings for picture
Viewing Mode Basic picture mode (Dynamic / Normal / Cinema / Game)
In each Viewing Mode; Backlight, Contrast, Brightness, Colour, Sharpness, Tint, Colour
Balance and 3D-COMB can be adjusted and stored to your preference
Set for each input signal
Dynamic : Provides enhanced picture contrast and sharpness when viewing in a
bright room
Normal : Recommended for viewing under normal lighting conditions
Cinema : For watching movies in a darkened room with improved performance of
contrast, black and colour reproduction
Game : Fast response signal speci cally to provide suitable images for playing games
Not valid on TV mode.
A continuous record of time spent in Game mode can be displayed in the top
right of the screen “Playing Time Display” (p. 9).
When SD Photo input is selected, the picture mode options will be
(Dynamic / Normal / Photo)
Backlight Contrast Brightness Colour Sharpness Increases or decreases
the levels of these options according to your personal preference
Tint With an NTSC signal source connected to the TV, the picture hue can be
adjusted to suit your taste
For NTSC or Component / HDMI input signal reception only.
Colour Balance Allows you to set the overall colour tone of the picture
(Cool / Normal / Warm)
Channel Colour Set Colour density varying between broadcast channels can be
adjusted to three levels for each reception channel
Select the channel you want to adjust and set this function.
P-NR A picture noise reduction function which automatically reduces unwanted
picture and  icker noise in the contoured parts of a picture (O / Min / Mid / Max)
Not valid on PC signal.
3D-COMB Makes still or slow moving pictures look more vivid (O / On)
Occasionally, while viewing still or slow moving pictures, colour patterning may be
seen. Set to “On” to display sharper and more accurate colours.
For PAL or NTSC signal reception only.
Not valid on Component, PC, HDMI and SD card.
Advanced PC Settings
R-Gain, G-Gain, B-Gain Adjusts each gain
Gamma Changes the gamma curve (2.0 / 2.2 / 2.5)
Reset to Defaults Press the OK button to reset the present Advanced PC Settings
to the default.
Reset to Defaults Press the OK button to reset the present Picture Menu settings
to the default.
To return to TV
at any time
To return to the
previous screen
To change menu
pages

Select the menu

Display the menu

Displays the functions that can be set (varies according to the input
signal)

Select the item and change the

setting

up
down
8
TH-L32C20KMRTX23,26,28K_EN_Folding.indd Sec1:8 5/25/2010 3:27:52 PM
Sound Menu - Settings for sound
Mode Basic sound mode (Music / Speech / User)
e selected mode a ects all input signals.
Music : Improves sound quality for watching music video, etc.
Speech : Improves sound quality for watching news, drama, etc.
In Music and Speech mode, you can adjust the “Bass” and “Treble” settings, and those
settings will be stored for each mode.
User : In this mode, “Equalizer” will appear in the Sound Menu instead of “Bass”
and “Treble”. Adjust the “Equalizer” to your preference “Equalizer” (below)
Bass Adjusts the bass level
Treble
Adjusts the treble level
Equalizer Adjusts the frequency level to suit your favourite sound quality
With / button, select a frequency band, then with / , adjust its level.
If you want to enhance the bass sound, raise the level of the lower frequency. If you want
to enhance the treble sound, raise the level of the higher frequency.
To reset the level of each frequency to the default settings, select “Reset to Defaults” with
the cursor button, then press the OK button.
Balance Adjusts the volume level of right and le speakers
Surround Surround sound settings (O / V-Audio)
V-Audio: Provides a dynamic enhancer to simulate improved spatial e ects
Switching is also possible by the Surround button on the remote control (p. 5).
Volume Correction Adjusts the volume of individual channel or input mode
Speaker Distance to Wall Adjusts the low frequency sound
(Over 30cm / Up to 30cm)
If the back space between the TV and wall is over 30 cm, select “Over 30cm”.
If the back space between the TV and wall is within 30 cm, select “Up to 30cm”.
MPX Selects multiplex sound mode (if available) (p. 12)
Normally : Stereo
Stereo signal cannot be received : Mono
M1 / M2 : Available while mono signal is transmitted
HDMI Input Select to  t the input signal (Digital / Analogue)
Digital : HDMI cable connection
Analogue : HDMI-DVI adapter cable connection
HDMI input mode only.
Reset to Defaults Press the OK button to reset the present settings of Mode,
Balance and Surround in Sound Menu to the default.
Setup Menu - Settings for TV
PC Setup
Input Resolution Switches to wide view
VGA (640 × 400 pixels, 640 × 480 pixels), WVGA (852 × 400 pixels, 852 × 480 pixels),
XGA (1,024 × 768 pixels), WXGA (1,280 × 768 pixels, 1,366 × 768 pixels)
Options change depending on signals
Clock Set to the minimum level if noise occurs
H-pos Adjusts screen horizontal position with / button
V-pos Adjusts screen vertical position with / button
Clock Phase Eliminates  icker and distortion. Adjust a er Clock adjustment and
set to the minimum level if noise occurs.
Sync PC sync signal type (H & V / On Green)
H & V : by the horizontal and vertical signals from your PC
On Green : by green signal from your PC
Reset to Defaults Press the OK button to reset the present PC Setup settings to
the default.
O Timer Sets the time the TV automatically goes to Standby mode
(O / 15 / 30 / 45 / 60 / 75 / 90 minutes)
Child Lock Locks a channel / AV input to prevent access to it (p. 10)
Tuning Menu
Channel List Edit Skips the unwanted channels or edits channels (p. 11)
Auto Tuning Sets TV channels automatically (p. 11)
Manual Tuning Sets TV channels manually (p. 11)
OSD Language Changes language for on-screen displays
(English / / / / / / Indonesia / Français)
Display Settings
Telet ext Teletext display mode (FASTEXT / List) (p. 7)
Teletext Character Set Selects teletext language (English / CIS / E.Europe /
Persian)
Input Labels Labels or skips each input terminal (p. 10)
Playing Time Display Set to “On” to display a continuous record of time spent in
Game mode every 30 mins (O / On)
is function is available when “Game” is selected in “Viewing Mode”.
Continued p. 10
9
TH-L32C20KMRTX23,26,28K_EN_Folding.indd Sec1:9 5/25/2010 3:27:53 PM
Child Lock
Change PIN
Child Lock List Access
Child Lock List - TV and AV
kcoLemaN
1
2Lock
3Lock
4Lock
5Lock
6Lock
7Lock
8Lock
Child Lock-PIN Entry
Please enter new PIN
PIN * * * *
For your convenience, you can label each input terminal or skip any unused
terminal.

Select an input terminal and set

You can lock speci c channels / AV input terminals and control who watches them.
When the locked channel / input is selected, a message appears; by entering the PIN
number, you can watch it.

Set

Input Labels

e labels you set will be displayed in “Input Selection” menu (p. 14) or
banner.
If “Skip” is selected, you cannot select the mode.

Control channel audience (Child Lock)

Enter the PIN number (4 digits)
(enter twice if  rst setting)
Select the channel / input to be locked
Select “Child Lock List”
VIERA Link Settings
VIERA Link Sets to use VIERA Link functions (O / On)
Power on Link When the connected equipment starts playback or direct
navigator / function menu for the equipment is activated, the TV is automatically
turned on. (Only when the TV is in Standby mode.) (O / On)
Power o Link When the TV is set to Standby mode, the connected equipment
is also automatically set to Standby.  is function will work even if the TV enters
standby mode automatically by O Timer function or auto power standby function.
(O / On)
Standby Power Save ¹ is function is available when “VIERA Link” and “Power
o Link” are set to “On”. It controls the power consumption in Standby mode of the
connected equipment to reduce the power consumption (O / On)
Intelligent Auto Standby ¹ is function is available when “VIERA Link” is set to
“On” . It makes non-used connected equipment go into Standby mode to reduce the
power consumption (O / On (With reminder) / On (No reminder))
¹ Only e ective if the connected equipment supports this function.
System Menu
Shipping Condition Resets all settings to the original condition. A er
performing this function, “Initial Setup” (p. 6) will automatically start when Mains
power On / O switch is next turned On.
So ware Licence Displays the so ware licence information
System Information Displays the system information of this TV
Other Settings
AV Colour System Selects optimum colour system based on video signals in AV
mode (Auto / PAL / SECAM / M.NTSC / NTSC)
Colour Matrix Available only with 480p or 576p input on video signals in a
natural colour from digital equipment connected to AV1 component or HDMI
terminal. Select SD or HD to adjust suitable colour parameters for SD (standard
de nition) or HD (high de nition)
SD : Input signal is a normal TV system
HD : Input signal is a high de nition system
Auto Standby S ets the TV to automatically goes to Standby mode when no
operation is performed within the selected period (O / 2 hours / 4 hours)
Automatic input switching with the connected equipment a ects t his function and
time-count will be reset. A noti cation message will appear 3 minutes before going
into Standby mode.
Power Save Reduces picture brightness to reduce power consumption (O / On)
16:9 Overscan Selects the screen area for displaying the image (O / On)
On : Enlarges the image to hide the edge of the image
O : Displays the image in the original size
Set to “On” if noise is generated on the edges of the screen.
is function is available when aspect is set to “16:9”.
is function can be memorized separately for SD (Standard De nition) and HD
(High De nition) signals.
Only available items can be selected.
A di erent menu will be displayed in the mode of SD Card (p. 14).
VIERA Main Menu Child LockSetup
VIERA Main Menu Display Settings Input LabelsSetup
Appears when the channel / input is locked
To cancel
Select the locked channel /
input
To lock all
To cancel all locks
To change the PIN number
Select “Change PIN” in
“Child Lock” and enter a
new PIN number twice
NOTE
Performing “Shipping
Condition” erases the PIN
number and all settings.
PC
AV1 AV1
AV2 AV2
PC
HDMI HDMI
Input Labels
10
TH-L32C20KMRTX23,26,28K_EN_Folding.indd Sec1:10 5/25/2010 3:27:53 PM
Channel List Editor
8
9
10
11
12
13
14
:reveal
:hide (skip)
select
reveal / hide
All tuning data will be erased
Auto Tuning
EXIT
RETURN
Start Auto Tuning
Auto Tuning
Scan
1
120
CH2
1
EXIT
8
Fine Tuning
Manual Tuning 1 120
Sound System
Colour System
4.5MHz
NTSC
Manual Tuning
Select Enter channel
Store EXIT
Search
RETURN
CH Up
CH Down
CH37
Press repeatedly until “Auto Tuning
appears
Access “Auto Tuning”
Start “Auto Tuning”
To return to TV

Auto tuning using the buttons on the TV

Manual Tuning
Channel List Edit Access
Auto Tuning Access
Access
Tuning Menu
You can skip unwanted channels and retune the TV channels when necessary.

Select the function you want to perform

Tuning and Editing Channels

Channel List Edit
Settings are made automatically
Start Auto Tuning
All the previous tuning settings are erased.
When the operation is completed, the channel at channel position “1” will be
displayed.
Search begins in the order from the lower channels to the higher channels. Channels
received during this process are added to the list (see above).
If tuning has not been done completely “Manual Tuning” (see right)
Auto Tuning
Fine Tuning
Use to make small adjustments to the tuning of an individual channel (a ected by
weather conditions, etc.)
Manual Tuning
Set channel manually a er Auto Tuning.
Before performing this function, you need to set the “Sound System” and “Colour
System”.
Set Colour System “Auto” normally.
If a VCR is connected only with the RF cable, select channel position “0”.
Select channel Select channel position
Manual Tuning
VIERA Main Menu Tuning Menu
Setup
You can hide (skip) unwanted channels.  e hidden channels cannot be displayed
except in this function.
Select a channel, then select to reveal or hide
You can set all TV channels automatically.
To reveal all channels
To retune selected channel (Manual Tuning) Search
Store
11
TH-L32C20KMRTX23,26,28K_EN_Folding.indd Sec1:11 5/25/2010 3:27:54 PM
VIERA Link “ Control™”
Enjoy additional HDMI interoperability with Panasonic products which have “HDAVI
Control” function.  is T V supports “HDAVI Control 5” function. Connections to the
equipment (DIGA Recorder, HD Video Camera, Player theatre, Ampli er, etc.) with
HDMI cable allow you to interface them automatically.  ese features are limited to
models incorporating “HDAVI Control” and “VIERA Link”.
Some functions are not available depending on the equipment’s version of HDAVI
Control. Please con rm the connected equipment’s version of HDAVI Control.
VIERA Link “HDAVI Control”, based on the control functions provided by HDMI
which is an industry standard known as HDMI CEC (Consumer Electronics Control), is
a unique function that we have developed and added. As such, its operation with other
manufacturers’ equipment that supports HDMI CEC cannot be guaranteed.
Please refer to individual manuals for the equipment. About applicable Panasonic
equipment, consult your local Panasonic dealer.
: HDMI Connection only
: HDMI and Audio out connections
: available with the equipment which has “HDAVI Control 2 or later” function
: available with the equipment which has “HDAVI Control 4 or later” function
: while playingback a disc
: except for watching a disc
Connected equipment
with VIERA Link
function
Features
DIGA
Recorder1
DVD
Player /
Blu-ray
Disc
Player1
HD Video
Camera /
LUMIX
Camera1
Player
theatre2
Blu-ray
Disc
theatre2
Ampli er2
Easy playback 55
Power on link
Power o link
Reduce unnecessary power
consumption in standby
44–– 4
Auto standby for unnecessary
equipment
333
Control the menu of the
connected equipment by
VIERA remote control
33333
Speaker control –––
Connection
For DIGA Recorder / DVD Player / Blu-ray Disc Player / HD Video Camera / LUMIX
Camera with VIERA Link function, connect to HDMI terminal via an HDMI cable.
For Player theatre / Blu-ray Disc theatre / Ampli er, connect to HDMI terminal via an
HDMI cable and/or RCA cable for audio output from the TV.
Use fully wired HDMI compliant cable. Non-HDMI-compliant cables cannot be utilized.
Recommended Panasonic’s HDMI cable part number:
RP-CDHS15 (1.5 m) RP-CDHS30 (3.0 m) RP-CDHS50 (5.0 m)
Preparations
Connect the equipment supporting VIERA Link.
Set up the connected equipment. Read the manual of the equipment.
Set VIERA Link On in Setup Menu “VIERA Link” (p. 10)
Set up the TV A er connection, turn the equipment on and then switch the TV on. Set
the input mode to HDMI (p. 14), and make sure that an image is displayed correctly.
is setup should be done each time when the following conditions occur:
• for the  rst time • when adding or reconnecting equipment • when changing setup
Stereo / Bilingual Sound Selection
Audio Signal STEREO MAIN SUB MONO
Mode Indicator
NICAM .......Used in New Zealand, Singapore, Hong Kong etc.
Type of broadcast Regular broadcast
(Standard Audio)
Regular +
NICAM MONO
(MAIN )
NICAM
STEREO
NICAM DUAL
MONO
(MAIN / SUB )
Mode Indicator No
Indicator
A2 (German) .......Used in Australia, Malaysia etc.
Type of broadcast Regular broadcast
(Standard Audio)
BILINGUAL or DUAL MONO:
MAIN / SUB STEREO
Mode Indicator No
Indicator
If the stereo signal is poor or the receiving conditions are not optimum or if
STEREO:MONO automatic switching occurs, it is recommended you switch from
STEREO to MONO.
Even when the contents of the receiving signal undergo changes, selection mode is kept
intact.
When the receiving conditions deteriorate, listening will be easier if the mode is set to the
MONO position, using the Stereo / Bilingual Sound Selection button.
DUAL, also known as DUAL MONO or as BILINGUAL is not currently transmitted in
some countries.
When you receive the stereo / bilingual sound system, sound output modes can
be selected by pressing the Stereo / Bilingual Sound Selection button.
12
TH-L32C20KMRTX23,26,28K_EN_Folding.indd Sec1:12 5/25/2010 3:27:55 PM
VIERA Link Control
Speaker Selection
Recorder
Home Cinema
VIERA Link Menu
VIERA Link Menu
VIERA Link Control
Speaker Selection
Recorder
Home Cinema
VIERA Link Menu
VIERA Link Control
Speaker Selection
Recorder
Home Cinema
VIERA Link Control
You can control some functions of the connected equipment with this TV remote
control by pointing at the TV’s signal receiver.
Select “VIERA Link Control”, then select the equipment you want to access
e menu of the accessed equipment is displayed.  e displayed item may
vary depending on the connected equipment. (Input mode will be changed
automatically.)
Operate the connected equipment
Follow the operation guide.
² “Home Cinema” means Player theatre,
Blu-ray Disc theatre or Recorder theatre.
†3 “Other” means Tuner set top box.
access
select “VIERA Link Control”
select the equipment
You can control the theatre speaker with this TV remote control by pointing at the
TV’s signal receiver.
Select “Speaker Selection”, then set to “Home Cinema” or “TV”
ese functions may not work properly depending on the connected equipment.
Image or sound may not be available for the  rst few seconds when input mode is
switched.
Easy playback may be available by using the remote control for Player theatre, Blu-ray
Disc theatre or Ampli er. Read the manual of the equipment.
“HDAVI Control 5” is the newest standard (current as of December, 2009) for HDAVI
Control compatible equipment.  is standard is compatible with conventional HDAVI
equipment.
To con rm this TV’s version of HDAVI Control “System Information” (p. 10)
VIERA TOOLS
Directly accesses to some special features.
Display icon of the features
Select a feature, then follow the operation of each feature
VIERA Link Control /
Speaker Selection /
Slideshow / Photos
Select the function you want to perform
If you cannot operate, check the settings and the equipment
“Summary of features”, “Connection”, “Preparations” (p. 12)

Using VIERA Link Menu

Display “VIERA Link Menu”
VIERA Link Control
Speaker Selection
Recorder
Home Cinema
VIERA Link Menu
VIERA Link Control
Speaker Selection
Recorder / Player / †2 Home Cinema / Video Camera
/ LUMIX / Digital Camera / †3 Other
To display the operation guide Store / set / access
Move the cursor / select the menu Return to the previous menu
Move the cursor / access / adjust Exit the menu
When the key words are displayed on colour bar
Type of the connected equipment is displayed.
If you access non-VIERA Link equipment
When the equipment with “HDAVI Control” function is connected
Some operations may not be available depending on the equipment. If so, use its own
remote control.
You can access the menu of the equipment but you cannot operate it.
Use its own remote control to operate the equipment.
select “Speaker Selection”
set
Home Cinema
Player theatre, Blu-ray Disc theatre or Ampli er in Standby mode will be
automatically turned on and the TV sound will be output from the speakers
connected to the equipment.
Volume up / down Volume slide bar will be displayed when adjusting the volume of
the equipment.
Mute
e sound of TV speakers is mute.
When the equipment is turned o , TV speakers will be active.
TV
TV speakers are active.
If you wish to enjoy multi-channel sound (e.g. Dolby Digital 5.1ch) via an
Ampli er, connect with HDMI and RCA cable, and then select “Home Cinema”.
To enjoy the sound from the DIGA Recorder in multi-channel sound, connect
an HDMI cable from the DIGA Recorder to the Ampli er.
You can also access VIERA Link Control
by using VIERA TOOLS (see below).
select
access
13
TH-L32C20KMRTX23,26,28K_EN_Folding.indd Sec1:13 5/25/2010 3:27:55 PM
File name
Date
Pixel
p1010001
1/38
2008/10/23
1600 x 1200
p1010004p1010003p1010002p1010001
p1010008p1010007p1010006p1010005
p1010012p1010011p1010010p1010009
Photo View Mode
Folder view
100_PANA
etaD yb troShtnoM yb troSwohsedilS
SelectEXIT
Select
RETURN
View
Rotate
Slideshow
Select
Single view
EXIT
List
Folder name
Number of pictures
100_PANA
1/23
38 pictures
200_PANA
20 pictures
102_PANA
14 pictures
101_PANA
3 pictures
100_PANA
38 pictures
Nature
14 pictures
Fruit
18 pictures
ROOM
1 picture
201_PANA
7 pictures
Photo View Mode
Folder view
SelectEXIT
Select
RETURN
All pictures
View
Side of the TV
Label surface
Push the center of the
card until a click is heard
(To remove, push again)
select
view
To display / hide the operation guide
To return to thumbnail (List)
Start Slideshow
To previous photo
Rotate 90° (anti-
clockwise)
To next photo
Rotate 90° (clockwise)
To view a single photo (Single view)
To sort into folders
( umbnail)
(Folder view)
Transition E ect Selects the transition e ect for
slideshow (O /Wipe /Wipe /Wipe / Wipe /
Comb / C omb / Dissolve / Checker Wipe /
Random / Multi / Collage)
When you select “Random”, all e ects are performed
randomly except “Multi” and “Collage”.
Colour E ect Selects the colour e ect for
slideshow (O /Sepia/Gray scale)
Interval S elects slideshow interval
(Short / Normal / Long)
Repeat Slideshow repeat (O / On)
To sort by month
To sort by date
To return to unsorted
thumbnail
Viewing Setup
Transition Effect Off
Interval
Repeat
Short
On
Colour Effect Off change
select
Error display (unloadable image, etc.)
Information of selected photo
Selected photo
select
select sorted
folder
view
thumbnail
Input Selection
AV1
AV2
PC
HDMI
TV
select
watch
Watching External Inputs

Display the input selection menu

Select the input mode of the connected

equipment to watch

Example (AV2)
You can also select the input using the AV button
on the side panel of the TV (p. 5) Press the button
repeatedly until the desired input is selected.
You can label or skip each input mode “Input
Labels” (p. 10)
Skipped inputs will not be displayed when the AV
button is pressed.
NOTE
If the external equipment has an aspect adjustment
function, set it to “16:9”.
It is also possible to switch to PC input directly from
TV mode by pressing the PC button.
You can also listen to the PC sound by connecting an
audio cable.
You can set up some functions; Advanced PC Settings
(p. 8) in Picture Menu and PC Setup (p. 9) in Setup
Menu.
For HDMI-compatible PC, it is possible to connect to
HDMI terminal by using HDMI cable.
Viewing from SD Card (VIERA IMAGE VIEWER)
Photo View: View still pictures recorded on a digital
camera.
During the operation, no signals are output from any of
the AV terminals.
“Date” shows the date on which the recording was made
by the digital camera. It is shown with asterisks when
the  le has no record of the date.
e les which are not in a folder will be collected
to the folder named “/”.
To display all the photos

Enter SD mode (Photo View)

Select the folder you want to view

All photos in SD Card are displayed by
thumbnail.

Insert the SD card

Select a photo

VIERA Main Menu Viewing Setup
Slideshow settings
To start Slideshow within the thumbnail
To pause cursor up button (press again to resume)
To return to Single view
Select an item and change the setting
Message Meaning / Action
Cannot read  le e le is broken or unreadable.
e TV does not support the format.
No SD card inserted Con rm SD Card is inserted correctly.
No valid  le to play  e card has no data.
Over 9999 pictures
found (max. is 9999)
Maximum valid number of photos
is 9,999.
SD card on screen messages
14
TH-L32C20KMRTX23,26,28K_EN_Folding.indd Sec1:14 5/25/2010 3:27:56 PM
NOTE
Signals other than above may not be
displayed properly.
e above signals are reformatted for
optimal viewing on your display.
PC signal is magni ed or compressed
for display, so that it may not be
possible to show  ne detail with
su cient clarity.
FAQs
Before requesting service or assistance, please follow these simple guides to resolve the
problem. If problem still persists, please contact your local Panasonic dealer.
White spots or shadow images (noise)
Check the position, direction, and connection
of the aerial.
Neither image nor sound is produced
Is the TV in “AV mode”?
Is the mains lead plugged into the socket outlet?
Is the TV turned On?
Check “Picture Menu” and volume.
Check all required cables and connections are
 rmly in place.
An error message appears
Follow the message’s instructions.
If the problem persists, contact your local
Panasonic dealer.
ere may be red spots, blue spots, green
spots and black spots on the screen
is is a characteristic of liquid crystal panels
and is not a problem.  e liquid crystal panel is
built with very high precision technology giving
you  ne picture details. Occasionally, a few non-
active pixels may appear on the screen as a  xed
point of red, green, blue or black.
Please note this does not a ect the performance
of your LCD and it is not a quality problem.
“VIERA Link” function does not work and
an error message appears
Con rm the connection.
Turn the connected equipment on and then
switch the TV on.
e LCD panel moves slightly when it is
pushed with a  nger
Clattered sound might be heard
ere are some looseness around the panel to
prevent damage to the panel.
e panel might move slightly when it is pushed
with a  nger, and clattered sound might be
heard.  is is not a malfunction.
TV goes into “Standby mode”
Auto power standby function is activated.
e TV enters Standby mode about 30 minutes
a er broadcasting ends.
No sound is produced
Is “Sound Mute” active?
Is the volume set to the minimum?
e remote control does not work or is
intermittent
Are the batteries installed correctly?
Has the TV been switched On?
Point the remote control directly at the front of
the TV (within a 30 degree angle of the front of
the TV).
Situate the TV away from sunshine or other
sources of bright light not to shine on the TV’s
remote control signal receiver.
Sound is unusual
Set the sound setting of the connected
equipment to “2ch L.PCM”.
Check the “HDMI Input” setting in the Sound
Menu.
If digital sound connection has a problem, select
analogue sound connection.
Sound level is low or sound is distorted
Sound signal reception may be deteriorated.
Set “MPX” in the Sound Menu to “Mono”.
Pictures from external equipment are
unusual when the equipment is connected
via HDMI
Is the HDMI cable connected properly?
Turn O the TV and equipment, then turn them
On again.
Check an input signal from the equipment.
Use an equipment compliant with
EIA/CEA-861/861B.
No image can be displayed
Is “Colour” or “Contrast” in the Picture Menu set
to the minimum?
Blurry or distorted image
(no sound or low volume)
Reset channel.
Chaotic image, noisy
Change the setting of “P-NR” in the Picture
Menu (to remove noise).
Check nearby electrical products (car,
motorcycle,  uorescent lamp).
Unusual image is displayed
Tu rn o the TV with Mains power On / O
switch, then turn it on again.
Input signals that can be displayed
Input Signal name COMPONENT HDMI
COMPONENT
(Y, PB/CB, PR/CR),
HDMI
Mark: Applicable input signal
525 (480) / 60i 
525 (480) / 60p 
625 (576) / 50i 
625 (576) / 50p 
750 (720) / 60p 
750 (720) / 50p 
1,125 (1,080) / 60i 
1,125 (1,080) / 50i 
1,125 (1,080) / 60p
1,125 (1,080) / 50p
1,125 (1,080) / 24p
Input Signal name
Horizontal
frequency
(kHz)
Vertical
frequency
(Hz)
PC (from D-sub 15P)
Applicable input signal for PC
is basically compatible to VESA
standard timing.
640 × 400 @70 Hz 31.47 70.07
640 × 480 @60 Hz 31.47 59.94
640 × 480 @75 Hz 37.50 75.00
800 × 600 @60 Hz 37.88 60.32
800 × 600 @75 Hz 46.88 75.00
800 × 600 @85 Hz 53.67 85.06
852 × 480 @60 Hz 31.44 59.89
1,024 × 768 @60 Hz 48.36 60.00
1,024 × 768 @70 Hz 56.48 70.07
1,024 × 768 @75 Hz 60.02 75.03
1,024 × 768 @85 Hz 68.68 85.00
1,280 × 1,024 @60 Hz 63.98 60.02
1,280 × 768 @60 Hz 47.70 60.00
1,366 × 768 @60 Hz 48.39 60.04
Macintosh13” (640 × 480) 35.00 66.67
Macintosh16” (832 × 624) 49.73 74.55
Macintosh21” (1,152 × 870) 68.68 75.06
PC (from HDMI terminal)
Applicable input signal for PC
is basically compatible to HDMI
standard timing
640 × 480 @60 Hz 31.47 60.00
750 (720) / 60p 45.00 60.00
1,125 (1,080) / 60p 67.50 60.00
Hot Plug Detect 19
DDC/CEC Ground 17
SCL 15
CEC 13
TMDS Clock Shield
11
TMDS Data0− 9
TMDS Data0+ 7
TMDS Data1 Shield 5
TMDS Data2− 3
TMDS Data2+ 1
18 +5V Power
16 SDA
14 Reserved
(in cable but
N.C. on device)
12 TMDS Clock−
10 TMDS Clock+
8 TMDS Data0 Shield
6 TMDS Data1−
4 TMDS Data1+
2 TMDS Data2 Shield
HDMI terminal
15
TH-L32C20KMRTX23,26,28K_EN_Folding.indd Sec1:15 5/25/2010 3:27:57 PM
A2 Landscape - en.indd 2A2 Landscape - en.indd 2 5/25/2010 3:29:18 PM5/25/2010 3:29:18 PM