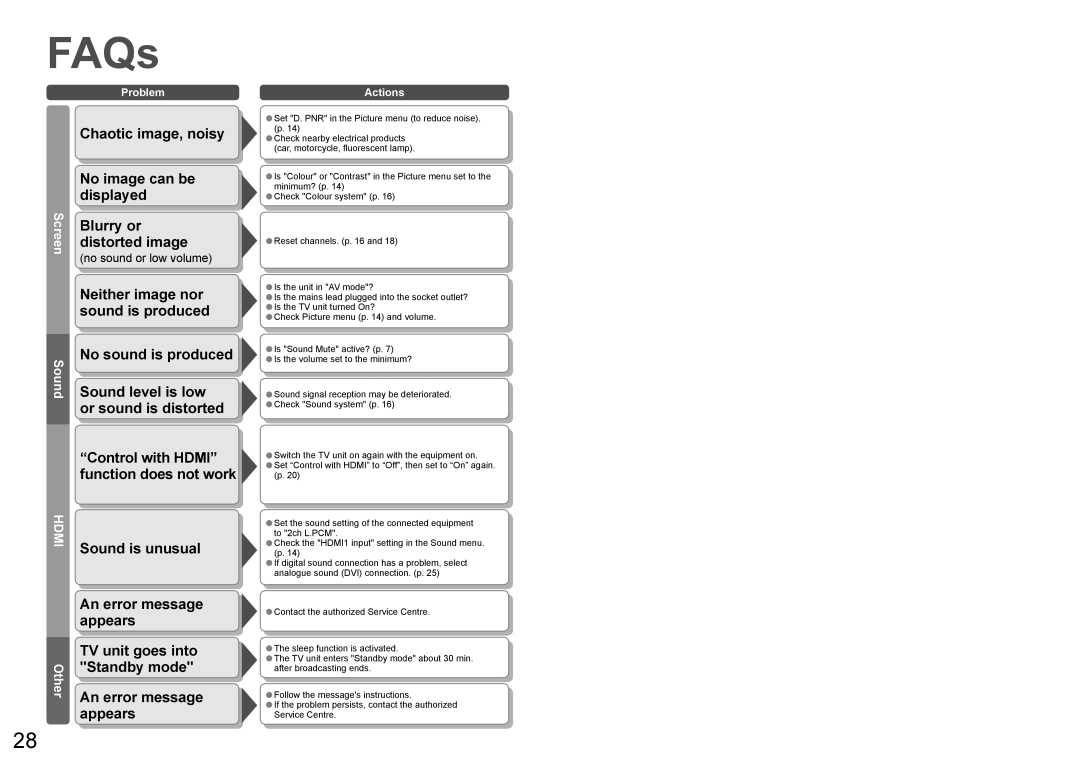
FAQs, etc.
28
29
FAQs
Speci cations
Note
Design and Speci cations are subject to change without notice. Weight and Dimensions shown are approximate.
TX-26LX60A TX-32LX60A
Power Source AC 110-240 V, 50 / 60 Hz
Power
Consumption
Average use 109 W 168 W
Standby condition 0.9 W
LCD Panel
Aspect Ratio 16:9
Visible screen size
(No. of pixels)
66.1 cmV 80.0 cmV
576 mm (W) × 324 mm (H) 698 mm (W) × 392 mm (H)
1,049,088 (1,366 (W) × 768 (H)) [4,098
× 768 dots]
Sound
Speaker 12 cm × 6 cm × 2 pcs, 4 Ω
Audio Output 20 W (10 W + 10 W), 10% THD
Headphones M3 (3.5 mm) Jack × 1
Receiving Systems /
Band name
Receiving Channels
(Regular TV)
Aerial - Rear VHF / UHF
Operating Conditions Temperature : 5 °C - 40 °C
Humidity : 5 % - 90 % RH (non-condensing)
Connection Terminals
AV1
Input
AUDIO L - R RCA PIN Type × 2 0.5 V [rms]
VIDEO RCA PIN Type × 1 1.0 V [p-p] (75 Ω)
S VIDEO Mini DIN 4-pin Y:1.0 V [p-p] (75 Ω) C:0.286 V [p-p] (75 Ω)
AV2
Input
AUDIO L - R RCA PIN Type × 2 0.5 V [rms]
VIDEO RCA PIN Type × 1 1.0 V [p-p] (75 Ω)
COMPONENT Y 1.0 V [p-p] (including synchronization)
PB/CB, PR/CR ±0.35 V [p-p]
AV3
Input
AUDIO L - R RCA PIN Type × 2 0.5 V [rms]
VIDEO RCA PIN Type × 1 1.0 V [p-p] (75 Ω)
S VIDEO Mini DIN 4-pin Y:1.0 V [p-p] (75 Ω) C:0.286 V [p-p] (75 Ω)
Others
HDMI1/2 Input TYPE A Connectors
Audio Input
for HDMI1 RCA PIN Type × 2 0.5 V [rms]
Monitor
Output
AUDIO L - R RCA PIN Type × 2 0.5 V [rms] (high impedance)
VIDEO RCA PIN Type × 1 1.0 V [p-p] (75 Ω)
Dimension
(W × H × D)
Including TV stand 657 mm × 525 mm × 300 mm 791 mm × 615 mm × 300 mm
TV Set only 657 mm × 473 mm × 128 mm 791 mm × 563 mm × 128 mm
Weight 15.0 k Net 19.0 k Net
Licence / Speci cations
Frequently Asked Questions
17 Systems Function 17 Systems Function
1 PAL B, G, H
Reception of broadcast
transmissions and
Playback from Video
Cassette Tape
Recorders
8
NTSC 4.43/5.5 MHz
Playback from Special VCR's or DVD
2 PAL I 9
NTSC 4.43/6.0 MHz
3 PAL D, K 10
NTSC 4.43/6.5 MHz
4
SECAM B, G
11
NTSC 3.58/5.5 MHz
5
SECAM D, K
12
NTSC 3.58/6.0 MHz
6 SECAM K1 13
NTSC 3.58/6.5 MHz
7
NTSC M (NTSC
3.58/4.5 MHz)
14 SECAM
I
15
PAL 60 Hz/5.5 MHz
Playback from Special Disc Players
and Special VCR's or DVD
16
PAL 60 Hz/6.0 MHz
17
PAL 60 Hz/6.5 MHz
VHF BAND
2-12 (PAL/SECAM B, K1)
0-12 (PAL B AUST.)
1-9 (PAL B N.Z.)
1-12 (PAL/SECAM D)
1-12 (NTSC M Japan)
2-13 (NTSC M USA)
UHF BAND
21-69 (PAL G, H, I/SECAM G, K, K1)
28-69 (PAL B AUST.)
13-57 (PAL D, K)
13-62 (NTSC M Japan)
14-69 (NTSC M USA)
CATV
S1-S20 (OSCAR)
1-125 (USA CATV)
C13-C49 (JAPAN)
S21-S41 (HYPER)
Z1-Z37 (CHINA)
5A, 9A (AUST.)
Licence
Trademark Credits
HDMI, the HDMI Logo and High-De nition Multimedia Interface are trademarks or registered trademarks of
HDMI Licensing LLC.
Problem Actions
Screen Sound OtherHDMI
Chaotic image, noisy
Set "D. PNR" in the Picture menu (to reduce noise).
(p. 14)
Check nearby electrical products
(car, motorcycle, uorescent lamp).
No image can be
displayed
Is "Colour" or "Contrast" in the Picture menu set to the
minimum? (p. 14)
Check "Colour system" (p. 16)
Blurry or
distorted image
(no sound or low volume)
Reset channels. (p. 16 and 18)
Neither image nor
sound is produced
Is the unit in "AV mode"?
Is the mains lead plugged into the socket outlet?
Is the TV unit turned On?
Check Picture menu (p. 14) and volume.
Sound is unusual
Set the sound setting of the connected equipment
to "2ch L.PCM".
Check the "HDMI1 input" setting in the Sound menu.
(p. 14)
If digital sound connection has a problem, select
analogue sound (DVI) connection. (p. 25)
TV unit goes into
"Standby mode"
The sleep function is activated.
The TV unit enters "Standby mode" about 30 min.
after broadcasting ends.
An error message
appears
Follow the message's instructions.
If the problem persists, contact the authorized
Service Centre.
An error message
appears
Contact the authorized Service Centre.
No sound is produced
Is "Sound Mute" active? (p. 7)
Is the volume set to the minimum?
Sound level is low
or sound is distorted
Sound signal reception may be deteriorated.
Check "Sound system" (p. 16)
“Control with HDMI”
function does not work
Switch the TV unit on again with the equipment on.
Set “Control with HDMI” to “Off”, then set to “On” again.
(p. 20)