● Heater unit installation
See OPTIONAL HEATER UNIT for details. |
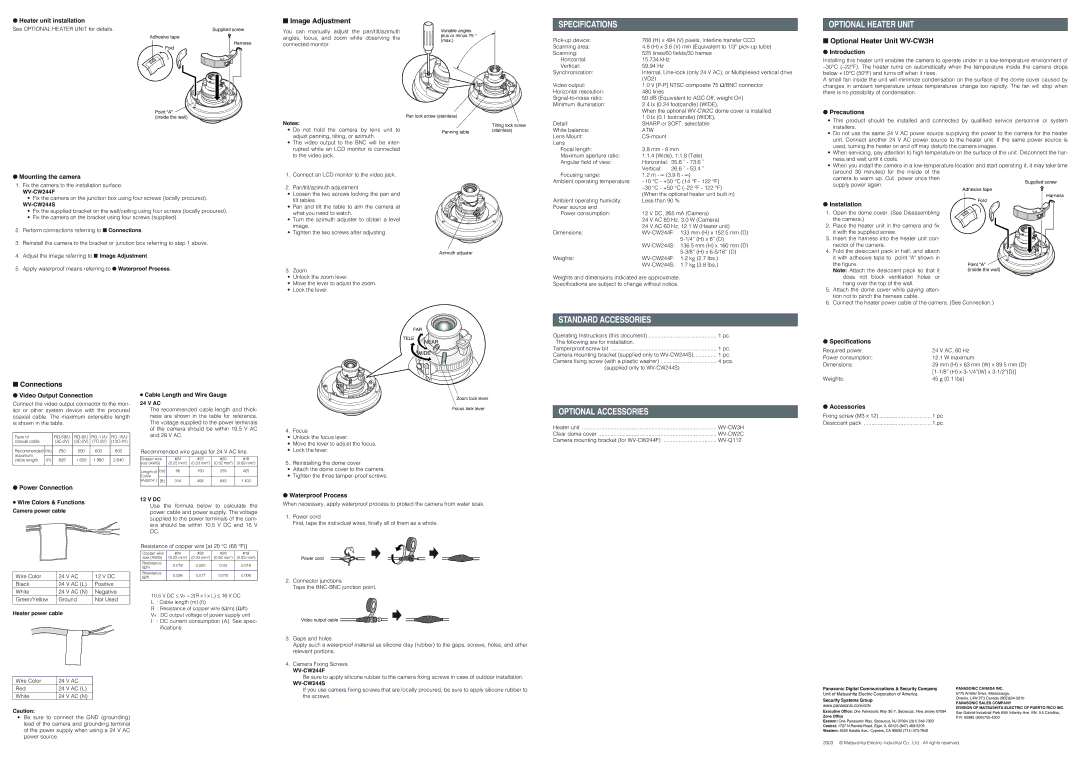
■Image Adjustment
SPECIFICATIONS
OPTIONAL HEATER UNIT
Supplied screw |
Adhesive tape |
Harness |
Fold |
Point “A”  (inside the wall)
● Mounting the camera | |
1. | Fix the camera to the installation surface. |
| |
| • Fix the camera on the junction box using four screws (locally procured). |
|
|
| • Fix the supplied bracket on the wall/ceiling using four screws (locally procured). |
| • Fix the camera on the bracket using four screws (supplied). |
2. | Perform connections referring to ■ Connections. |
3. | Reinstall the camera to the bracket or junction box referring to step 1 above. |
You can manually adjust the pan/tilt/azimuth angles, focus, and zoom while observing the connected monitor.
Notes:
•Do not hold the camera by lens unit to adjust panning, tilting, or azimuth.
•The video output to the BNC will be inter- rupted while an LCD monitor is connected to the video jack.
1.Connect an LCD monitor to the video jack.
2.Pan/tilt/azimuth adjustment
•Loosen the two screws locking the pan and tilt tables.
•Pan and tilt the table to aim the camera at what you need to watch.
•Turn the azimuth adjuster to obtain a level image.
•Tighten the two screws after adjusting.
Variable angles plus or minus 75 ° (max.)
Pan lock screw (stainless) |
|
| Tilting lock screw |
Panning table | (stainless) |
|
Scanning area:
Scanning:
Horizontal:
Vertical:
Synchronization:
Video output:
Horizontal resolution:
Minimum illumination:
Detail:
White balance: Lens Mount: Lens
Focal length:
Maximum aperture ratio: Angular field of view:
Focusing range:
Ambient operating temperature:
Ambient operating humidity: Power source and
Power consumption:
Dimensions:
768 (H) x 494 (V) pixels, Interline transfer CCD
4.8(H) x 3.6 (V) mm (Equivalent to 1/3”
15.734 kHz
59.94Hz
Internal,
1.0V
50 dB (Equivalent to AGC Off, weight On)
2.4lx (0.24 footcandle) (WIDE),
When the optional
1.0lx (0.1 footcandle) (WIDE), SHARP or SOFT, selectable
ATW
3.8mm - 8 mm
1:1.4 (Wide), 1:1.8 (Tele) Horizontal: 35.6 ˚ - 73.6 ˚ Vertical: 26.6 ˚ - 53.4 ˚ 1.2 m - ∞ (3.9 ft - ∞)
12 V DC, 265 mA (Camera)
24 V AC 60 Hz, 3.0 W (Camera)
24 V AC 60 Hz, 12.1 W (Heater unit)
■Optional Heater Unit
●Introduction
Installing this heater unit enables the camera to operate under in a
A small fan inside the unit will minimize condensation on the surface of the dome cover caused by changes in ambient temperature unless temperatures change too rapidly. The fan will stop when there is no possibility of condensation.
●Precautions
•This product should be installed and connected by qualified service personnel or system installers.
•Do not use the same 24 V AC power source supplying the power to the camera for the heater unit. Connect another 24 V AC power source to the heater unit. If the same power source is used, turning the heater on and off may disturb the camera images.
•When servicing, pay attention to high temperature on the surface of the unit. Disconnect the har- ness and wait until it cools.
•When you install the camera in a
camera to warm up. Cut power once then
supply power again.
| Adhesive tape |
| Adhesive tape |
| Harness |
| Fold |
● Installation | |
1. | Open the dome cover. (See Disassembling |
| the camera.) |
2. | Place the heater unit in the camera and fix |
| it with the supplied screw. |
3. | Insert the harness into the heater unit con- |
4. | Adjust the image referring to ■ Image Adjustment. |
5. | Apply waterproof means referring to ● Waterproof Process. |
Azimuth adjuster
3. Zoom
Weights:
nector of the camera. |
|
4. Fold the desiccant pack in half, and attach |
|
it with adhesive tape to point "A" shown in |
|
the figure. | Point “A” |
| Point “A” |
Note: Attach the desiccant pack so that it | (inside the wall) |
(inside the wall) |
•Unlock the zoom lever.
•Move the lever to adjust the zoom.
•Lock the lever.
Weights and dimensions indicated are approximate. Specifications are subject to change without notice.
does not block ventilation holes or hang over the top of the wall.
5. | Attach the dome cover while paying atten- |
| tion not to pinch the harness cable. |
6. | Connect the heater power cable of the camera. (See Connection.) |
■Connections
●Video Output Connection
Connect the video output connector to the mon- itor or other system device with the procured coaxial cable. The maximum extensible length is shown in the table.
Type of |
| ||||
coaxial cable |
| ||||
Recommended (m) | 250 | 500 | 600 | 800 | |
maximum |
|
|
|
|
|
cable length | (ft) | 825 | 1 650 | 1 980 | 2 640 |
●Power Connection
●Wire Colors & Functions
Camera power cable
Wire Color | 24 V AC | 12 V DC | |
Black | 24 | V AC (L) | Positive |
White | 24 | V AC (N) | Negative |
Green/Yellow | Ground | Not Used | |
Heater power cable
Wire Color | 24 | V AC |
Red | 24 V AC (L) | |
White | 24 | V AC (N) |
Caution:
•Be sure to connect the GND (grounding) lead of the camera and grounding terminal of the power supply when using a 24 V AC power source.
●Cable Length and Wire Gauge
24 V AC
The recommended cable length and thick- ness are shown in the table for reference. The voltage supplied to the power terminals of the camera should be within 19.5 V AC and 28 V AC.
Recommended wire gauge for 24 V AC line.
Copper wire | #24 | #22 | #20 | #18 | |
size (AWG) | (0.22 mm2) | (0.33 mm2) | (0.52 mm2) | (0.83 mm2) | |
|
|
|
|
|
|
Length of | (m) | 95 | 150 | 255 | 425 |
Cable |
|
|
|
|
|
|
|
|
|
| |
(Approx.) | (ft) | 314 | 495 | 842 | 1 403 |
|
|
|
|
|
|
12 V DC
Use the formula below to calculate the power cable and power supply. The voltage supplied to the power terminals of the cam- era should be within 10.5 V DC and 16 V DC.
Resistance of copper wire [at 20 °C (68 °F)]
Copper wire | #24 | #22 | #20 | #18 | |
size (AWG) | (0.22 mm2) | (0.33 mm2) | (0.52 mm2) | (0.83 mm2) | |
|
|
|
|
| |
Resistance | 0.078 | 0.050 | 0.03 | 0.018 | |
Ω/m | |||||
|
|
|
| ||
|
|
|
|
| |
Resistance | 0.026 | 0.017 | 0.010 | 0.006 | |
Ω/ft | |||||
|
|
|
| ||
|
|
|
|
|
10.5V DC ≤ VA − 2(R x I x L) ≤ 16 V DC
L : Cable length (m) (ft)
R : Resistance of copper wire (Ω/m) (Ω/ft)
VA : DC output voltage of power supply unit
I : DC current consumption (A). See spec- ifications.
FAR
TELE
NEAR
WIDE
Zoom lock lever
Focus lock lever
4. Focus
•Unlock the focus lever.
•Move the lever to adjust the focus.
•Lock the lever.
5. Reinstalling the dome cover
•Attach the dome cover to the camera.
•Tighten the three
●Waterproof Process
When necessary, apply waterproof process to protect the camera from water soak.
1.Power cord
First, tape the individual wires, finally all of them as a whole.
Power cord
2.Connector junctions
Tape the
Video output cable ![]()
![]()
![]()
![]()
3.Gaps and holes
Apply such a waterproof material as silicone clay (rubber) to the gaps, screws, holes, and other relevant portions.
4.Camera Fixing Screws
Be sure to apply silicone rubber to the camera fixing screws in case of outdoor installation.
If you use camera fixing screws that are locally procured, be sure to apply silicone rubber to the screws.
STANDARD ACCESSORIES
Operating Instructions (this document) | 1 pc. |
The following are for installation. |
|
Tamperproof screw bit | 1 pc. |
Camera mounting bracket (supplied only to | 1 pc. |
Camera fixing screw (with a plastic washer) | 4 pcs. |
(supplied only to |
|
OPTIONAL ACCESSORIES
Heater unit | |
Clear dome cover | |
Camera mounting bracket (for |
● Specifications |
Required power: | 24 V AC, 60 Hz | |
Power consumption: | 12.1 | W maximum |
Dimensions: | 29 mm (H) x 83 mm (W) x 89.5 mm (D) | |
| ||
Weights: | 45 g | (0.1 lbs) |
● Accessories
Fixing screw (M3 x 12) | ...................................1 pc. |
Desiccant pack | 1.pc. |
Panasonic Digital Communications & Security Company | PANASONIC CANADA INC. | |
Unit of Matsushita Electric Corporation of America | 5770 Ambler Drive, Mississauga, | |
Security Systems Group | Ontario, L4W 2T3 Canada | |
PANASONIC SALES COMPANY | ||
www.panasonic.com/cctv | ||
DIVISION OF MATSUSHITA ELECTRIC OF PUERTO RICO INC. | ||
Executive Office: One Panasonic Way | ||
San Gabriel Industrial Park 65th Infantry Ave. KM. 9.5 Carolina, | ||
Zone Office | ||
P.R. 00985 | ||
Eastern: One Panasonic Way, Secaucus, NJ 07094 (201) | ||
| ||
Central: 1707 N.Randal Road, Elgin, IL 60123 (847) |
| |
Western: 6550 Katella Ave., Cypress, CA 90630 (714) |
|
2003 © Matsushita Electric Industrial Co., Ltd. All rights reserved.