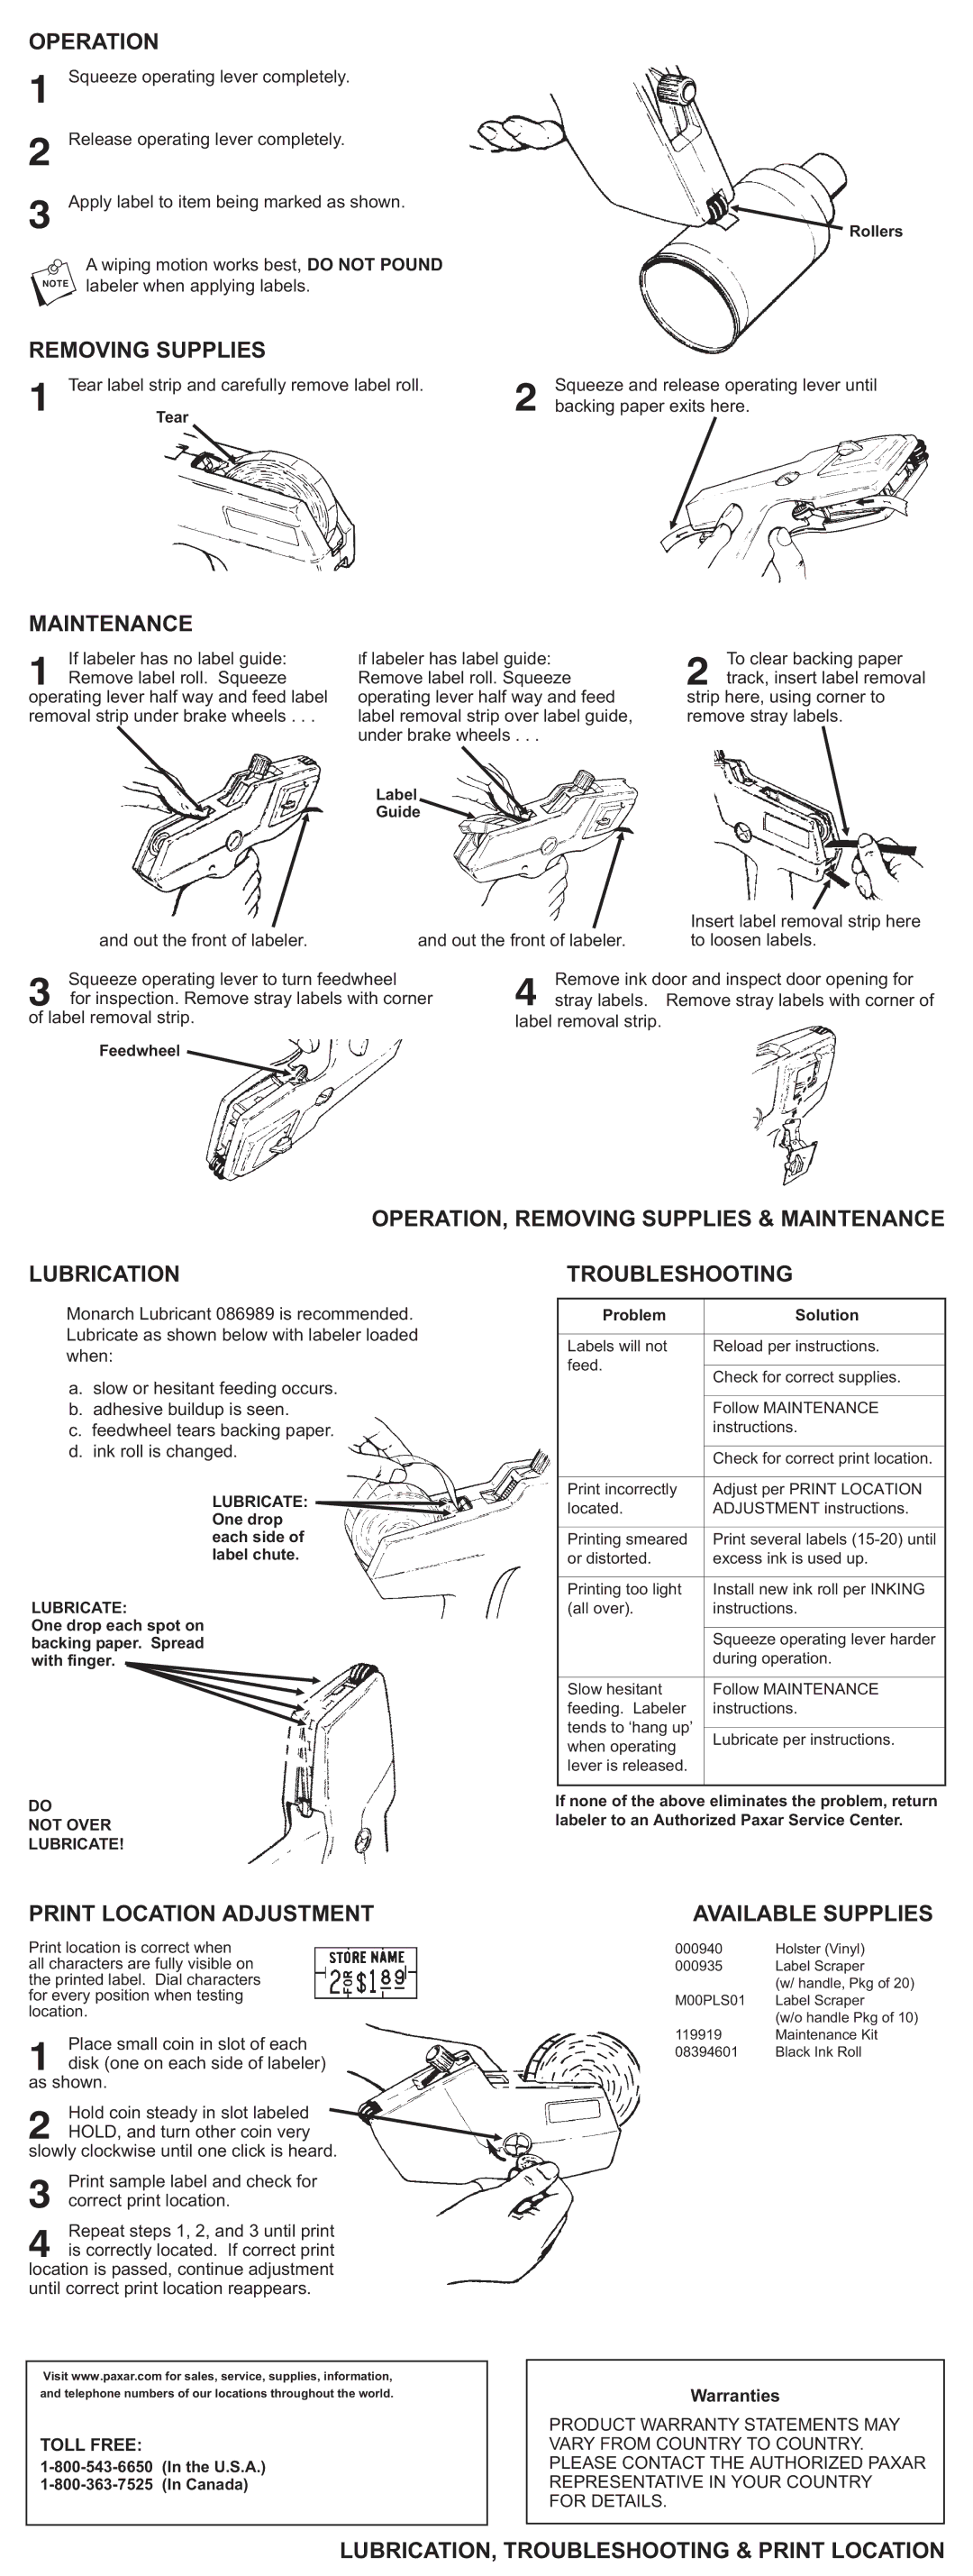
OPERATION
1
2
3
Squeeze operating lever completely.
Release operating lever completely.
Apply label to item being marked as shown.
Rollers
nA wiping motion works best, DO NOT POUND labeler when applying labels.
REMOVING SUPPLIES
1 | Tear label strip and carefully remove label roll. | 2 | Squeeze and release operating lever until |
Tear | backing paper exits here. | ||
|
|
|
MAINTENANCE
1Remove label roll. Squeeze
operating lever half way and feed label removal strip under brake wheels . . .If labeler has no label guide:
If labeler has label guide: Remove label roll. Squeeze operating lever half way and feed label removal strip over label guide, under brake wheels . . .
Label
Guide
2track, insert label removal
strip here, using corner to remove stray labels.To clear backing paper
and out the front of labeler. | and out the front of labeler. |
Insert label removal strip here to loosen labels.
3for inspection. Remove stray labels with corner of label removal strip.Squeeze operating lever to turn feedwheel
Feedwheel ![]()
4stray labels. Remove stray labels with corner of label removal strip.Remove ink door and inspect door opening for
OPERATION, REMOVING SUPPLIES & MAINTENANCE
LUBRICATION
Monarch Lubricant 086989 is recommended. Lubricate as shown below with labeler loaded when:
a.slow or hesitant feeding occurs.
b.adhesive buildup is seen.
c.feedwheel tears backing paper.
d.ink roll is changed.
LUBRICATE: ![]() One drop
One drop
each side of label chute.
LUBRICATE:
One drop each spot on backing paper. Spread with finger.
DO
NOT OVER
LUBRICATE!
TROUBLESHOOTING
Problem | Solution | |
|
| |
Labels will not | Reload per instructions. | |
feed. |
| |
Check for correct supplies. | ||
| ||
|
| |
| Follow MAINTENANCE | |
| instructions. | |
|
| |
| Check for correct print location. | |
|
| |
Print incorrectly | Adjust per PRINT LOCATION | |
located. | ADJUSTMENT instructions. | |
|
| |
Printing smeared | Print several labels | |
or distorted. | excess ink is used up. | |
|
| |
Printing too light | Install new ink roll per INKING | |
(all over). | instructions. | |
|
| |
| Squeeze operating lever harder | |
| during operation. | |
|
| |
Slow hesitant | Follow MAINTENANCE | |
feeding. Labeler | instructions. | |
tends to ‘hang up’ |
| |
Lubricate per instructions. | ||
when operating | ||
| ||
lever is released. |
| |
|
|
If none of the above eliminates the problem, return labeler to an Authorized Paxar Service Center.
PRINT LOCATION ADJUSTMENT
Print location is correct when all characters are fully visible on the printed label. Dial characters for every position when testing location.
1disk (one on each side of labeler) as shown.Place small coin in slot of each
2HOLD, and turn other coin very slowly clockwise until one click is heard.Hold coin steady in slot labeled
3 | Print sample label and | check for |
correct print location. |
|
4is correctly located. If correct print
location is passed, continue adjustment until correct print location reappears.Repeat steps 1, 2, and 3 until print
Visit www.paxar.com for sales, service, supplies, information,
and telephone numbers of our locations throughout the world.
TOLL FREE:
AVAILABLE SUPPLIES
000940 | Holster (Vinyl) |
000935 | Label Scraper |
| (w/ handle, Pkg of 20) |
M00PLS01 | Label Scraper |
| (w/o handle Pkg of 10) |
119919 | Maintenance Kit |
08394601 | Black Ink Roll |
Warranties
PRODUCT WARRANTY STATEMENTS MAY VARY FROM COUNTRY TO COUNTRY. PLEASE CONTACT THE AUTHORIZED PAXAR REPRESENTATIVE IN YOUR COUNTRY FOR DETAILS.