C2947M-D (6/08)
C10CH Series Camera
Quick Start Guide
SETUP MENUS
The camera default settings are set at the factory to operate in most applications and lighting conditions, and normally require no adjustments. Sometimes, however, adjustments may be necessary.
Use the setup menus to customize the camera settings for your application as needed. Refer to the Installation/Operation manual (C2946M) for complete instructions and explanations of camera settings.
ACCESSING THE SETUP MENUS
Use the
Menu Options | Navigating the Menu |
Display the MAIN MENU on the screen. | Press and hold down the center button for two |
|
This quick start guide describes how to install and configure the C10CH Series camera in most applications. It contains a representation of the setup menus to help you locate and change specific settings.
Refer to the enclosed CD for the following documentation:
•Installation/Operation manual: C2946M
•Quick Start Guide: C2947M
•Important Safety Instructions: SAFETY.PDF
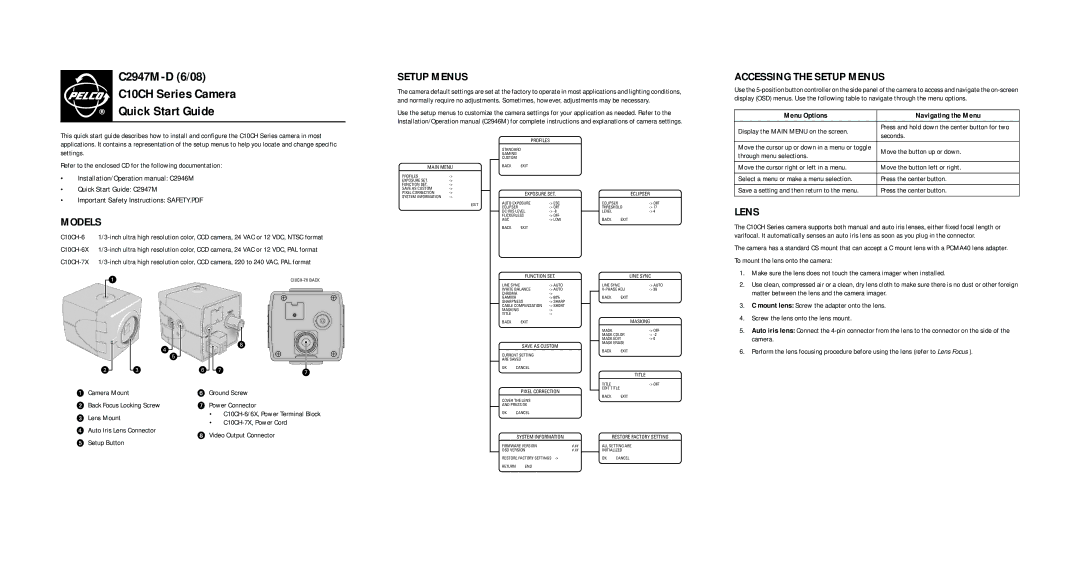
MODELS
ì Camera Mount | r Ground Screw | |
î Back Focus Locking Screw | s Power Connector | |
ï Lens Mount | • | |
• | ||
ñ Auto Iris Lens Connector | ||
t Video Output Connector | ||
ó Setup Button | ||
|
MAIN MENU
PROFILES | |
EXPOSURE SET. | |
FUNCTION SET. | |
SAVE AS CUSTOM | |
PIXEL CORRECTION | |
SYSTEM INFORMATION |
EXIT
PROFILES
STANDARD
GAMING
CUSTOM
BACK EXIT
EXPOSURE SET.
AUTO EXPOSURE | ||
ECLIPSER |
| |
DC IRIS LEVEL | ||
FLICKERLESS | ||
AGC |
| |
BACK | EXIT |
|
FUNCTION SET.
LINE SYNC |
| |
WHITE BALANCE | ||
CHROMA |
| |
GAMMA |
| |
SHARPNESS | ||
CABLE COMPENSATION | ||
MASKING |
| |
TITLE |
| |
BACK | EXIT |
|
SAVE AS CUSTOM
CURRENT SETTING
ARE SAVED
OK CANCEL
PIXEL CORRECTION
COVER THE LENS
AND PRESS OK
OK CANCEL
SYSTEM INFORMATION
FIRMWARE VERSION | #.## | |
OSD VERSION | #.## | |
RESTORE FACTORY SETTINGS | ||
RETURN | END |
|
|
| ECLIPSER |
ECLIPSER |
| |
THRESHOLD | ||
LEVEL |
| |
BACK | EXIT |
|
|
| LINE SYNC |
LINE SYNC |
| |
BACK | EXIT |
|
|
| MASKING |
MASK |
| |
MASK COLOR | ||
MASK EDIT | ||
MASK ERASE |
| |
BACK | EXIT |
|
| TITLE |
TITLE | |
EDIT TITLE |
|
BACK | EXIT |
RESTORE FACTORY SETTING
ALL SETTING ARE
INITIALIZED
OK CANCEL
| seconds. | |
Move the cursor up or down in a menu or toggle | Move the button up or down. | |
through menu selections. | ||
| ||
|
| |
Move the cursor right or left in a menu. | Move the button left or right. | |
|
| |
Select a menu or make a menu selection. | Press the center button. | |
|
| |
Save a setting and then return to the menu. | Press the center button. |
LENS
The C10CH Series camera supports both manual and auto iris lenses, either fixed focal length or varifocal. It automatically senses an auto iris lens as soon as you plug in the connector.
The camera has a standard CS mount that can accept a C mount lens with a PCMA40 lens adapter.
To mount the lens onto the camera:
1.Make sure the lens does not touch the camera imager when installed.
2.Use clean, compressed air or a clean, dry lens cloth to make sure there is no dust or other foreign matter between the lens and the camera imager.
3.C mount lens: Screw the adapter onto the lens.
4.Screw the lens onto the lens mount.
5.Auto iris lens: Connect the
6.Perform the lens focusing procedure before using the lens (refer to Lens Focus ).