Pella 81AK0101 installation instructions Between the door panel and door frame. Additional

Models: 81AK0101

1 18
Download 18 pages 358 b
Page 8
Image 8

3 SETTING AND FASTENING THE DOOR (continued):

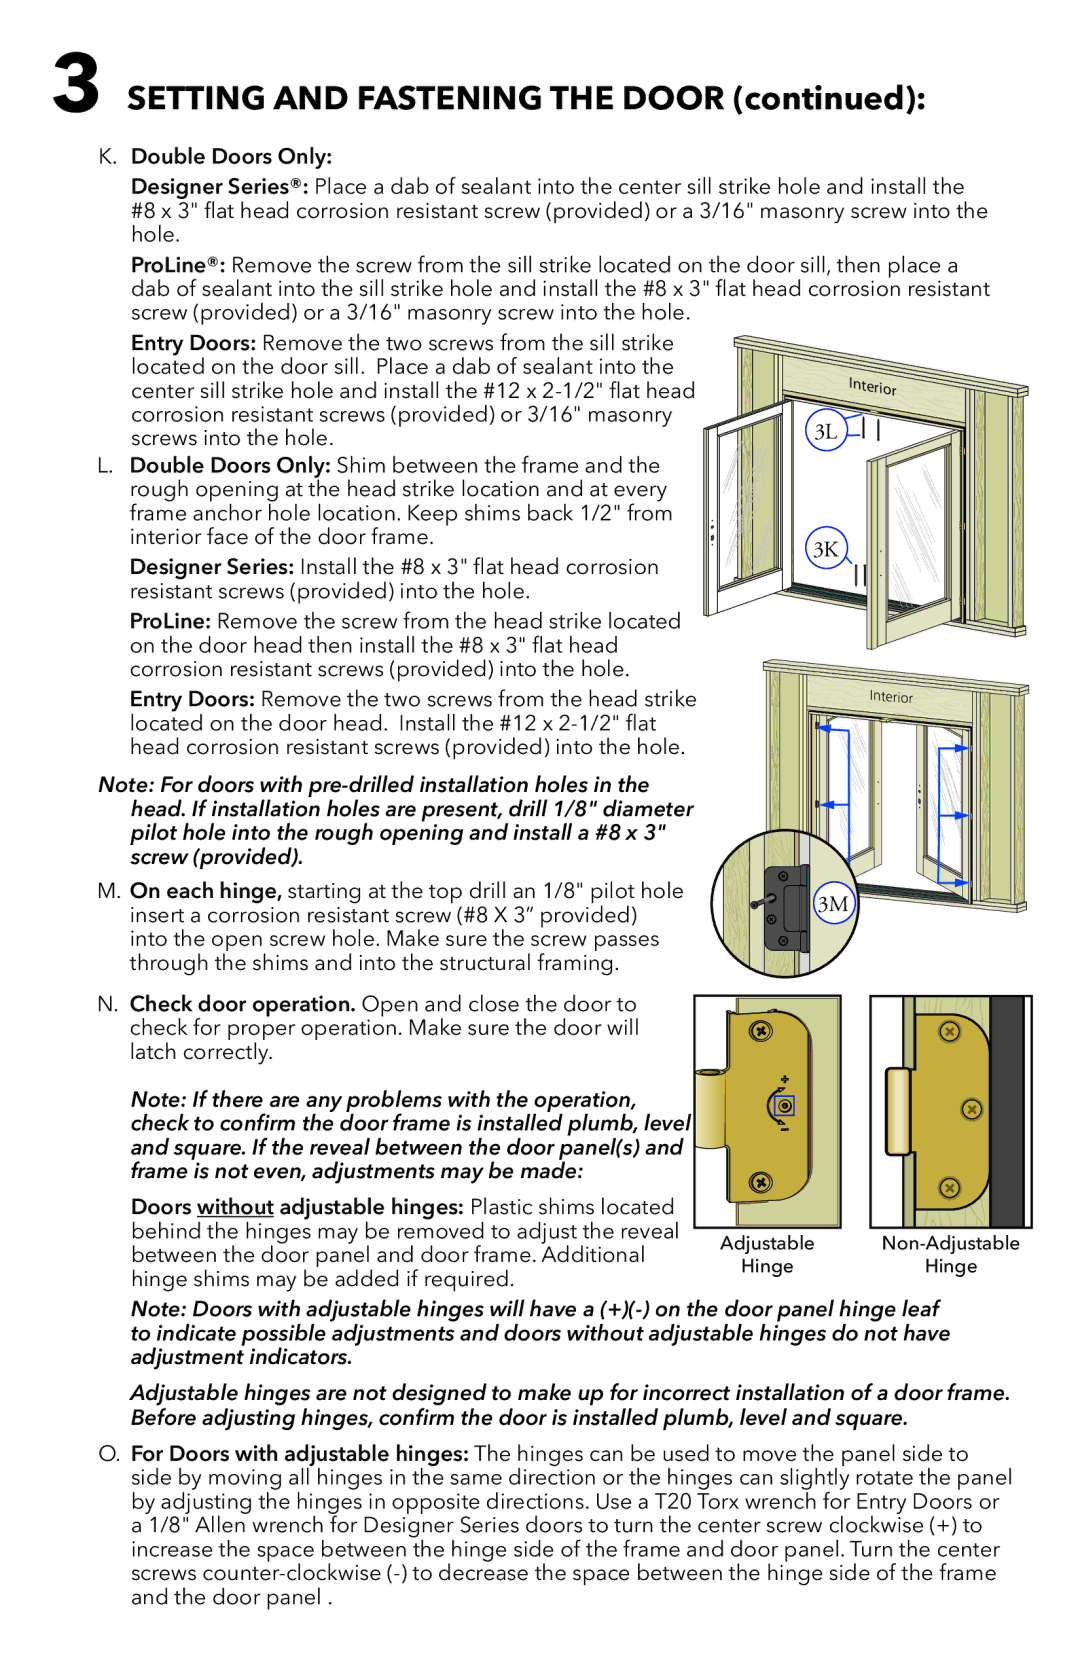
K.Double Doors Only:

Designer Series®: Place a dab of sealant into the center sill strike hole and install the

#8 x 3" flat head corrosion resistant screw (provided) or a 3/16" masonry screw into the hole.

ProLine®: Remove the screw from the sill strike located on the door sill, then place a dab of sealant into the sill strike hole and install the #8 x 3" flat head corrosion resistant screw (provided) or a 3/16" masonry screw into the hole.

Entry Doors: Remove the two screws from the sill strike located on the door sill. Place a dab of sealant into the center sill strike hole and install the #12 x 2-1/2" flat head corrosion resistant screws (provided) or 3/16" masonry screws into the hole.

L.Double Doors Only: Shim between the frame and the rough opening at the head strike location and at every frame anchor hole location. Keep shims back 1/2" from

interior face of the door frame.

Designer Series: Install the #8 x 3" flat head corrosion resistant screws (provided) into the hole.

ProLine: Remove the screw from the head strike located on the door head then install the #8 x 3" flat head corrosion resistant screws (provided) into the hole.

Entry Doors: Remove the two screws from the head strike located on the door head. Install the #12 x 2-1/2" flat head corrosion resistant screws (provided) into the hole.

Note: For doors with pre-drilled installation holes in the head. If installation holes are present, drill 1/8" diameter pilot hole into the rough opening and install a #8 x 3" screw (provided).

M.On each hinge, starting at the top drill an 1/8" pilot hole insert a corrosion resistant screw (#8 X 3” provided) into the open screw hole. Make sure the screw passes through the shims and into the structural framing.

3L

3K

3M3L

N. Check door operation. Open and close the door to


check for proper operation. Make sure the door will


latch correctly.


Note: If there are any problems with the operation,


check to confirm the door frame is installed plumb, level


and square. If the reveal between the door panel(s) and


frame is not even, adjustments may be made:


Doors without adjustable hinges: Plastic shims located


behind the hinges may be removed to adjust the reveal

Adjustable

between the door panel and door frame. Additional

Hinge

hinge shims may be added if required.


Non-Adjustable

Hinge

Note: Doors with adjustable hinges will have a (+)(-) on the door panel hinge leaf to indicate possible adjustments and doors without adjustable hinges do not have adjustment indicators.

Adjustable hinges are not designed to make up for incorrect installation of a door frame. Before adjusting hinges, confirm the door is installed plumb, level and square.

O.For Doors with adjustable hinges: The hinges can be used to move the panel side to side by moving all hinges in the same direction or the hinges can slightly rotate the panel by adjusting the hinges in opposite directions. Use a T20 Torx wrench for Entry Doors or a 1/8" Allen wrench for Designer Series doors to turn the center screw clockwise (+) to increase the space between the hinge side of the frame and door panel. Turn the center screws counter-clockwise (-) to decrease the space between the hinge side of the frame and the door panel .

Page 8
Image 8
Pella 81AK0101 installation instructions Between the door panel and door frame. Additional

81AK0101 specifications

The Pella 81AK0101 is an innovative window solution designed to provide both aesthetic appeal and functional efficiency. Known for its remarkable blend of style, durability, and energy efficiency, this window model is ideal for homeowners seeking to enhance their living spaces while minimizing energy costs.

One of the standout features of the Pella 81AK0101 is its energy efficiency. The window is designed with multiple layers of insulating glass, which significantly reduce heat transfer. This is complemented by low-E (low-emissivity) glass coatings that reflect heat during the summer months and retain warmth during the winter, making it suitable for diverse climates. The dual-pane construction further enhances the window's performance, minimizing condensation and improving thermal performance.

Another exceptional characteristic of the Pella 81AK0101 is its durability. Constructed with high-quality materials, these windows are built to withstand the elements, ensuring long-lasting performance. The fusion-welded vinyl frames provide added strength and resistance against warping, cracking, and fading. This durability translates to lower maintenance costs and longer lifespans, making Pella windows a smart investment for homeowners.

In terms of design, the Pella 81AK0101 offers a wide array of style options to fit various home aesthetics. From traditional to modern, these windows can be customized with various finishes, colors, and grid patterns. Homeowners can choose between various configurations, such as single-hung, double-hung, or sliding styles, allowing for increased versatility in design.

Safety features are also a top priority with the Pella 81AK0101. It includes advanced locking mechanisms that enhance security, providing peace of mind for homeowners. Additionally, the laminated glass option is available for those wishing to enhance safety further, as it helps prevent shattering and minimizes the risk of injury.

Overall, the Pella 81AK0101 window model stands out as an exceptional choice for energy efficiency, durability, and design flexibility. With its commitment to quality and innovation, Pella continues to be a respected name in the window industry. Homeowners looking to enhance their spaces while enjoying significant energy savings will find the Pella 81AK0101 an excellent addition to their homes.