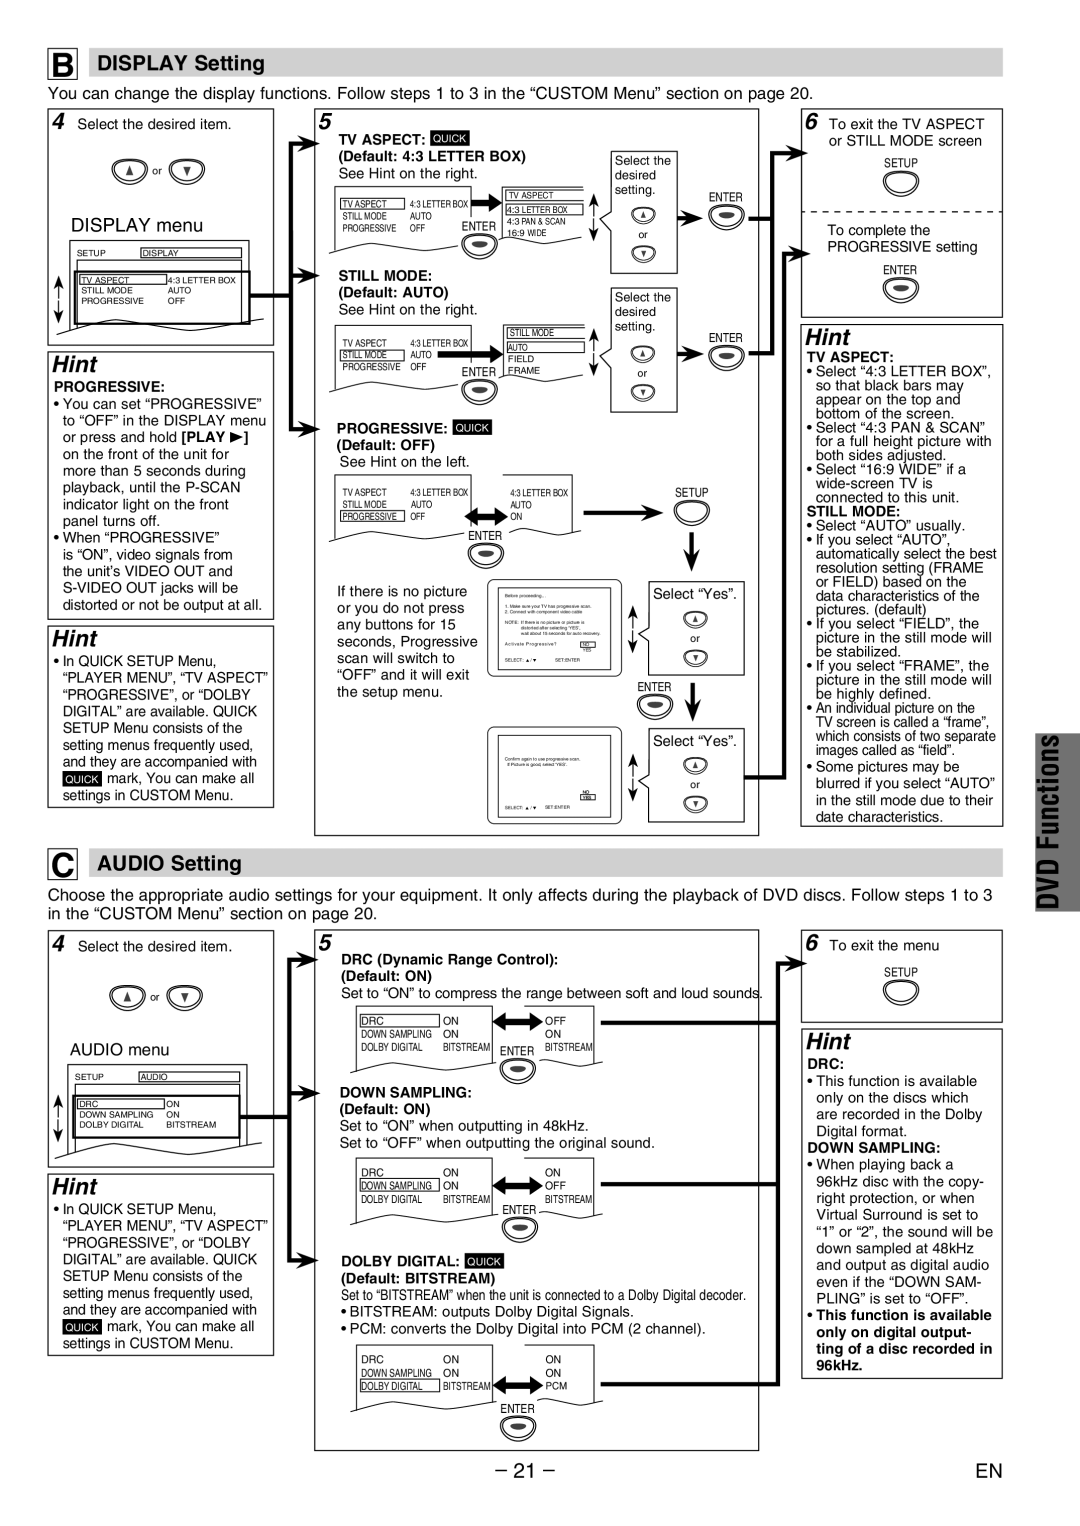
B DISPLAY Setting

You can change the display functions. Follow steps 1 to 3 in the “CUSTOM Menu” section on page 20.

4 Select the desired item.


or

DISPLAY menu

SETUP

DISPLAY

TV ASPECT


4:3 LETTER BOX

STILL MODE


AUTO

PROGRESSIVE

OFF

Hint


PROGRESSIVE:

5

TV ASPECT: QUICK

(Default: 4:3 LETTER BOX)

See Hint on the right.

TV ASPECT

4:3 LETTER BOX


TV ASPECT


4:3 LETTER BOX

STILL MODE

AUTO


ENTER


4:3 PAN & SCAN

PROGRESSIVE

OFF


16:9 WIDE


STILL MODE: (Default: AUTO) See Hint on the right.

TV ASPECT

4:3 LETTER BOX

STILL MODE

AUTO

STILL MODE

AUTO


FIELD

PROGRESSIVE

OFF

ENTER

FRAME


Select the desired setting.

or

Select the desired setting.

or

ENTER

ENTER

6 To exit the TV ASPECT or STILL MODE screen

SETUP

To complete the PROGRESSIVE setting

ENTER

Hint

TV ASPECT:

• Select “4:3 LETTER BOX”,

so that black bars may

• You can set “PROGRESSIVE”

to “OFF” in the DISPLAY menu

or press and hold [PLAY B]

on the front of the unit for

more than 5 seconds during

playback, until the P-SCAN

indicator light on the front

panel turns off.

• When “PROGRESSIVE”

is “ON”, video signals from

the unit’s VIDEO OUT and

PROGRESSIVE: QUICK

(Default: OFF)

See Hint on the left.

TV ASPECT

4:3 LETTER BOX


4:3 LETTER BOX

STILL MODE

AUTO


AUTO

PROGRESSIVE

OFF


ON

ENTER

SETUP

appear on the top and

bottom of the screen.

• Select “4:3 PAN & SCAN”

for a full height picture with

both sides adjusted.

• Select “16:9 WIDE” if a

wide-screen TV is

connected to this unit.

STILL MODE:

• Select “AUTO” usually.

• If you select “AUTO”,

automatically select the best

resolution setting (FRAME

or FIELD) based on the

S-VIDEO OUT jacks will be

distorted or not be output at all.

Hint

In QUICK SETUP Menu, “PLAYER MENU”, “TV ASPECT” “PROGRESSIVE”, or “DOLBY DIGITAL” are available. QUICK SETUP Menu consists of the setting menus frequently used, and they are accompanied with QUICK mark, You can make all settings in CUSTOM Menu.

If there is no picture or you do not press any buttons for 15 seconds, Progressive scan will switch to “OFF” and it will exit the setup menu.

Before proceeding…

1.Make sure your TV has progressive scan.

2.Connect with component video cable

NOTE: If there is no picture or picture is distorted after selecting ‘YES’,

wait about 15 seconds for auto recovery.

Activate Progressive?

NO


YES

SELECT: K / L

SET:ENTER


Confirm again to use progressive scan. If Picture is good, select ‘YES’.

NO

YES

SELECT: K / L SET:ENTER

Select “Yes”.

or

ENTER

Select “Yes”.

or

data characteristics of the

pictures. (default)

• If you select “FIELD”, the

picture in the still mode will

be stabilized.

• If you select “FRAME”, the

picture in the still mode will

be highly defined.

• An individual picture on the

TV screen is called a “frame”,

which consists of two separate

images called as “field”.

• Some pictures may be

blurred if you select “AUTO”

in the still mode due to their

date characteristics.

Functions

C AUDIO Setting

Choose the appropriate audio settings for your equipment. It only affects during the playback of DVD discs. Follow steps 1 to 3 in the “CUSTOM Menu” section on page 20.

DVD

4 Select the desired item.

or

AUDIO menu

SETUP

AUDIO


DRC


ON

DOWN SAMPLING

ON

DOLBY DIGITAL

BITSTREAM


Hint

In QUICK SETUP Menu, “PLAYER MENU”, “TV ASPECT” “PROGRESSIVE”, or “DOLBY DIGITAL” are available. QUICK SETUP Menu consists of the setting menus frequently used, and they are accompanied with QUICK mark, You can make all settings in CUSTOM Menu.

5

DRC (Dynamic Range Control):

(Default: ON)


Set to “ON” to compress the range between soft and loud sounds.


DRC

ON


OFF


DOWN SAMPLING

ON


ON


DOLBY DIGITAL

BITSTREAM


BITSTREAM


ENTER


DOWN SAMPLING:


(Default: ON)


Set to “ON” when outputting in 48kHz.

Set to “OFF” when outputting the original sound.


DRC

ON


ON


DOWN SAMPLING

ON


OFF


DOLBY DIGITAL

BITSTREAM


BITSTREAM


ENTER


DOLBY DIGITAL: QUICK

(Default: BITSTREAM)

Set to “BITSTREAM” when the unit is connected to a Dolby Digital decoder.

BITSTREAM: outputs Dolby Digital Signals.

PCM: converts the Dolby Digital into PCM (2 channel).

DRC

ON


ON

DOWN SAMPLING

ON


ON

DOLBY DIGITAL

BITSTREAM


PCM

ENTER

6 To exit the menu

SETUP

Hint

DRC:

• This function is available

only on the discs which are recorded in the Dolby Digital format.

DOWN SAMPLING:

When playing back a 96kHz disc with the copy- right protection, or when Virtual Surround is set to “1” or “2”, the sound will be down sampled at 48kHz and output as digital audio even if the “DOWN SAM- PLING” is set to “OFF”.

This function is available only on digital output- ting of a disc recorded in 96kHz.

– 21 –

EN

Page 21
Image 21
Philco PVD2000 manual Display Setting, Audio Setting, Audio menu

PVD2000 specifications

The Philco PVD2000 is a state-of-the-art programmable digital video recorder that combines cutting-edge technology with user-friendly features. Designed for modern viewing habits, it offers an extensive range of functionalities tailored to enhance the television experience.

At the core of the PVD2000 is its robust storage capability, which enables users to record their favorite shows and movies with ease. Featuring a whopping 500GB hard drive, this device allows for extensive recording time, making it ideal for households with diverse viewing preferences. Users can record multiple shows simultaneously, thanks to its twin tuners, allowing for uninterrupted viewing, even during conflicting broadcasts.

One of the standout features of the Philco PVD2000 is its program guide, which provides detailed information about upcoming shows and movies. This intuitive interface allows users to schedule recordings with just a few clicks, ensuring that they never miss their favorite content. The PVD2000 supports series recording, so users can automatically record all episodes of a selected show without the need for manual input every time.

In terms of technology, the PVD2000 utilizes advanced compression algorithms, enabling it to maximize storage efficiency without compromising video quality. The device supports Full HD 1080p output, providing stunning picture clarity and vibrant colors, making it perfect for high-definition television sets.

Connectivity is another strong suit of the Philco PVD2000. It is equipped with multiple HDMI ports, USB connections, and an Ethernet port, allowing for seamless integration with other devices and smart TVs. This connectivity also enables users to access on-demand streaming services, bringing a world of content right to their living room.

Furthermore, the PVD2000 includes features such as pause live TV, rewind, and fast-forward capabilities, giving viewers full control over their viewing experience. Its sleek design and compact form factor make it a stylish addition to any entertainment setup.

Overall, the Philco PVD2000 stands out as a versatile and efficient digital video recorder that caters to the needs of contemporary viewers. With its extensive features, impressive storage capacity, and high-quality output, it is an essential device for anyone looking to elevate their television experience. Whether for binge-watching series or catching up on missed broadcasts, the PVD2000 is sure to impress.