BASIC TV AND REMOTE OPERATION
TELEVISION
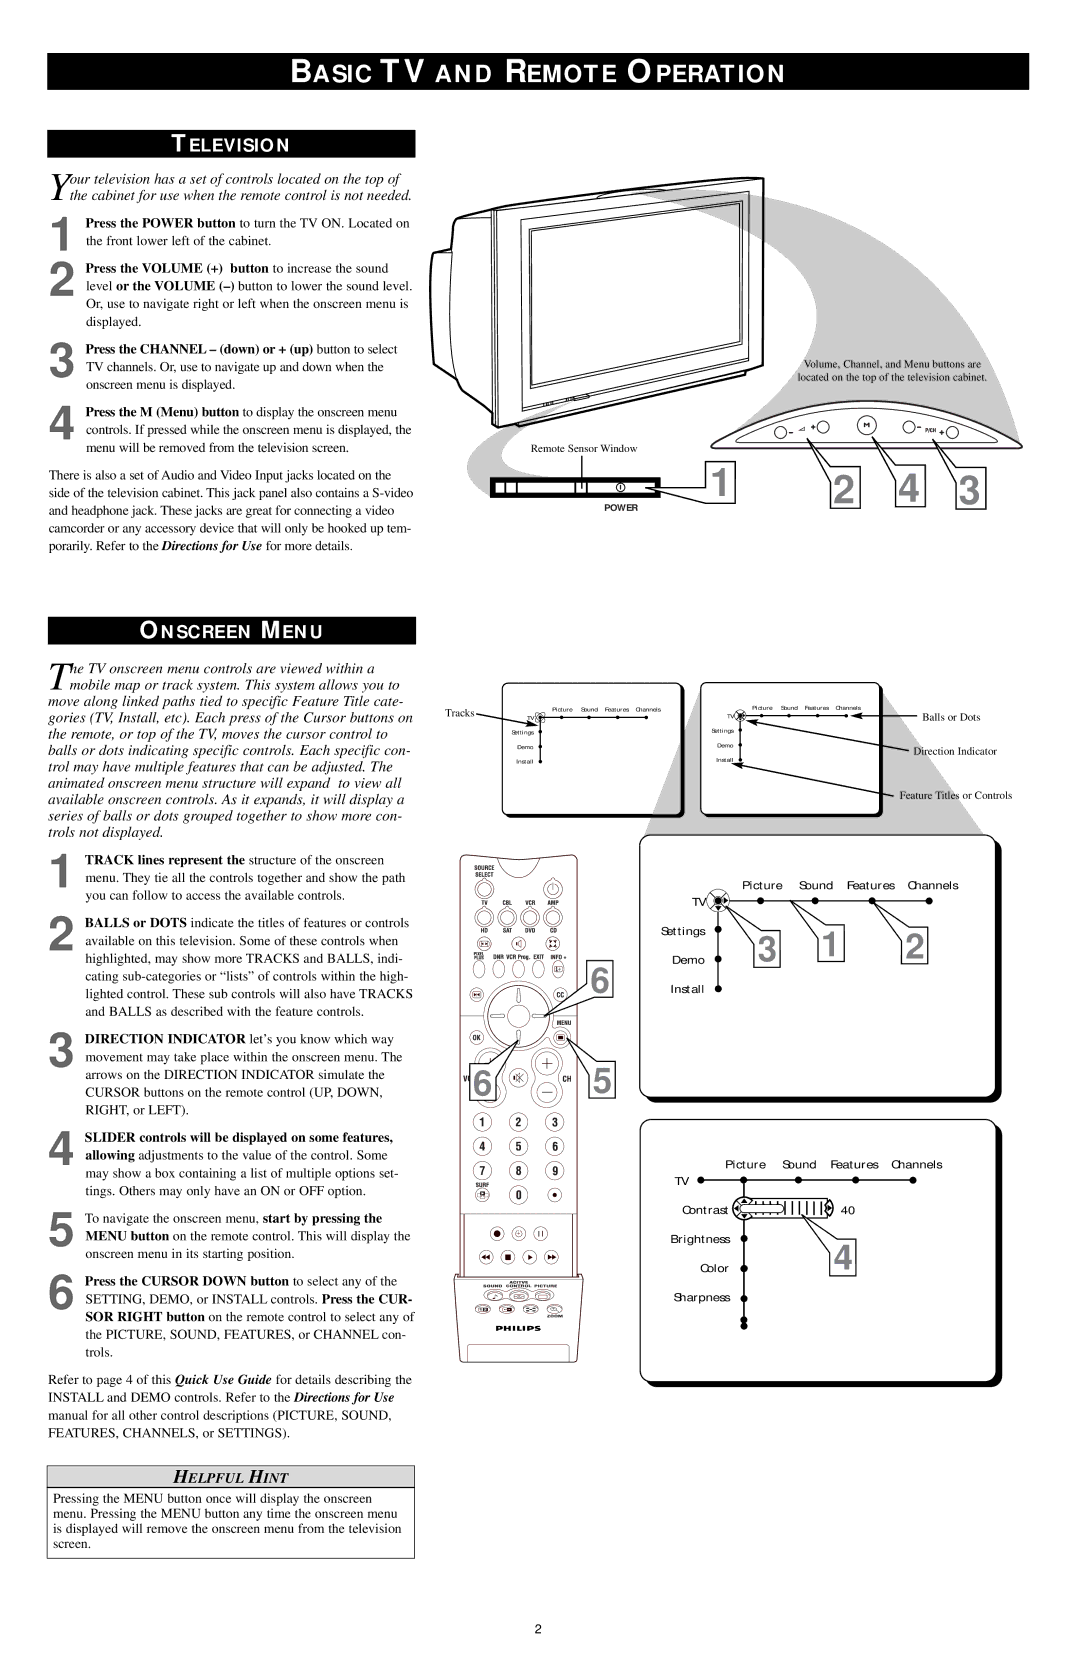
Your television has a set of controls located on the top of the cabinet for use when the remote control is not needed.
1 Press the POWER button to turn the TV ON. Located on the front lower left of the cabinet.
2 Press the VOLUME (+) button to increase the sound level or the VOLUME
3 Press the CHANNEL – (down) or + (up) button to select TV channels. Or, use to navigate up and down when the onscreen menu is displayed.
4 Press the M (Menu) button to display the onscreen menu controls. If pressed while the onscreen menu is displayed, the menu will be removed from the television screen.
There is also a set of Audio and Video Input jacks located on the side of the television cabinet. This jack panel also contains a
ONSCREEN MENU
The TV onscreen menu controls are viewed within a mobile map or track system. This system allows you to
move along linked paths tied to specific Feature Title cate- gories (TV, Install, etc). Each press of the Cursor buttons on the remote, or top of the TV, moves the cursor control to balls or dots indicating specific controls. Each specific con- trol may have multiple features that can be adjusted. The animated onscreen menu structure will expand to view all available onscreen controls. As it expands, it will display a series of balls or dots grouped together to show more con- trols not displayed.
1 TRACK lines represent the structure of the onscreen menu. They tie all the controls together and show the path you can follow to access the available controls.
2 BALLS or DOTS indicate the titles of features or controls available on this television. Some of these controls when highlighted, may show more TRACKS and BALLS, indi- cating
3 DIRECTION INDICATOR let’s you know which way movement may take place within the onscreen menu. The arrows on the DIRECTION INDICATOR simulate the CURSOR buttons on the remote control (UP, DOWN, RIGHT, or LEFT).
4 SLIDER controls will be displayed on some features, allowing adjustments to the value of the control. Some
may show a box containing a list of multiple options set- tings. Others may only have an ON or OFF option.
5 To navigate the onscreen menu, start by pressing the MENU button on the remote control. This will display the onscreen menu in its starting position.
6 Press the CURSOR DOWN button to select any of the SETTING, DEMO, or INSTALL controls. Press the CUR- SOR RIGHT button on the remote control to select any of the PICTURE, SOUND, FEATURES, or CHANNEL con- trols.
Refer to page 4 of this Quick Use Guide for details describing the INSTALL and DEMO controls. Refer to the Directions for Use manual for all other control descriptions (PICTURE, SOUND, FEATURES, CHANNELS, or SETTINGS).
Volume, Channel, and Menu buttons are located on the top of the television cabinet.
Remote Sensor Window
POWER | 1 | 2 4 3 |
Tracks | Picture Sound Features Channels | Picture | Sound Features Channels | |
TV | TV | Balls or Dots | ||
| ||||
| Settings | Settings |
| |
| Demo | Demo | Direction Indicator | |
| Install | Install | ||
|
|
Feature Titles or Controls
| TV | Picture | Sound | Features | Channels |
|
|
|
|
| |
| Settings | 3 | 1 |
| 2 |
6 | Demo |
| |||
Install |
|
|
|
|
6 ![]()
![]()
![]() 5
5
Picture Sound Features Channels
TV
Contrast ![]()
![]()
![]()
![]()
![]()
![]()
![]()
![]()
![]()
![]()
![]()
![]() 40
40
Brightness | 4 |
Color | |
Sharpness |
|
HELPFUL HINT
Pressing the MENU button once will display the onscreen menu. Pressing the MENU button any time the onscreen menu is displayed will remove the onscreen menu from the television screen.
2