REMOTE CONTROL OPERATION
REMOTE CONTROL BATTERIES
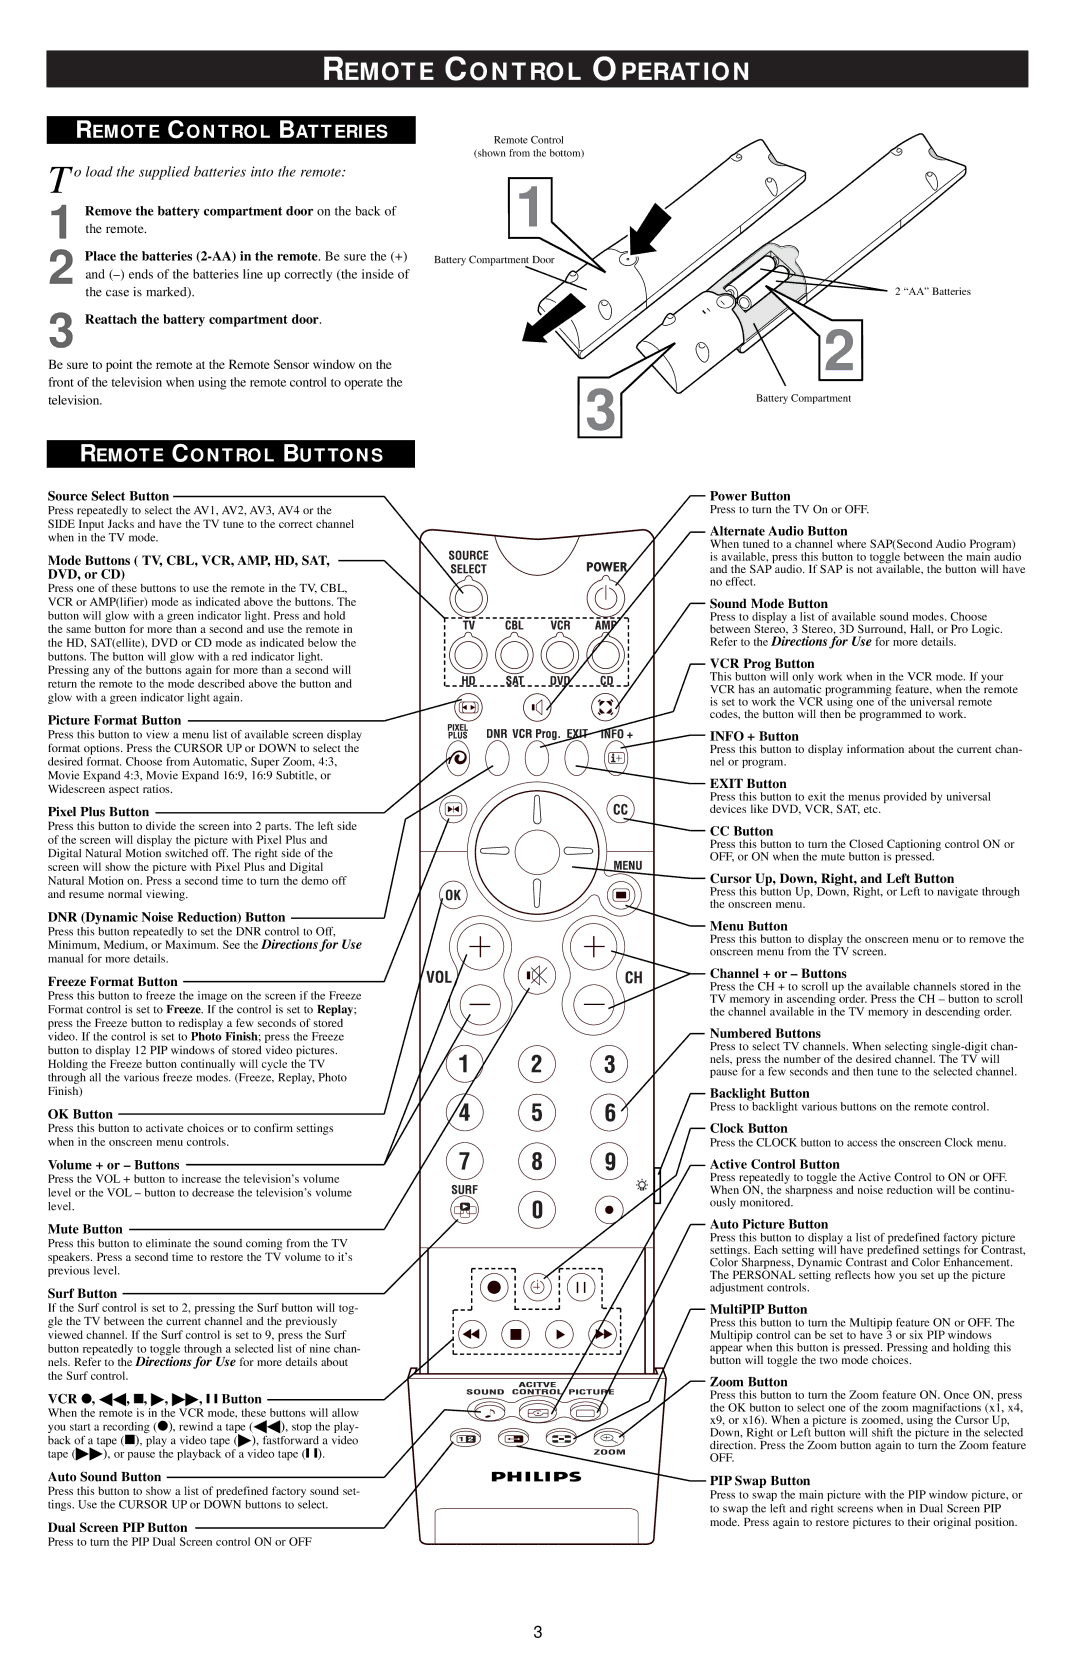
T o load the supplied batteries into the remote:
1 Remove the battery compartment door on the back of the remote.
2 Place the batteries
3 Reattach the battery compartment door.
Be sure to point the remote at the Remote Sensor window on the front of the television when using the remote control to operate the television.
REMOTE CONTROL BUTTONS
Remote Control
(shown from the bottom)
1
Battery Compartment Door
2 “AA” Batteries
2
3 | Battery Compartment |
|
Source Select Button
Press repeatedly to select the AV1, AV2, AV3, AV4 or the SIDE Input Jacks and have the TV tune to the correct channel when in the TV mode.
Mode Buttons ( TV, CBL, VCR, AMP, HD, SAT, DVD, or CD)
Press one of these buttons to use the remote in the TV, CBL, VCR or AMP(lifier) mode as indicated above the buttons. The button will glow with a green indicator light. Press and hold the same button for more than a second and use the remote in the HD, SAT(ellite), DVD or CD mode as indicated below the buttons. The button will glow with a red indicator light. Pressing any of the buttons again for more than a second will return the remote to the mode described above the button and glow with a green indicator light again.
Picture Format Button
Press this button to view a menu list of available screen display format options. Press the CURSOR UP or DOWN to select the desired format. Choose from Automatic, Super Zoom, 4:3, Movie Expand 4:3, Movie Expand 16:9, 16:9 Subtitle, or Widescreen aspect ratios.
Pixel Plus Button
Press this button to divide the screen into 2 parts. The left side of the screen will display the picture with Pixel Plus and Digital Natural Motion switched off. The right side of the screen will show the picture with Pixel Plus and Digital Natural Motion on. Press a second time to turn the demo off and resume normal viewing.
DNR (Dynamic Noise Reduction) Button
Press this button repeatedly to set the DNR control to Off, Minimum, Medium, or Maximum. See the Directions for Use manual for more details.
Freeze Format Button
Press this button to freeze the image on the screen if the Freeze Format control is set to Freeze. If the control is set to Replay; press the Freeze button to redisplay a few seconds of stored video. If the control is set to Photo Finish; press the Freeze button to display 12 PIP windows of stored video pictures. Holding the Freeze button continually will cycle the TV through all the various freeze modes. (Freeze, Replay, Photo Finish)
OK Button
Press this button to activate choices or to confirm settings when in the onscreen menu controls.
Volume + or – Buttons
Press the VOL + button to increase the television’s volume level or the VOL – button to decrease the television’s volume level.
Mute Button
Power Button
Press to turn the TV On or OFF.
Alternate Audio Button
When tuned to a channel where SAP(Second Audio Program) is available, press this button to toggle between the main audio and the SAP audio. If SAP is not available, the button will have no effect.
Sound Mode Button
Press to display a list of available sound modes. Choose between Stereo, 3 Stereo, 3D Surround, Hall, or Pro Logic. Refer to the Directions for Use for more details.
VCR Prog Button
This button will only work when in the VCR mode. If your VCR has an automatic programming feature, when the remote is set to work the VCR using one of the universal remote codes, the button will then be programmed to work.
INFO + Button
Press this button to display information about the current chan- nel or program.
EXIT Button
Press this button to exit the menus provided by universal devices like DVD, VCR, SAT, etc.
 CC Button
Press this button to turn the Closed Captioning control ON or
OFF, or ON when the mute button is pressed.
![]() Cursor Up, Down, Right, and Left Button
Cursor Up, Down, Right, and Left Button
Press this button Up, Down, Right, or Left to navigate through the onscreen menu.
Menu Button
Press this button to display the onscreen menu or to remove the onscreen menu from the TV screen.
Channel + or – Buttons
Press the CH + to scroll up the available channels stored in the TV memory in ascending order. Press the CH – button to scroll the channel available in the TV memory in descending order.
Numbered Buttons
Press to select TV channels. When selecting
Backlight Button
Press to backlight various buttons on the remote control.
Clock Button
Press the CLOCK button to access the onscreen Clock menu.
Active Control Button
Press repeatedly to toggle the Active Control to ON or OFF. When ON, the sharpness and noise reduction will be continu- ously monitored.
Auto Picture Button
Press this button to eliminate the sound coming from the TV speakers. Press a second time to restore the TV volume to it’s previous level.
Surf Button
If the Surf control is set to 2, pressing the Surf button will tog- gle the TV between the current channel and the previously viewed channel. If the Surf control is set to 9, press the Surf button repeatedly to toggle through a selected list of nine chan- nels. Refer to the Directions for Use for more details about the Surf control.
VCR ●, , ■, , , ❙ ❙ Button
When the remote is in the VCR mode, these buttons will allow
you start a recording (●), rewind a tape ( ), stop the play- back of a tape (■), play a video tape ( ), fastforward a video
tape ( ), or pause the playback of a video tape (❙ ❙).
Auto Sound Button
Press this button to show a list of predefined factory sound set- tings. Use the CURSOR UP or DOWN buttons to select.
Dual Screen PIP Button
Press to turn the PIP Dual Screen control ON or OFF
3 |
Press this button to display a list of predefined factory picture settings. Each setting will have predefined settings for Contrast, Color Sharpness, Dynamic Contrast and Color Enhancement. The PERSONAL setting reflects how you set up the picture adjustment controls.
MultiPIP Button
Press this button to turn the Multipip feature ON or OFF. The Multipip control can be set to have 3 or six PIP windows appear when this button is pressed. Pressing and holding this button will toggle the two mode choices.
Zoom Button
Press this button to turn the Zoom feature ON. Once ON, press the OK button to select one of the zoom magnifactions (x1, x4, x9, or x16). When a picture is zoomed, using the Cursor Up, Down, Right or Left button will shift the picture in the selected direction. Press the Zoom button again to turn the Zoom feature OFF.
PIP Swap Button
Press to swap the main picture with the PIP window picture, or to swap the left and right screens when in Dual Screen PIP mode. Press again to restore pictures to their original position.