Connecting a VCR and Cable Box

NOTE: A cable box with AUDIO OUT jacks such as the one used in the example on this page might pass stereo sound to the TV. Check with your cable TV company. The RF jack out- put jack on a cable box (commonly labeled “OUT TO TV,” “OUTPUT,” or “OUT”) will not pass stereo sound to your TV.

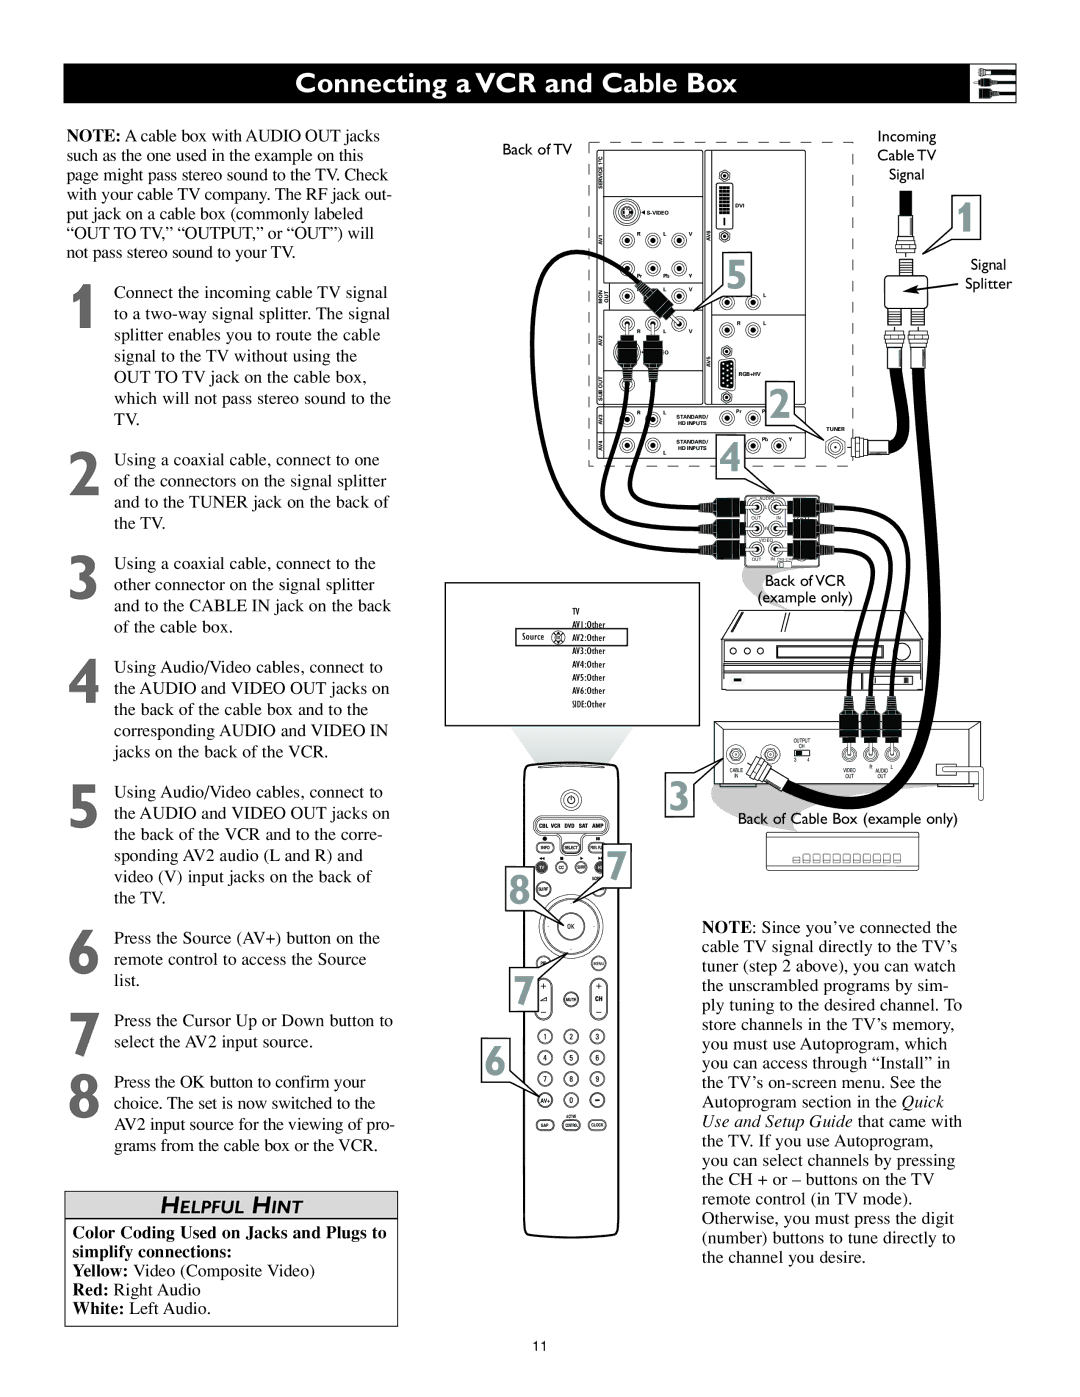
1 Connect the incoming cable TV signal to a two-way signal splitter. The signal splitter enables you to route the cable signal to the TV without using the OUT TO TV jack on the cable box, which will not pass stereo sound to the TV.

2 Using a coaxial cable, connect to one of the connectors on the signal splitter

Back of TV

C


2


SERVICE 1


DVI


G S-VIDEO


AV1

R

L

V

AV6


Pr

Pb

Y


5


MON

OUT

L

V


L


R

L


AV2

R

L

V


AV5


AV3 SUB OUT


RGB+HV


R

L

STANDARD/

Pr

2


HD INPUTS


4


TUNER

AV4


STANDARD/

Pb

Y

R

L

HD INPUTS


Incoming

Cable TV

Signal

1

Signal

Splitter

and to the TUNER jack on the back of the TV.

3 Using a coaxial cable, connect to the

AUDIO

L

OUT IN

R

VIDEO

OUT IN CH3 CH4

other connector on the signal splitter and to the CABLE IN jack on the back of the cable box.

4 Using Audio/Video cables, connect to the AUDIO and VIDEO OUT jacks on the back of the cable box and to the corresponding AUDIO and VIDEO IN

TV

AV1:Other

Source OK AV2:Other

AV3:Other

AV4:Other

AV5:Other

AV6:Other

SIDE:Other

Back of VCR

(example only)

jacks on the back of the VCR.

5 Using Audio/Video cables, connect to the AUDIO and VIDEO OUT jacks on the back of the VCR and to the corre- sponding AV2 audio (L and R) and video (V) input jacks on the back of the TV.

OUTPUT


CH


3

4


CABLE

VIDEO

R AUDIO L

IN

OUT

OUT

3

Back of Cable Box (example only)

INFO


SELECT

PIXEL

TV

CC

SURR

HD 7

8 SURF


6 Press the Source (AV+) button on the remote control to access the Source list.

7 Press the Cursor Up or Down button to select the AV2 input source.

8 Press the OK button to confirm your choice. The set is now switched to the AV2 input source for the viewing of pro- grams from the cable box or the VCR.

HELPFUL HINT

Color Coding Used on Jacks and Plugs to simplify connections:

Yellow: Video (Composite Video)

Red: Right Audio

White: Left Audio.

PIP

7 MUTE

6

AV+

ACTIVE

SAP CONTROL CLOCK

NOTE: Since you’ve connected the cable TV signal directly to the TV’s tuner (step 2 above), you can watch the unscrambled programs by sim- ply tuning to the desired channel. To store channels in the TV’s memory, you must use Autoprogram, which you can access through “Install” in the TV’s on-screen menu. See the Autoprogram section in the Quick Use and Setup Guide that came with the TV. If you use Autoprogram, you can select channels by pressing the CH + or – buttons on the TV remote control (in TV mode). Otherwise, you must press the digit (number) buttons to tune directly to the channel you desire.

11

Page 11
Image 11
Philips 55PL9774, 62PL9774 setup guide Connecting a VCR and Cable Box

62PL9774, 55PL9774 specifications

The Philips 55PL9774 and 62PL9774 are standout models in the Philips television lineup, combining advanced technology with a sleek design to enhance the viewing experience. Both models are part of Philips' commitment to providing high-quality displays that cater to the needs of modern viewers.

One of the most notable features of the Philips 55PL9774 and 62PL9774 is their stunning 4K Ultra HD resolution. With a resolution of 3840 x 2160 pixels, viewers can enjoy crisp, clear images that bring content to life. The impressive pixel density ensures that even the finest details are rendered with remarkable clarity, making these televisions ideal for everything from movie nights to gaming.

In addition to their impressive resolution, both models incorporate Philips' Ambilight technology. This unique feature uses LED lights placed on the back of the TV to create an immersive lighting experience that extends the screen's colors into the surrounding environment. This not only enhances the overall viewing experience but also transforms any room into a dynamic, cinematic space.

Both the 55PL9774 and 62PL9774 support HDR (High Dynamic Range) for vivid colors and improved contrast. With HDR, darker scenes reveal hidden details, while bright scenes burst with color, offering an unparalleled level of visual fidelity. This feature is particularly beneficial for content that is designed with HDR in mind, like modern films and video games.

The audio experience is also noteworthy, as both models come equipped with high-quality sound systems that provide rich and immersive audio. The integration of Dolby Atmos technology enhances the soundstage, allowing viewers to feel as though they are part of the action. Whether you’re watching the latest blockbuster or listening to music, the auditory experience is designed to complement the stunning visuals.

Connectivity is a strong suit for both models. They support multiple HDMI and USB ports, as well as wireless connectivity options such as Wi-Fi and Bluetooth. This makes it easy to connect various devices like gaming consoles, streaming boxes, and sound systems, ensuring that users can enjoy a seamless entertainment setup.

In summary, the Philips 55PL9774 and 62PL9774 offer a all-around superior viewing experience, with their 4K resolution, Ambilight technology, HDR support, and immersive audio capabilities. These features, combined with robust connectivity options, make them excellent choices for anyone looking to elevate their home entertainment setup.