N E R ’ S M a N U a L
Warranty Verification
Safety Instructions Read before operating equipment
Table of Contents
Features
Standard TV broadcast VHF/UHF or Cable TV
Picture Menu Control Adjustments
HOW to Select Features With Buttons on the Remote
COLOR, Brightness SHARPNESS, TINT, Picture
Picture Menu Controls
Select Clearview control
If there is RED or Blue color
RED/BLUE Convergence
Select Convergence
Press the Menu Buttons
Correction control
Flesh Correction
Select Flesh
Press the Menu buttons
Select Picture Source Select control
Feature Menu Control Adjustments
Picture Source
Press the Menu buttons to move the RED highlight. Press
Select Closed Captioning control
Feature Menu Controls
Closed Caption
Text 1, 2, 3
CABLE- If you do have
Cable Tuning
Select Cable Channel Tuning control
Cable TV connected to the TV. Channels 1-125 available
Press the Menu button to turn
Channel Memory AUTO-PROGRAMMING
Select Channel Memory
Press the Status or Menu M
ADD/DELETE Channels
Select Channel Memory ADD/DELETE Channels control
SET Clock
Select SET Clock control
Press the remotes number
SET on Timer
Select SET on Timer control
Screen
Press the Sleep button
Sleep Timer
Press the Sleep button on
Press the Status or Menu
Half Hour Reminder
Channel Display
Select Channel Display control
Select Half Hour Reminder control
Parental Control
Next Enter Your New Access Code shows on the screen
Enter a new four digit number code using the remote
Select the Parental Control
Select the Block Channels control
More
Press the Menu
Channel Labels
Do you ever have trouble remembering on which
Menu M buttons to highlight
Language
Select the Language
Display control
Sound Menu Control Adjustments
BASS, TREBLE, Balance
Bass Boost
Select Stereo sound control
Sound Menu Controls
Stereo
Press the Status button to clear
Incredible Stereo
Display Volume
Select Display Volume control
Select Incredible Stereo control
Turn OFF the TV
TV Speakers
Option
Speakers control
Surround Sound
Place the speakers so
Variable Audio Output
Connect the Video OUT jack from the VCR to the AUX
Using the AUDIO/VIDEO Input Jacks
VCR/AUX Inputs
Connect the Audio OUT jacks Right and Left from
AUX 3 Inputs
Camcorder to the Front Audio in jacks on the TV
Select the AUX Picture Source Select control on the TV
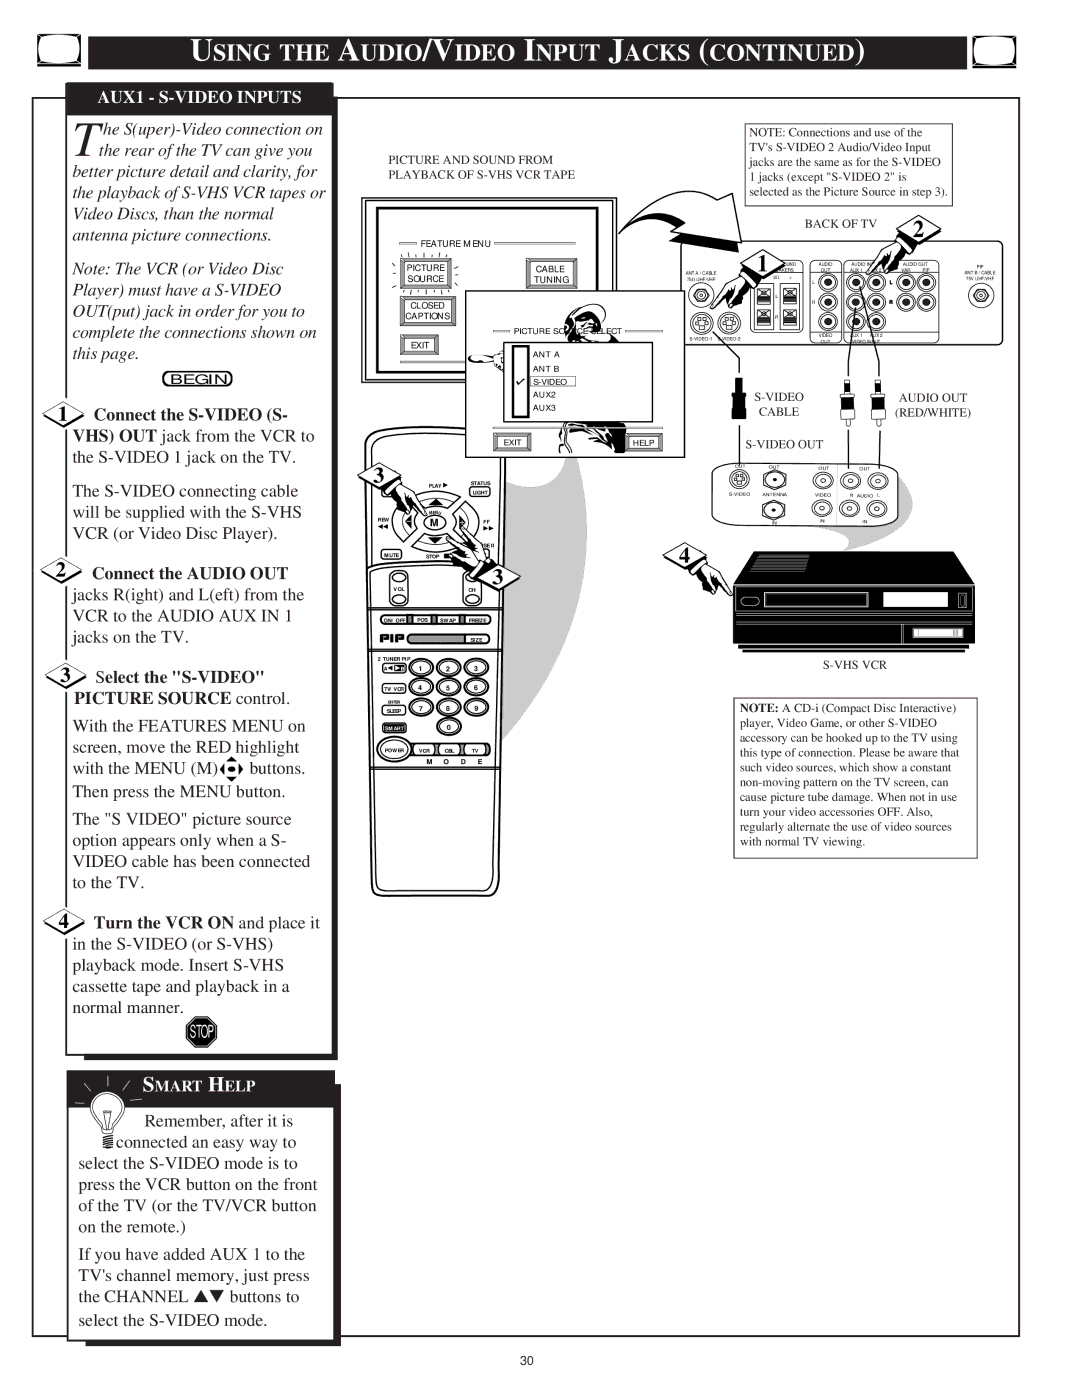
AUX1 S-VIDEO Inputs
Using the AUDIO/VIDEO Output Jacks
AUDIO/VIDEO Outputs
Connect the Video OUT jack
Remote Control Operation
Smart Picture
Previous
Press the Smart button on the remote
Change Label
Press the Status button to clear the screen when completed
Smart Sound
Channel for viewing. You can use
With the Smart Surf control
On see above, select a desired
Number buttons on the remote or
Setting the Remote to Work Vcrs
Within thirty seconds after
Please read through steps Before beginning
Press and release the REC
Release the VCR System
Setting the Remote to Work Cable TV Converters
Cable Converter
Release the CBL System
Button, Enter the TWO
Point the remote at
Setting Your Remote to Work VCRS, Converters Search
Please read through steps 1-4 before beginning
Using the Remotes VCR Buttons
Rewind Button
HOW to USE the PICTURE-IN-PICTURE PIP Feature
Connect your Antenna or
Connect the twin Output
Select control to ANT B
Turn the TV on
Place the TVs PIP Source
Press the Menu
PIP on / OFF PIP Position PIP Swap
Using PIP with the Remote Control
Press the PIP ON/OFF button to show the PIP picture
PIP Freeze
Select PIP Source control
Selecting the Picture Source for PIP
PIP Source
Menu M buttons to highlight
Select PIP Color or PIP
Adjusting Picture -IN -PICTURE Color and Tint
PIP Color / PIP Tint
Press the + and buttons to
Connect the Cable OUT on
First use an optional signal
More PIP Connections
Connect the Video OUT
Select Help on the TVs Main Menu Press the remotes Menu
TV Help Menu
He on screen Help menu offers both Operating Tips
Follow the on Screen Directions to View Operating Tips
TV Displays Wrong Channel or No Channels Above
Tips if Something Isnt Working
Glossary to Television Terms
Index
Philips Consumer Electronics Company
Georgia North Carolina Illinois
Page
Page
Limited Warranty
3135 015
Page
Optional Accessory Storage Shelf and Screen Filter