Portable Radio
AE2110 AE2150
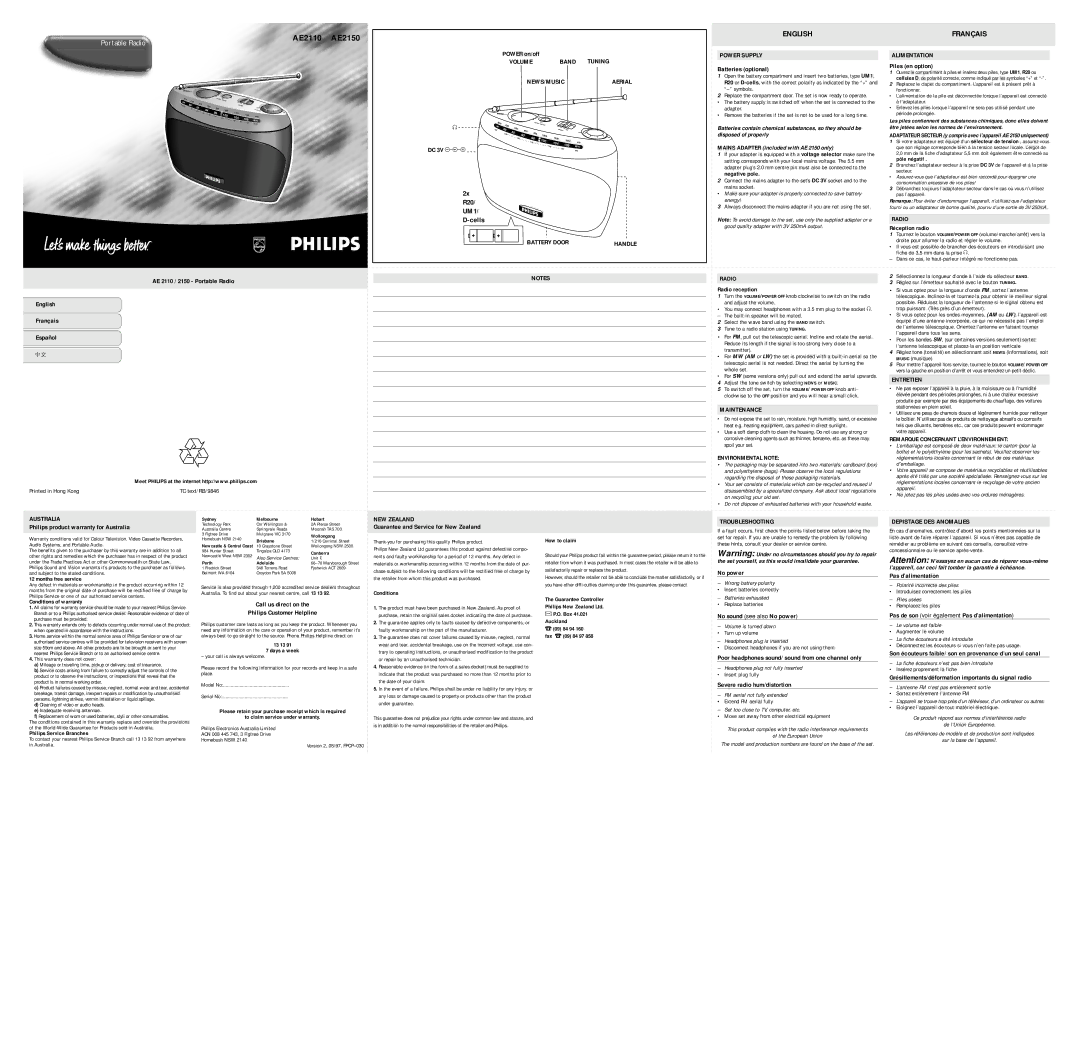
POWER on/off | BAND TUNING |
VOLUME |
ENGLISH
POWER SUPPLY
Batteries (optional)
FRANÇAIS
ALIMENTATION
Piles (en option)
1 Ouvrez le compartiment à piles et insérez deux piles, type UM1, R20 ou |
POWER | OFF |
M | W | 5 |
|
|
|
|
|
|
|
|
| NEEWS | MUUSII |
|
|
|
|
|
|
|
|
|
|
|
|
| |||
FM |
|
|
|
|
|
|
|
|
|
|
|
|
|
| C |
|
|
|
| FFM |
|
|
|
|
|
| |||
| 20 |
| 53 | 0 |
|
|
|
|
|
|
|
|
|
|
|
|
|
|
|
|
|
|
|
| |||||
Sc |
| 8 |
|
|
| 65 |
|
|
|
|
|
|
|
|
|
|
| BANA |
| MA | MW |
|
|
| |||||
|
|
|
|
|
|
|
|
|
|
|
|
|
|
|
|
|
|
|
|
|
| ||||||||
ale |
| 8 |
|
|
|
|
|
|
|
|
|
|
|
|
|
|
|
|
|
| ND |
|
|
|
|
| |||
|
|
|
| 9 |
|
|
|
|
| 0 |
| 8 |
|
|
|
|
|
|
|
|
|
|
|
|
|
|
|
|
|
|
|
|
|
|
|
|
|
|
|
|
|
|
|
|
|
|
|
|
|
|
|
|
|
|
|
|
| ||
|
| 10 | • | 2 |
|
| 94 |
|
| 00 |
|
| 1000 |
|
|
|
|
|
|
|
| TTU | |||||||
|
| • • 20 |
|
|
|
|
|
|
|
|
|
|
|
|
|
|
|
| |||||||||||
|
|
|
| • | • | • |
|
| 96 |
|
|
|
| 1300 |
|
|
|
| UNNIINNG | ||||||||||
|
|
|
|
|
| • |
|
|
|
|
|
|
|
|
|
|
|
|
|
|
|
|
| ||||||
|
|
|
|
|
|
| 30 | • • | 40 | • |
|
| 10 | 0 |
|
|
| 1600 |
|
|
| ||||||||
|
|
|
|
|
|
|
|
| • • 5 | • • | • |
|
| 10 |
|
| MHz | ||||||||||||
|
|
|
|
|
|
|
|
|
|
|
| 0 | 60 | • • | • | 70 |
| 4 |
| 108 | |||||||||
|
|
|
|
|
|
|
|
|
|
|
|
|
|
| • | • • 80 |
|
| MHz | ||||||||||
|
|
|
|
|
|
|
|
|
|
|
|
|
|
|
|
|
|
|
| • | • | • 90 | • | • | 100 | ||||
|
|
|
|
|
|
|
|
|
|
|
|
|
|
|
|
|
|
|
|
|
|
|
| • | Scale | ||||
p
DC 3V ->+
|
|
|
|
|
|
|
|
|
|
|
| NEWS/MUSIC |
|
| AERIAL | |||||||||||||||
| PO |
|
|
|
|
|
|
|
|
|
|
|
|
|
|
|
|
|
|
|
|
|
|
|
|
|
|
|
|
|
| WER OF F |
|
|
|
|
|
|
|
|
|
|
|
|
|
|
|
|
|
|
|
|
|
|
|
|
|
|
| ||
| MW |
|
|
|
|
|
|
|
|
|
|
|
|
|
| NE | WS | MUSIC |
|
|
|
|
|
|
|
|
|
| ||
| 52 | 0 |
|
|
|
|
|
|
|
|
|
|
|
|
|
|
|
|
|
|
|
|
|
|
| |||||
FM |
|
|
|
|
|
|
|
|
|
|
|
|
|
|
|
|
|
|
|
|
|
|
|
| ||||||
| 530 |
|
|
|
|
|
|
|
|
|
|
|
|
|
|
|
| FM |
|
|
|
|
| |||||||
68 |
|
|
|
|
|
|
|
|
|
|
|
|
|
|
|
|
|
|
|
|
|
| ||||||||
LW |
|
|
|
|
|
|
|
|
|
|
|
|
|
|
|
|
|
|
| BAND |
|
| LW |
| ||||||
|
| 8 | 8 |
|
|
| 650 |
|
|
|
|
|
|
|
|
|
|
|
|
| M W |
| ||||||||
|
| 1 |
|
|
|
|
|
|
| 80 | 0 |
|
|
|
|
|
|
|
|
|
|
|
| |||||||
|
| 49 | • |
|
| 92 |
|
|
|
|
|
|
|
|
|
|
|
|
|
|
|
| ||||||||
|
|
| • • • |
|
|
|
|
|
| 96 | 1000 |
|
|
|
|
|
|
|
|
| ||||||||||
|
|
|
|
| • | • | 150 |
|
|
|
|
|
|
| 1300 |
|
|
|
|
| ||||||||||
|
|
|
|
|
| • • |
|
|
|
|
|
| 100 |
|
|
|
|
|
|
|
| |||||||||
|
|
|
|
|
|
|
| • | • | • | • |
|
|
|
|
|
|
| 1 | 600 |
| |||||||||
|
|
|
|
|
|
|
|
|
| 170 |
|
|
|
|
|
| 104 |
|
| kHz | ||||||||||
|
|
|
|
|
|
|
|
|
|
|
| • | • |
| • • |
|
|
|
|
| ||||||||||
|
|
|
|
|
|
|
|
|
|
|
|
|
|
| • • |
|
|
|
| 109 | ||||||||||
|
|
|
|
|
|
|
|
|
|
|
|
|
|
|
|
| • • | • | 178 |
| MHz | |||||||||
|
|
|
|
|
|
|
|
|
|
|
|
|
|
|
|
|
|
|
| • • | • | • • | • 184 | |||||||
|
|
|
|
|
|
|
|
|
|
|
|
|
|
|
|
|
|
|
|
|
|
|
|
| ||||||
|
|
|
|
|
|
|
|
|
|
|
|
|
|
|
|
|
|
|
|
|
|
|
|
|
|
|
|
|
| kHz |
1Open the battery compartment and insert two batteries, type UM1, R20 or
2Replace the compartment door. The set is now ready to operate.
•The battery supply is switched off when the set is connected to the adapter.
•Remove the batteries if the set is not to be used for a long time.
Batteries contain chemical substances, so they should be disposed of properly
MAINS ADAPTER (included with AE 2150 only)
1If your adapter is equipped with a voltage selector make sure the setting corresponds with your local mains voltage. The 5.5 mm adapter plug’s 2.0 mm centre pin must also be connected to the negative pole.
2Connect the mains adapter to the set’s DC 3V socket and to the mains socket.
cellules D, de polarité correcte, comme indiqué par les symboles “+” et |
2 Replacez le clapet du compartiment. L’appareil est à présent prêt à |
fonctionner. |
•L’alimentation de la pile est déconnectée lorsque l’appareil est connecté à l’adaptateur.
•Enlevez les piles lorsque l’appareil ne sera pas utilisé pendant une période prolongée.
Les piles contiennent des substances chimiques, donc elles doivent être jetées selon les normes de l’environnement.
ADAPTATEUR SECTEUR (y compris avec l’appareil AE 2150 uniquement)
1Si votre adaptateur est équipé d’un sélecteur de tension ,
2Branchez l’adaptateur secteur à la prise DC 3V de l’appareil et à la prise secteur.
•
3 Débranchez toujours l’adaptateur secteur dans le cas où vous n’utilisez |
2x
R20/
UM1/ D-cells
BATTERY DOOR | HANDLE |
•Make sure your adapter is properly connected to save battery energy!
3Always disconnect the mains adapter if you are not using the set.
Note: To avoid damage to the set, use only the supplied adapter or a good quality adapter with 3V 250mA output.
pas l’appareil. |
Remarque: Pour éviter d’endommager l’appareil, n’utilisez que l’adaptateur fourni ou un adaptateur de bonne qualité, pourvu d’une sortie de 3V 250mA.
RADIO
Réception radio
1Tournez le bouton VOLUME/POWER OFF (volume/marche/arrêt) vers la droite pour allumer la radio et régler le volume.
•Il vous est possible de brancher des écouteurs en introduisant une fiche de 3,5 mm dans la prise p.
– Dans ce cas, le
AE 2110 / 2150 - Portable Radio | NOTES |
|
English
Français
Español
∑
Meet PHILIPS at the internet http://www.philips.com
Printed in Hong Kong | TC text/RB/9846 |
RADIO
Radio reception
1Turn the VOLUME/POWER OFF knob clockwise to switch on the radio and adjust the volume.
•You may connect headphones with a 3.5 mm plug to the socket p.
– The
2 Select the wave band using the BAND switch.
3 Tune to a radio station using TUNING.
•For FM, pull out the telescopic aerial. Incline and rotate the aerial. Reduce its length if the signal is too strong (very close to a transmitter).
•For MW (AM or LW) the set is provided with a
•For SW (some versions only) pull out and extend the aerial upwards.
4 Adjust the tone switch by selecting NEWS or MUSIC.
5 To switch off the set, turn the VOLUME/ POWER OFF knob anti- clockwise to the OFF position and you will hear a small click.
MAINTENANCE
•Do not expose the set to rain, moisture, high humidity, sand, or excessive heat e.g. heating equipment, cars parked in direct sunlight.
•Use a soft damp cloth to clean the housing. Do not use any strong or corrosive cleaning agents such as thinner, benzene, etc. as these may spoil your set.
ENVIRONMENTAL NOTE:
•The packaging may be separated into two materials: cardboard (box) and polyethylene (bags). Please observe the local regulations regarding the disposal of these packaging materials.
•Your set consists of materials which can be recycled and reused if disassembled by a specialized company. Ask about local regulations on recycling your old set.
•Do not dispose of exhausted batteries with your household waste.
2Sélectionnez la longueur d’onde à l’aide du sélecteur BAND.
3Réglez sur l’émetteur souhaité avec le bouton TUNING.
•Si vous optez pour la longueur d’onde FM, sortez l’antenne télescopique.
•Si vous optez pour les ondes moyennes, (AM ou LW), l’appareil est équipé d’une antenne incorporée, ce qui ne nécessite pas l’emploi de l’antenne télescopique. Orientez l’antenne en faisant tourner l’appareil dans tous les sens.
•Pour les bandes SW, (sur certaines versions seulement) sortez
l’antenne telescopique et
4Réglez tone (tonalité) en sélectionnant soit NEWS (informations), soit MUSIC (musique).
5Pour mettre l’appareil hors service, tournez le bouton VOLUME/ POWER OFF vers la gauche en position d’arrêt et vous entendrez un petit déclic.
ENTRETIEN
•Ne pas exposer l’appareil à la pluie, à la moisissure ou à l’humidité élevée pendant des périodes prolongées, ni à une chaleur excessive produite par exemple par des équipements de chauffage, des voitures stationnées en plein soleil.
•Utilisez une peau de chamois douce et légèrement humide pour nettoyer le boîtier. N’utilisez pas de produits de nettoyage abrasifs ou corrosifs tels que diluants, benzènes etc., car ces produits peuvent endommager votre appareil.
REMARQUE CONCERNANT L’ENVIRONNEMENT:
•L’emballage est composé de deux matériaux: le carton (pour la boîte) et le polyéthylène (pour les sachets). Veuillez observer les réglementations locales concernant le rebut de ces matériaux d’emballage.
•Votre appareil se compose de matériaux recyclables et réutilisables après été triés par une société spécialisée.
•Ne jetez pas les piles usées avec vos ordures ménagères.
AUSTRALIA
Philips product warranty for Australia
Warranty conditions valid for Colour Television, Video Cassette Recorders, Audio Systems, and Portable Audio.
The benefits given to the purchaser by this warranty are in addition to all other rights and remedies which the purchaser has in respect of the product under the Trade Practices Act or other Commonwealth or State Law.
Philips Sound and Vision warrants it’s products to the purchaser as follows and subject to the stated conditions.
12 months free service
Any defect in materials or workmanship in the product occurring within 12 months from the original date of purchase will be rectified free of charge by Philips Service or one of our authorised service centers.
Conditions of warranty
1.All claims for warranty service should be made to your nearest Philips Service Branch or to a Philips authorised service dealer. Reasonable evidence of date of purchase must be provided.
2.This warranty extends only to defects occurring under normal use of the product when operated in accordance with the instructions.
3.Home service within the normal service area of Philips Service or one of our authorised service centres will be provided for television receivers with screen size 59cm and above. All other products are to be brought or sent to your nearest Philips Service Branch or to an authorised service centre.
4.This warranty does not cover:
a)Mileage or traveling time, pickup or delivery, cost of insurance.
b)Service costs arising from failure to correctly adjust the controls of the product or to observe the instructions, or inspections that reveal that the product is in normal working order.
c)Product failures caused by misuse, neglect, normal wear and tear, accidental breakage, transit damage, inexpert repairs or modification by unauthorised persons, lightning strikes, vermin intestation or liquid spillage.
d)Cleaning of video or audio heads.
e)Inadequate receiving antennae.
f)Replacement of worn or used batteries, styli or other consumables.
The conditions contained in this warranty replace and override the provisions of the
Philips Service Branches
To contact your nearest Philips Service Branch call 13 13 92 from anywhere in Australia.
Sydney | Melbourne | Hobart | |
Technology Park | Cnr Wellington & | 2A Pierce Street | |
Australia Centre | Springvale Roads | Moonah TAS 700 | |
3 Figtree Drive | Mulgrave VIC 3170 | Wollongong | |
Homebush NSW 2140 | Brisbane | ||
1/216 Corrimal Street | |||
Newcastle & Central Coast | |||
10 Graystone Street | Wollongong NSW 2500 | ||
984 Hunter Street | Tingalpa QLD 4173 | Canberra | |
Newcastle West NSW 2302 | Also Service Centres: | ||
Unit F, | |||
Perth | Adelaide | ||
1 Fredrick Street | 348 Torrens Road | Fyshwick ACT 2609 | |
Belmont WA 6104 | Croydon Park SA 5008 |
|
Service is also provided through 1,200 accredited service dealers throughout Australia. To find out about your nearest centre, call 13 13 92.
Call us direct on the
Philips Customer Helpline
Philips customer care lasts as long as you keep the product. Whenever you need any information on the care or operation of your product, remember it’s always best to go straight to the source. Phone Philips Helpline direct on
13 13 91
7 days a week
– your call is always welcome.
Please record the following information for your records and keep in a safe place.
Model No:....................................................
Serial No:....................................................
Please retain your purchase receipt which is required
to claim service under warranty.
Philips Electronics Australia Limited
ACN 008 445 743, 3 Figtree Drive
Homebush NSW 2140
Version 2, 08/97,
NEW ZEALAND
Guarantee and Service for New Zealand
Philips New Zealand Ltd guarantees this product against defective compo- nents and faulty workmanship for a period of 12 months. Any defect in materials or workmanship occurring within 12 months from the date of pur- chase subject to the following conditions will be rectified free of charge by the retailer from whom this product was purchased.
Conditions
1.The product must have been purchased in New Zealand. As proof of purchase, retain the original sales docket indicating the date of purchase.
2.The guarantee applies only to faults caused by defective components, or faulty workmanship on the part of the manufacturer.
3.The guarantee does not cover failures caused by misuse, neglect, normal wear and tear, accidental breakage, use on the incorrect voltage, use con- trary to operating instructions, or unauthorised modification to the product or repair by an unauthorised technician.
4.Reasonable evidence (in the form of a sales docket) must be supplied to indicate that the product was purchased no more than 12 months prior to the date of your claim.
5.In the event of a failure, Philips shall be under no liability for any injury, or any loss or damage caused to property or products other than the product under guarantee.
This guarantee does not prejudice your rights under common law and statute, and is in addition to the normal responsibilities of the retailer and Philips.
How to claim
Should your Philips product fail within the guarantee period, please return it to the retailer from whom it was purchased. In most cases the retailer will be able to satisfactorily repair or replace the product.
However, should the retailer not be able to conclude the matter satisfactorily, or if you have other
The Guarantee Controller
Philips New Zealand Ltd.
4P.O. Box 41.021 Auckland
3 (09) 84 94 160
fax 3 (09) 84 97 858
TROUBLESHOOTING
If a fault occurs, first check the points listed below before taking the set for repair. If you are unable to remedy the problem by following these hints, consult your dealer or service centre.
Warning: Under no circumstances should you try to repair the set yourself, as this would invalidate your guarantee.
No power
–Wrong battery polarity
• Insert batteries correctly
–Batteries exhausted
• Replace batteries
No sound (see also No power)
–Volume is turned down
• Turn up volume
–Headphones plug is inserted
• Disconnect headphones if you are not using them
Poor headphones sound/ sound from one channel only
–Headphones plug not fully inserted
• Insert plug fully
Severe radio hum/distortion
–FM aerial not fully extended
• Extend FM aerial fully
–Set too close to TV, computer, etc.
• Move set away from other electrical equipment
This product complies with the radio interference requirements
of the European Union
The model and production numbers are found on the base of the set.
DEPISTAGE DES ANOMALIES
En cas d’anomalies, contrôlez d’abord les points mentionnées sur la liste avant de faire réparer l’appareil. Si vous n’êtes pas capable de remédier au problème en suivant ces conseils, consultez votre concessionnaire ou le service
Attention: N’essayez en aucun cas de réparer
Pas d’alimentation
– Polarité incorrecte des piles
• Introduisez correctement les piles
– Piles usées
• Remplacez les piles
Pas de son (voir également Pas d’alimentation)
–Le volume est faible
• Augmenter le volume
–La fiche écouteurs a été introduite
• Déconnectez les écouteurs si vous n’en faite pas usage.
Son écouteurs faible/ son en provenance d’un seul canal
–La fiche écouteurs n’est pas bien introduite
• Insérez proprement la fiche
Grésillements/déformation importants du signal radio
–L’antenne FM n’est pas entièrement sortie
• Sortez entièrement l’antenne FM
–L’appareil se trouve trop près d’un téléviseur, d’un ordinateur ou autres
• Eloignez l’appareil de tout matériel électrique.
Ce produit répond aux normes d’interférence radio
de l’Union Européenne.
Les références de modèle et de production sont indiquées
sur la base de l’appareil.