|
|
|
|
|
|
| Recording | General | Troubleshooting |
| |
|
|
|
|
|
|
RECORDING
Copyright:
Recording is permissible insofar as copyright or other rights of third parties are not infringed.
Safeguarding a cassette against erasure: Accidental erasure can be prevented by breaking
MAINTENANCE
Cassette deck
Clean the parts indicated in fig. 5 after every 50 hours of operation or, on average, once a month.
• | Open the cassette holder by pressing EJ 9 #. |
• | Use a cotton boll slightly moistened with |
| alcohol or a special head cleaning fluid. |
If a fault occurs, first check the points listed below before taking the set for repair.
If you are unable to remedy a problem by following these hints, consult your dealer or service center.
WARNING
Under no circumstances should you try to repair the set yourself, as this would
joid the warrenty.
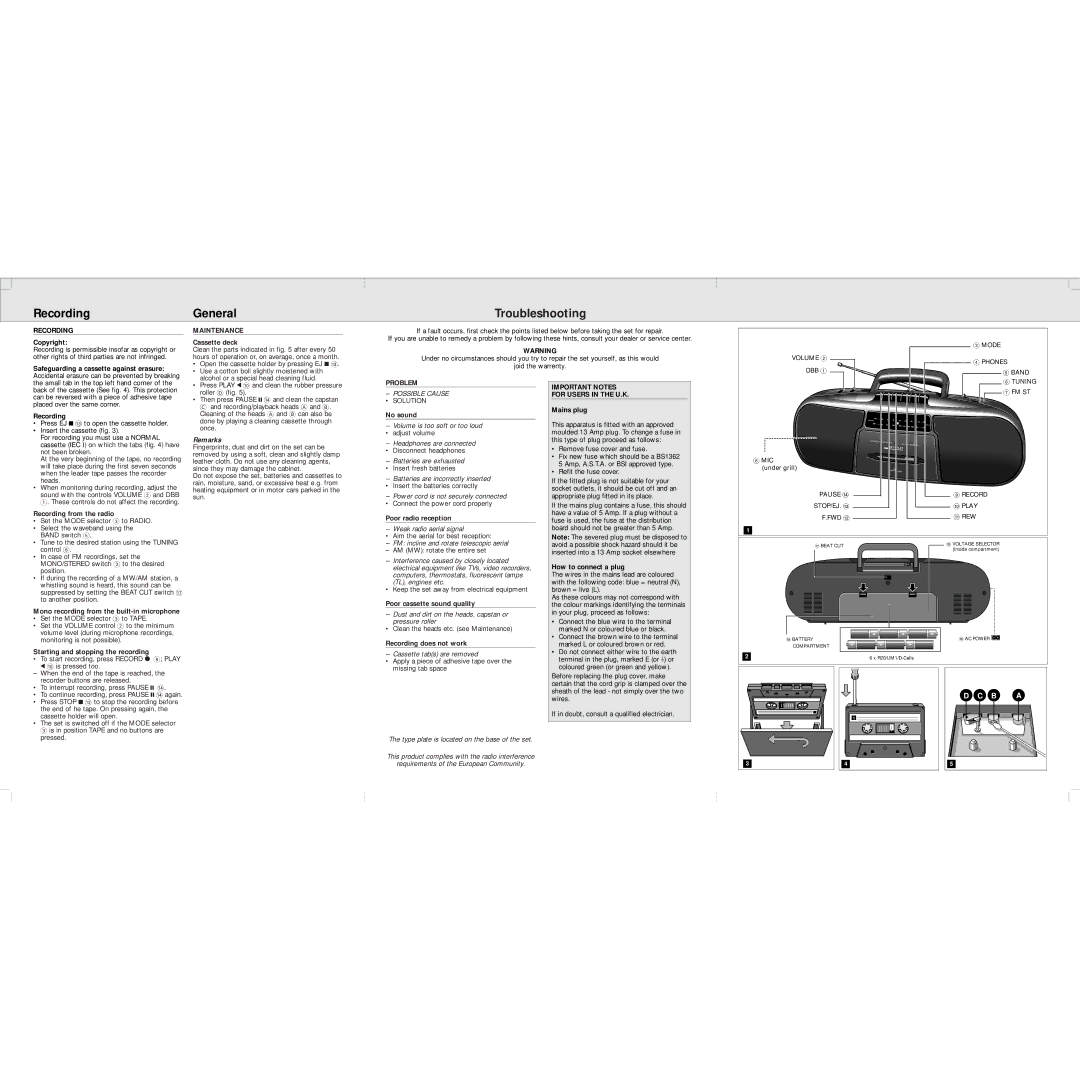
| 3 MODE |
VOLUME 2 | 4 PHONES |
| |
DBB 1 | 5 BAND |
|
the small tab in the top left hand corner of the back of the cassette (See fig. 4). This protection can be reversed with a piece of adhesive tape placed over the same corner.
Recording
•Press EJ 9 # to open the cassette holder.
•Insert the cassette (fig. 3).
For recording you must use a NORMAL cassette (IEC I) on which the tabs (fig. 4) have not been broken.
At the very beginning of the tape, no recording will take place during the first seven seconds when the leader tape passes the recorder heads.
•When monitoring during recording, adjust the sound with the controls VOLUME 2 and DBB 1. These controls do not affect the recording.
Recording from the radio
•Set the MODE selector 3 to RADIO.
•Select the waveband using the BAND switch 5.
•Tune to the desired station using the TUNING control 6.
•In case of FM recordings, set the MONO/STEREO switch 3 to the desired position.
•If during the recording of a MW/AM station, a whistling sound is heard, this sound can be suppressed by setting the BEAT CUT switch & to another position.
Mono recording from the built-in microphone
•Set the MODE selector 3 to TAPE.
•Set the VOLUME control 2 to the minimum volume level (during microphone recordings, monitoring is not possible).
Starting and stopping the recording
•To start recording, press RECORD 0 9; PLAY 1 0 is pressed too.
–When the end of the tape is reached, the recorder buttons are released.
•To interrupt recording, press PAUSE ; $.
•To continue recording, press PAUSE ; $ again.
•Press STOP 9 # to stop the recording before the end of he tape. On pressing again, the cassette holder will open.
•The set is switched off if the MODE selector 3 is in position TAPE and no buttons are pressed.
• Press PLAY 1 0 and clean the rubber pressure |
roller D (fig. 5). |
• Then press PAUSE ; $ and clean the capstan |
C and recording/playback heads A and B. |
Cleaning of the heads A and B can also be |
done by playing a cleaning cassette through |
once. |
Remarks
Fingerprints, dust and dirt on the set can be removed by using a soft, clean and slightly damp leather cloth. Do not use any cleaning agents, since they may damage the cabinet.
Do not expose the set, batteries and cassettes to rain, moisture, sand, or excessive heat e.g. from heating equipment or in motor cars parked in the sun.
PROBLEM
–POSSIBLE CAUSE
• SOLUTION
No sound
–Volume is too soft or too loud
• adjust volume
–Headphones are connected
• Disconnect headphones
–Batteries are exhausted
• Insert fresh batteries
–Batteries are incorrectly inserted
• Insert the batteries correctly
–Power cord is not securely connected
• Connect the power cord properly
Poor radio reception
– Weak radio aerial signal
• Aim the aerial for best reception:
–FM: incline and rotate telescopic aerial
–AM (MW): rotate the entire set
–Interference caused by closely located electrical equipment like TVs, video recorders, computers, thermostats, fluorescent lamps (TL), engines etc.
• Keep the set away from electrical equipment
Poor cassette sound quality
–Dust and dirt on the heads, capstan or pressure roller
• Clean the heads etc. (see Maintenance)
Recording does not work
– Cassette tab(s) are removed
•Apply a piece of adhesive tape over the missing tab space
The type plate is located on the base of the set.
This product complies with the radio interference
requirements of the European Community.
IMPORTANT NOTES
FOR USERS IN THE U.K.
Mains plug
This apparatus is fitted with an approved moulded 13 Amp plug. To change a fuse in this type of plug proceed as follows:
•Remove fuse cover and fuse.
•Fix new fuse which should be a BS1362 5 Amp, A.S.T.A. or BSI approved type.
•Refit the fuse cover.
If the fitted plug is not suitable for your socket outlets, it should be cut off and an appropriate plug fitted in its place.
If the mains plug contains a fuse, this should have a value of 5 Amp. If a plug without a fuse is used, the fuse at the distribution board should not be greater than 5 Amp.
Note: The severed plug must be disposed to avoid a possible shock hazard should it be inserted into a 13 Amp socket elsewhere
How to connect a plug
The wires in the mains lead are coloured with the following code: blue = neutral (N), brown = live (L).
As these colours may not correspond with the colour markings identifying the terminals in your plug, proceed as follows:
•Connect the blue wire to the terminal marked N or coloured blue or black.
•Connect the brown wire to the terminal marked L or coloured brown or red.
•Do not connect either wire to the earth terminal in the plug, marked E (or e) or coloured green (or green and yellow).
Before replacing the plug cover, make certain that the cord grip is clamped over the sheath of the lead - not simply over the two wires.
If in doubt, consult a qualified electrician.
|
|
|
|
|
|
|
|
|
|
| 6 TUNING |
IOIO |
|
|
|
|
|
|
|
|
|
| 7 FM ST |
IOIO |
|
| IOIOOOO |
| OIOIIOOIOOOIOIIOOIOO |
|
|
|
| ||
IOIO | IOIO |
| IOIOOOO |
|
|
|
|
| |||
IOIO | IOIO |
|
|
|
|
|
|
|
|
| |
|
|
|
|
| OIOIO | OO |
| OIOIOOIOIOOOIOIOOIOIOO | |||
|
|
|
|
|
|
|
|
|
|
| |
|
|
|
|
|
|
|
|
|
|
| OIOIOOIOIOOI I I I |
|
|
|
|
|
|
|
|
|
|
| OIOIOOIOIOOIOIOOOIOIOOIOIOO |
|
| FM • • • • • • 88 | 92 | 96 | 100 | 104 |
|
|
|
| |
|
|
|
|
|
| 106 | 108 • • • MHz |
| |||
|
| AM • • • • • • 540 | 600 | 700 | 900 | 1100 |
|
|
|
|
|
|
|
|
|
| 1300 | 1500 | 1700 • • • • • KHz |
| |||
|
|
|
|
|
|
|
|
|
| ||
|
| AUTOMATICIC STOP | MECHANISMI | •• |
|
|
|
|
|
|
|
|
|
|
| ONE |
|
|
|
|
| ||
|
|
|
|
|
| TOUCH RECORDINGI |
| ||||
|
|
| REC • PLAY |
|
|
|
|
| |||
8 MIC |
|
|
|
|
|
|
|
|
|
|
|
(under grill) |
|
|
| DBB |
|
|
|
|
|
|
|
|
| dynamicic bass boostt |
|
|
|
|
| ||||
PAUSE $ |
|
|
|
|
|
|
|
|
|
| 9 RECORD |
STOP/EJ. # |
|
|
|
|
|
|
|
|
|
| 0 PLAY |
F.FWD @ |
|
|
|
|
|
|
|
|
|
| ! REW |
1 |
|
|
|
|
|
|
|
|
|
|
|
& BEAT CUT |
|
|
|
|
|
|
|
|
|
| % VOLTAGE SELECTOR |
|
|
|
|
|
|
|
|
|
| (inside compartment) | |
|
|
|
|
|
|
|
|
|
|
| |
|
|
|
|
|
|
|
|
|
|
|
|
|
| ^ AC POWER |
|
|
|
|
|
|
|
|
|
|
|
|
|
| |
* BATTERY |
|
|
|
|
|
|
|
|
|
|
|
|
| |
|
|
|
|
|
|
|
|
|
|
| COMPARTMENT |
|
|
|
|
2 |
| 6 x |
|
|
|
|
| D | C | B | A |
|
| 1 |
|
|
|
3 | 4 | 5 |
|
|
|